
The Disk You Inserted Was Not Readable by This Computer on Mac? 8 Ways
When "the disk you inserted was not readable by this computer" appears, your external drive or USB is suddenly inaccessible. This error often stems from file system corruption, partition issues, or driver conflicts. This guide covers troubleshooting steps for both Mac and Windows.
By Delores / Updated on March 24, 2026
The Disk You Inserted Was Not Readable By This Computer!
Error Message - The disk you attached was not readable!
I updated my os to Ventura. None of my ports is reading my external hard drive. It's formatted specifically for a Mac, and I was just using it a few hours ago. Initializing is absolutely not an option. I'm a photographer with some active projects on the drive.
- Question from reddit.com
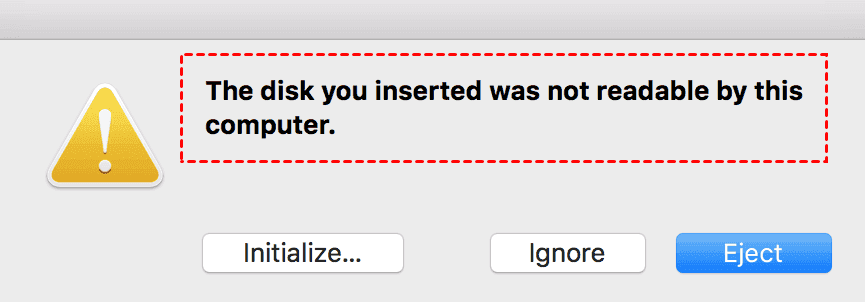
The disk you inserted was not readable by this computer error
I’m using a MacBook Air (I think it’s the M1 model) running macOS Sonoma. I have a Western Digital “My Elements” external hard drive that I’ve been using for a while to store backups and big files. It always worked fine before.
But today, when I plugged it in, my Mac popped up a message saying:
The disk you inserted was not readable by this computer.
It gives me three options: Initialize…, Ignore, or Eject.
Can someone explain in simple terms what this error means? And is there any safe way to fix it without losing my data?
- Question from community.wd.com
You plug in your external hard drive, USB flash drive, or SD card, eager to access important files. Then a pop-up appears with the error message: The disk you inserted was not readable by this computer.
Don’t panic. This error is more common than you think, and in most cases, your data is still safely on the drive. Let’s walk through why this happens and how to get everything back up and running.
Reasons for The Disk You Inserted Was Not Readable by This Computer
Understanding the root cause helps you fix it faster. This error is usually solvable. And the following reasons might cause the error:
- File System Incompatibility Between Mac and Windows. A format mismatch is the most common trigger. If you move a drive between Windows and Mac, you might see that the disk is not readable by this computer, a Mac error. Windows uses NTFS; Macs use APFS or HFS+. Unless the drive is formatted to exFAT—which both systems read—your computer will reject it.
- Corrupted Partition Table or Damaged Drive Structure. The partition table organizes data. When it gets corrupted—from improper ejection, power loss, or software glitches—your system can’t interpret the drive..
- Physical Drive Issues or Connection Problems. A loose cable, failing USB port, or physical drive damage can also trigger the error.
How to Fix the Disk You Attached Was Not Readable by This Computer on Mac
If you’re on a Mac and facing this error, click "Ignore", which prevents immediate reformatting, allowing you to try repairing it in Disk Utility. Then try the built-in tools to fix it.
Way 1. Try Another Cable
A faulty cable is a surprisingly common culprit. Internal damage or wear can prevent your drive from communicating properly. Swap it with a known working cable—if the drive mounts, you’ve found the fix.
Way 2. Try Another USB Port
USB ports can fail or deliver inconsistent power. Bypass any USB hubs and connect directly. Try different ports on your computer. If the drive works in one port but not another, the port itself is the issue.
Way 3. Try The Disk on A Windows Computer or Another Mac
Testing on another computer tells you whether the problem is the drive or your setup. If the drive works elsewhere, your original computer has the issue—likely a file system mismatch. If it fails on multiple machines, you’re dealing with corruption or physical damage.
Way 4. Use Disk Utility to Run First Aid on the Drive
Disk Utility is your best friend here.
1. Open your Finder.
2. Choose from Applications > Utilities, then locate your external drive in the sidebar.
3. Click "First Aid" and let it run.
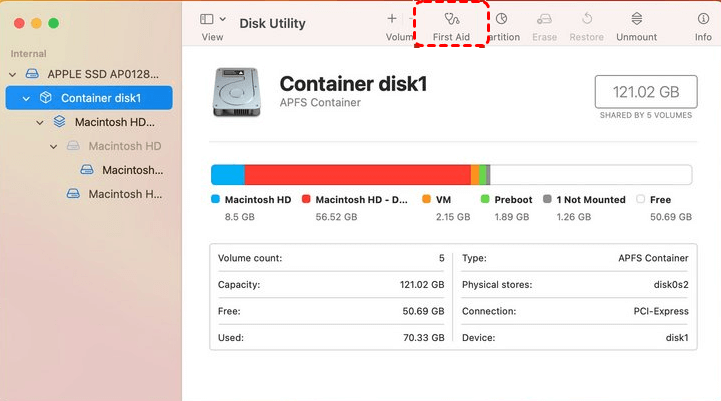
This tool scans for file system errors and attempts to repair them automatically. If the repair is successful, your drive should mount and become accessible again.
This is often the quickest fix if the disk you inserted is not readable by this computer on macOS.
Way 5. Mount the Drive Manually Through Disk Utility
Sometimes the drive appears in Disk Utility but doesn’t mount automatically.
If you see it grayed out, select it and click "Mount" in the toolbar. This forces the system to attempt mounting again.
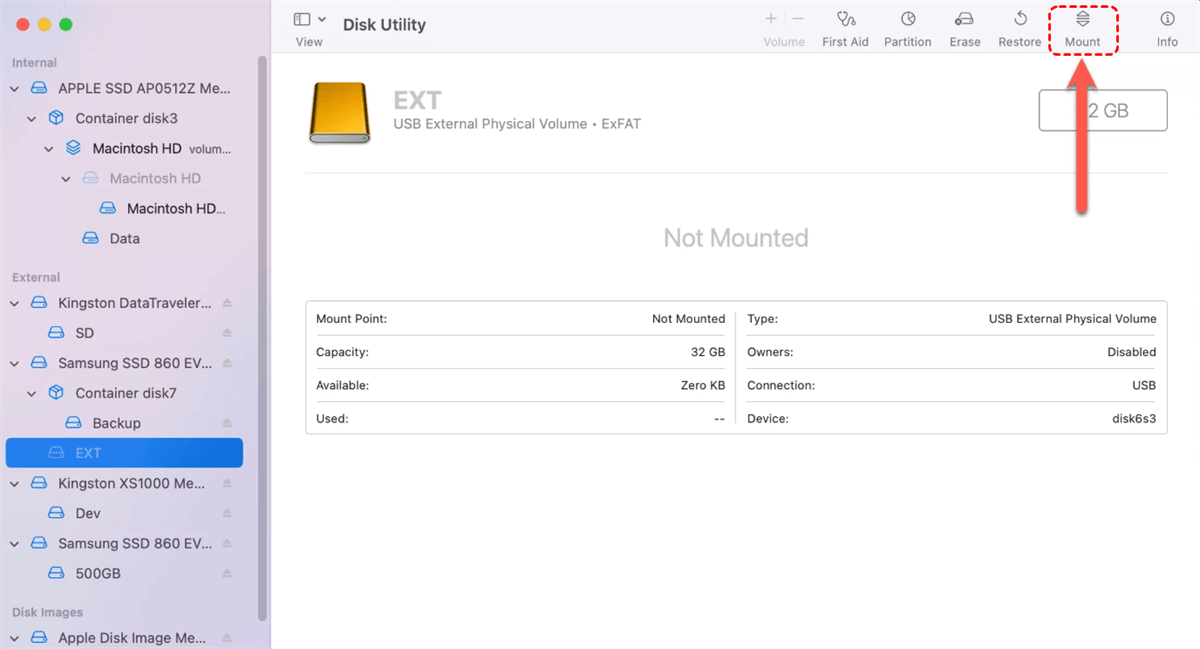
If it mounts successfully, your files should appear in Finder and can be readable.
Way 6. Check for Hidden Partitions Preventing Access
In some cases, the drive may have a hidden partition—like an EFI system partition—that confuses macOS.
You can use Disk Utility’s "Show All Devices" option to see the full drive structure.
From there, you can attempt to mount the main data partition
Way 7. Use Terminal Commands to Force Mount the Drive
For more advanced users, Terminal can sometimes force a stubborn drive to mount.
1. Open Terminal and type diskutil list to see all connected drives.
2. Identify your external drive, then type diskutil unmount /dev/disk1s1 (replacing with your drive identifier).
2. Then type diskutil mount /dev/disk1s1 (replacing with your drive identifier) to force mount the drive.
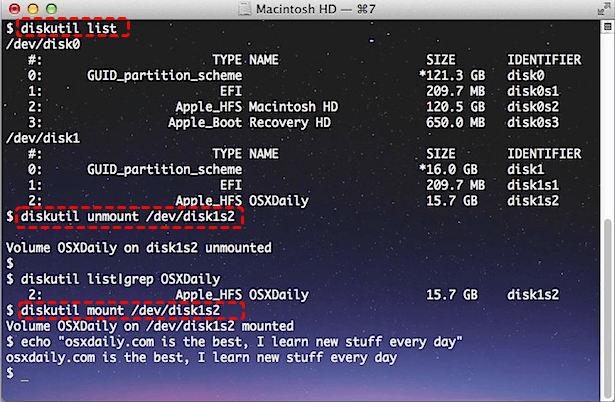
This command bypasses some of the graphical interface restrictions and can mount drives that Disk Utility won’t touch.
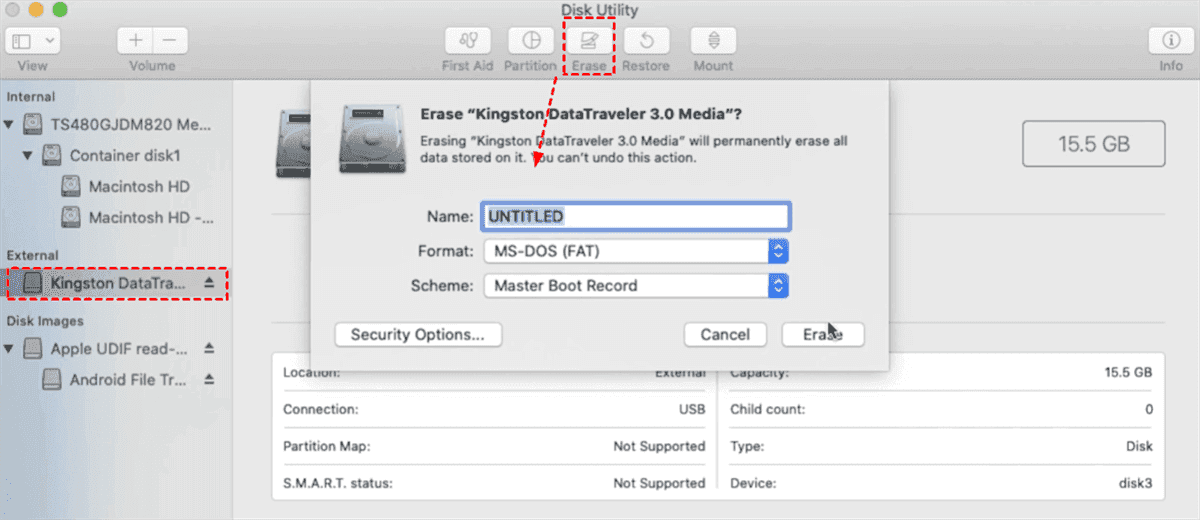
Way 8. Erase The Disk (Data Loss)
If the drive is brand new or you do not need the data, reformatting is the most effective solution, especially if it was used on a Windows machine (NTFS format).
1. Open Disk Utility.
2. Select the drive and click Erase.
3. Choose a compatible format: ExFAT (works on Mac and PC) or APFS/Mac OS Extended (Mac only).
4. Click Erase to format the disk.
Preventing Future Disk Readability Errors
Format Drives to a Universally Compatible File System: If you frequently switch between Mac and Windows, format your external drives to exFAT. This file system works seamlessly with both operating systems. Keep in mind that formatting erases all data, so back up your files first.
Safely Eject External Drives Every Time: Always eject drives properly through the operating system before disconnecting. On Mac, drag the drive to the trash or click the eject icon. On Windows, use the "Safely Remove Hardware" option in the system tray.
Regularly Back Up Important Data: Regular backups ensure that even if a drive fails, your files aren’t lost. Use cloud storage, a secondary external drive, or both.
FAQs About Disk Readability Errors
Why does my Mac say the disk you inserted was not readable by this computer?
A: macOS displays this when it cannot read the drive’s file system. Common causes include NTFS formatting, a corrupted partition table, or physical damage. Running Disk Utility’s First Aid often resolves it without data loss.
Will reformatting fix the disk you attached was not readable error?
A: Yes, but it erases all data. Recover important files first, then reformat. Choose exFAT for cross-platform use, APFS for Mac-only, or NTFS for Windows-only.
Can a damaged USB cable cause the disk to be unreadable by this computer, Mac error?
A: Yes. A faulty cable interrupts the connection. Try a different cable, USB port, or another computer. Sometimes this simple fix is all you need.
Is the disk you inserted not readable by this computer a sign that my drive is failing?
A: Not necessarily. It often points to logical issues. If the drive works on another computer, it’s likely fine. If it fails on multiple machines with unusual noises, physical failure may be the cause.
Can I use Terminal to fix the disk that is not readable by this Mac computer?
A: Yes. Use diskutil list to identify the drive, then diskutil mount /dev/diskXsX to mount it. diskutil repairDisk /dev/diskX attempts repairs. Use caution—incorrect commands can cause data loss.
Try Windows Data Recovery Software to Recover Missing Files
If you need to recover files from a Windows computer, you can try MyRecover. MyRecover is a professional data recovery software designed for Windows systems. It helps users recover lost, deleted, or inaccessible files from internal and external storage devices. The tool supports a wide range of file types and works across various data loss scenarios—from accidental deletions to formatted drives and corrupted partitions.

- High Recovery Rate – Achieves up to 99% success across over 1,000 file types, including documents, photos, videos, audio, and emails.
- 1000+ Formats – photos, videos, docs, archives, emails, compressed files, etc.
- Dual Scan Modes – Quick Scan for recently deleted files; Deep Scan for formatted, corrupted, or severely damaged drives.
- Preview Before Recovery – View files before restoring them to ensure you only recover what you actually need.
- Broad Device Support (500+) – Works with SSDs, HDDs, USB flash drives, SD cards, PS4/5, Xbox One, cameras, and other storage devices.
- User-Friendly Interface – No technical expertise required. Simple, intuitive design guides you through the recovery process step by step.
- Flexible Filtering – Narrow results by file type, date, size, or name to find specific files quickly.


Stay Updated With Our
Latest Tips
Add us as a preferred source on Google to never miss helpful guides.