
7 Fixes: The Semaphore Timeout Period Has Expired on Windows 10/11
When your external hard drive stops responding, the "the semaphore timeout period has expired" error often appears. This guide covers the root causes and practical solutions. We focus on resolving "the semaphore timeout period has expired windows 10" errors by adjusting driver settings and checking physical connections to get your device working again.
By Delores / Updated on March 11, 2026
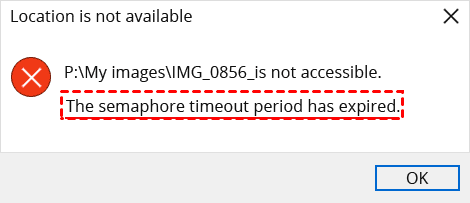
The Semaphore Timeout Period Has Expired!
External hard drive returns a "The semaphore timeout period has expired" error
I haven't used my pretty much full 2TB external hard drive in a few months and wanted to grab some movies off it. But when I plug it into my laptop, it either won't show up in my computer, or it shows up in Device Manager and the eject tab shortcut on the start menu, but I can't actually access it.
But suddenly last night it showed up on my computer, but it took ages to load into the hard drive. Then, when I got in and tried to access any of the folders on it, it came up with “The semaphore timeout period has expired".
What can I do to access the data on this drive?
- Question from superuser.com
If you are suffering from the error message "The Semaphore Timeout Period Has Expired", you are in the right place.
What in the world is a semaphore, and why should I care that its timeout expired? This error has plagued Windows users for years, interrupting file transfers and blocking access to important data at the worst possible time. Fortunately, it's usually fixable, and I'm going to show you exactly how.
About the "The Semaphore Timeout Period Has Expired" Error
What does "the semaphore timeout period has expired"actually mean? In computing, a semaphore is a signaling mechanism that controls access to shared resources. It helps coordinate how different programs use devices such as external hard drives or network locations, ensuring that multiple processes do not attempt to access the same resource simultaneously.
When this error appears, it means the system sent a request to a device and waited for a response, but the device did not reply within the allowed time. The timeout period—the amount of time Windows waits for a response—ended before the device responded.
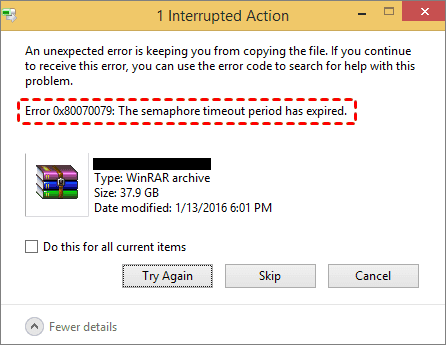
This error usually occurs in two common situations. The first is during file transfers over a network, where it may appear as the error code 0x80070079: the semaphore timeout period has expired. The second is when accessing an external USB drive, where Windows may display a message stating that the location is not accessible because the semaphore timeout period has expired.
Common Causes Behind Error 0x80070079
Some reasons might cause “The semaphore timeout period has expired" in Windows 10 and 11.
- Physical Connection Problems. Your cable might be damaged, the port could be loose, or if you're using a front-panel USB port, it might not be getting enough juice to keep the drive happy.
- Driver Conflicts and Outdated Software. When your network adapter or USB controller drivers are past their prime, communication between your operating system and hardware breaks down.
- File System Limitations. If you're trying to transfer a file larger than 4GB to a drive formatted with FAT32, you're asking for trouble. While you'd typically get a more descriptive error, the semaphore timeout can sometimes show up in these situations.
- Software Interference. Firewalls and antivirus programs sometimes block file transfers without so much as a warning prompt.
- Underlying Hardware Failure. A degrading read/write head or worn-out flash cells can cause the device to hang while trying to access data. If you hear unusual grinding or clicking noises, that's your drive crying out for help.
How to Recover Files with MyRecover
When the semaphore timeout period has expired error strikes; your files might still be intact on the drive—you just can't access them normally. In this situation, using reliable data recovery software is often the safest way to retrieve important files before attempting further repairs. MyRecover is a practical option for recovering data from problematic drives.
MyRecover is designed to recover lost or inaccessible files from HDDs, SSDs, USB drives, and other storage devices. When a semaphore timeout error interrupts access to an external drive, the software can scan the device directly and locate recoverable data.
- Key Strengths of MyRecover:
- Deep and Quick Scan Modes. MyRecover combines a Quick Scan to locate recently lost files and a Deep Scan to thoroughly search the disk for hidden or corrupted data. This dual-scan technology improves the chances of recovering files from drives affected by connection or communication errors.
- Recovery from Multiple Data Loss Scenarios. The tool supports recovery in many situations, including inaccessible drives, formatted partitions, accidental deletion, system crashes, and disk errors such as the semaphore timeout issue.
- Wide File Type Support. MyRecover can restore documents, photos, videos, compressed files, and emails, supporting thousands of file formats. This is particularly useful if the external drive stores mixed data types.
- Preview Before Recovery. The preview feature allows you to check files before restoring them. This helps confirm that the files are intact and prevents unnecessary recovery of unwanted data.
- User-Friendly Interface. The recovery process is straightforward: select the external drive, run a scan, preview the results, and recover the files to another location. Even users without technical experience can complete the process quickly.
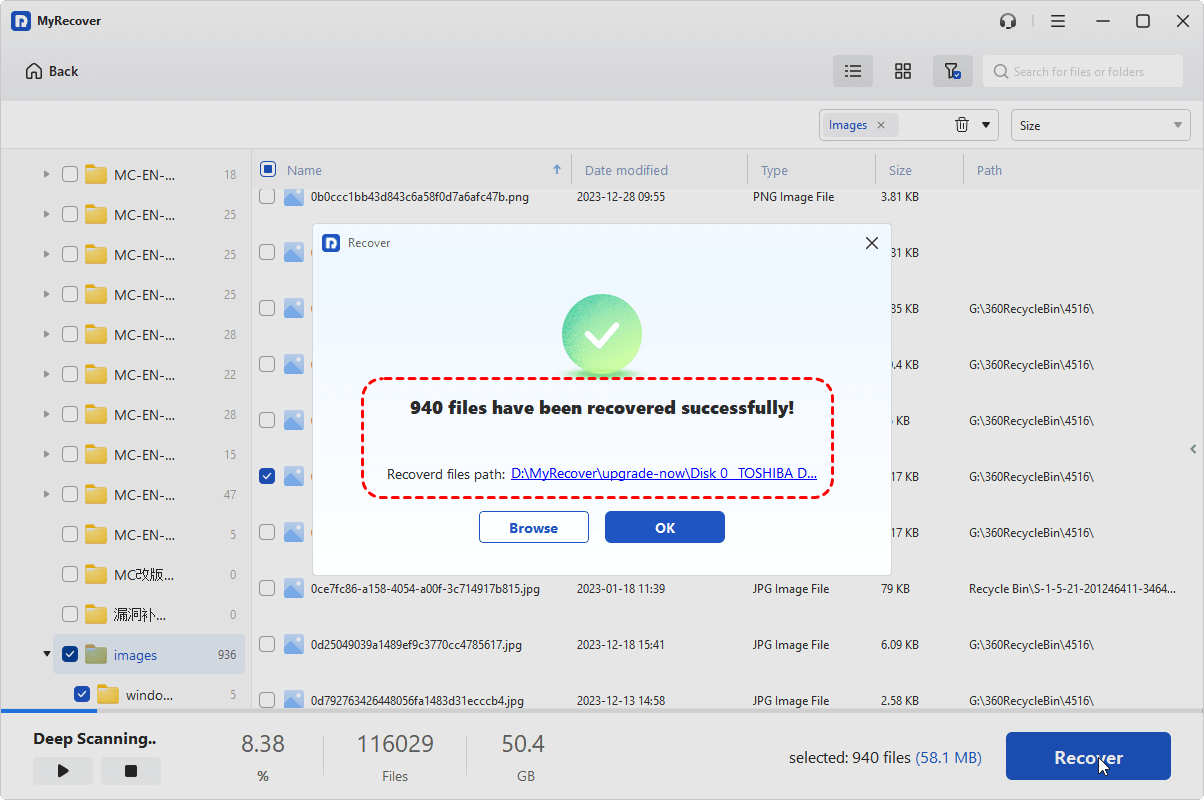
Here is how to recover important files from the drive that shows "The semaphore timeout period has expired" with MyRecover:
1. Please download and install MyRecover on your computer. Connect your drive if it's an external hard drive.
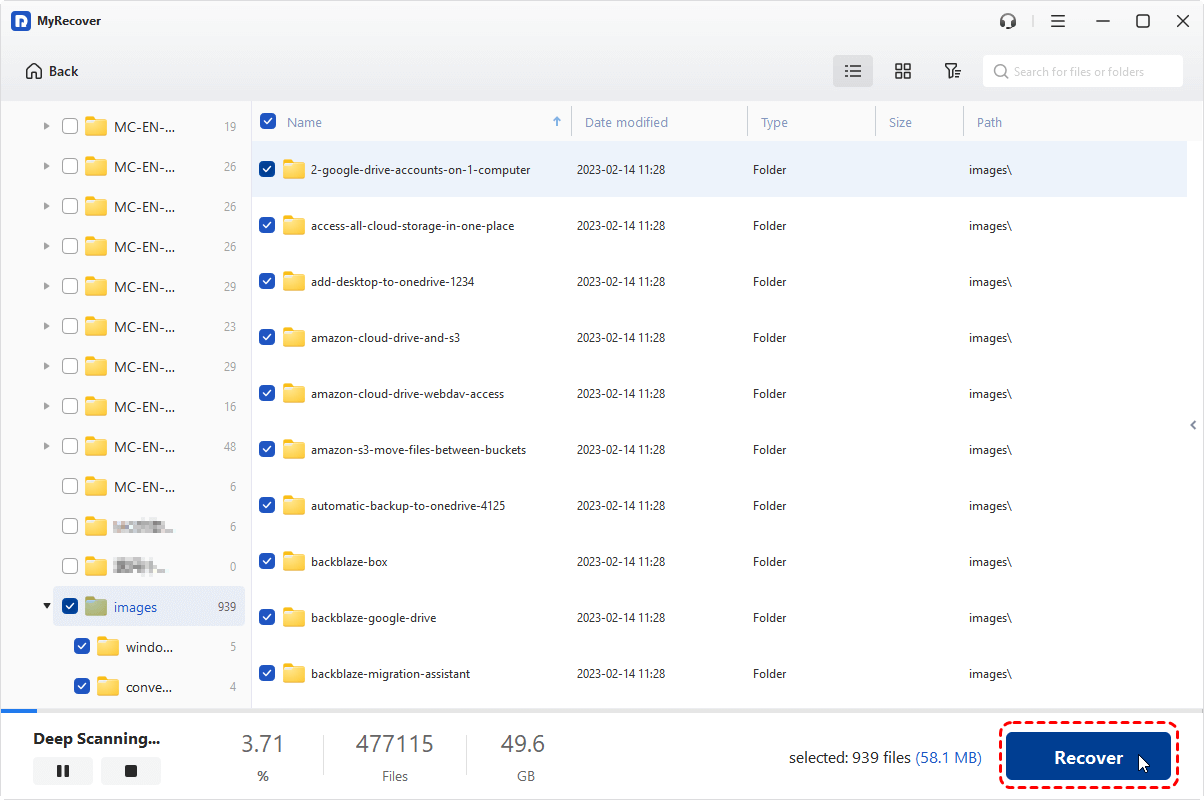
2. Run MyRecover, tap Disk Data Recovery, choose the drive that shows “the semaphore period has expired" error, and hit Scan while hovering over it.

3. Wait for the process to complete, and hit OK.
4. Preview and select the files that matter to you, and hit Recover.
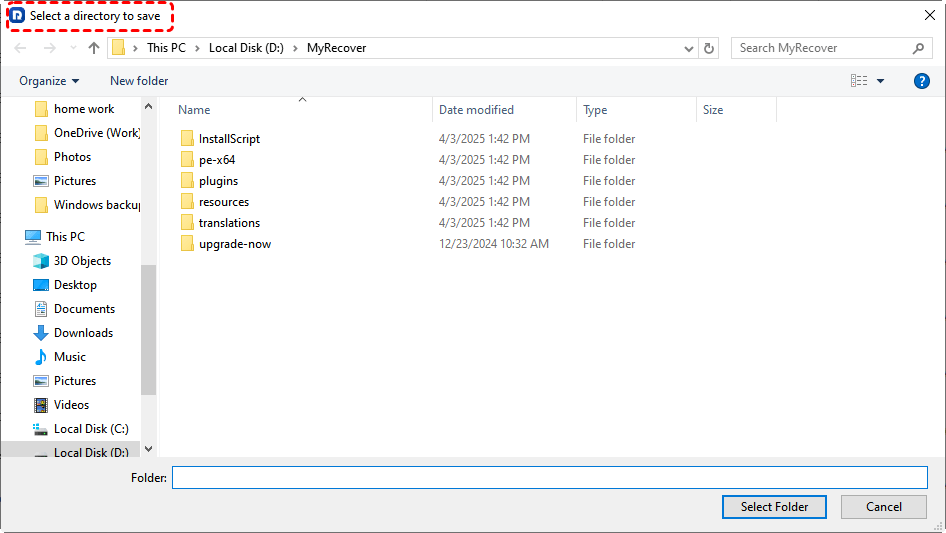
5. Choose a safe location to keep them now.
- Notes:✎...
- Once scanned, you can find your missing files by file type. You can also tap Path to find files with folder structures. Besides, filtering files is very useful to choose specific files, like searching them by file extensions, name, size, and modified date, etc.
- You can double-click to preview (or click the Preview button) to ensure they are intact.
- Upgrading to MyRecover Technicianis your best choice if you are going to recover files from unlimited computers.

- Recover Deleted Files Easily with Simple Clicks
- 1000+ File Formats Supported
- Support HDD, SSD, External Hard Drive, USB Drive, SD Card, etc.
- Quickly Find Files Using File Types, Name, Size, etc.
- Preview Files Before Recovering
- Recover Unlimited Data
7 Fixes for The Semaphore Timeout Period Has Expired
It's time to fix your hard drive that is showing errors after recovering files.
Way 1. Try Different Ports and Cables
Unplug the external storage device and wait ten seconds. Connect to a different USB port—preferably one directly on the motherboard rather than a front-panel port or USB hub. Swap out the USB cable for a known working one.
If you're using a USB 3.0 port and getting errors, try a USB 2.0 cable instead—some users have reported this eliminates the problem, go figure.
Way 2. Adjust USB Selective Suspend Setting
Windows has a power-saving feature that can shut down USB ports to conserve energy—annoying when you're in the middle of a file transfer. This little "helpful" feature might actually be causing the semaphore timeout period has expired in Windows 10 without you realizing it.
1. Open Control Panel and navigate to "Power Options".
2. Click "Change plan settings" next to your selected plan, then "Change advanced power settings".
3. Expand "USB settings", then "USB selective suspend setting", and disable it.
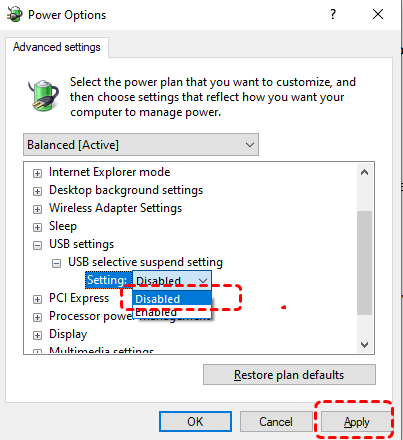
This tells Windows to keep your USB ports awake and attentive, even when it's trying to save power.
Way 3. Run the Hardware and Devices Troubleshooter
Windows has built-in tools that can work wonders, and the Hardware and Devices troubleshooter is your first line of defense. Some users have confirmed in forums that the hardware and devices troubleshooter resolved error 0x80070079, the semaphore timeout period has expired on their systems, without breaking a sweat.
Here's how to run it: Press the Windows key + S to open search, type "CMD", right-click on Command Prompt, and select "Run as administrator". Then, copy and paste this command and hit Enter:
msdt.exe -id DeviceDiagnostic
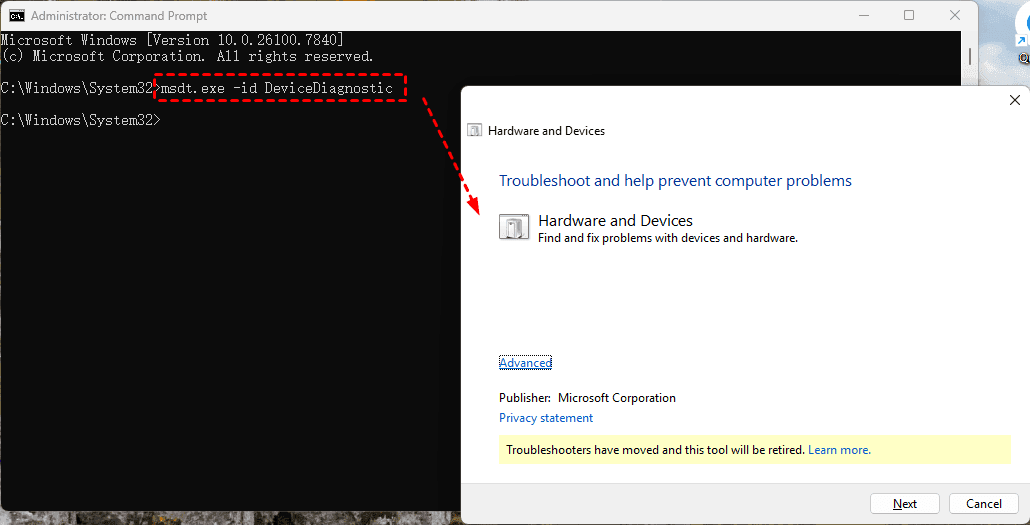
The troubleshooter will open—just click "Next" and let it do its thing. It'll scan for issues and apply fixes automatically, saving you from digging through complicated settings.
Way 4. Update Your USB and Network Drivers
1. Press Windows + R, type devmgmt.msc, and hit Enter to open Device Manager.
2. Expand "Universal Serial Bus controllers", right-click on each USB Root Hub, and select "Update driver".

3. Choose "Search automatically for updated driver software" and let Windows work its magic.
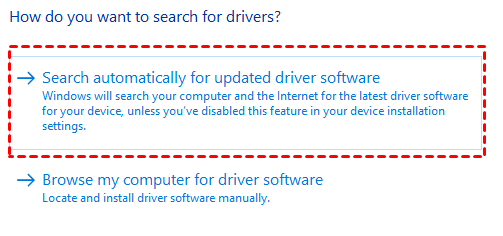
For network-related issues, expand "Network adapters", right-click your wireless adapter, and update that driver too. After updating, restart your system to make those changes stick—it's a small step that often pays off big time.
Way 5. Disable Firewall and Antivirus Temporarily
1. Press Windows + R, type control, and hit Enter to open Control Panel.
2. Type "firewall" in the search box and click "Windows Firewall".
3. On the left pane, click "Turn Windows Firewall on or off".
4. Select "Turn off Windows Firewall (not recommended)" for both private and public network settings, then click OK.
For antivirus software, right-click the system tray icon and look for an option to disable protection temporarily. After turning these off, try your file transfer again. If it works, you've found the culprit—just remember to turn your security back on afterward.
Way 6. Convert FAT32 to NTFS (Lose Data)
If you're working with an external drive formatted as FAT32, you're hitting a wall with files over 4GB. Converting to NTFS removes this limitation and might just solve your "the semaphore timeout period has expired" in external hard drive headaches.
First, check your drive's current file system. Right-click the drive in File Explorer, select "Properties", and look next to "File system". If it says FAT32, right-click the drive, select "Format", choose NTFS from the File System dropdown, and click Start.
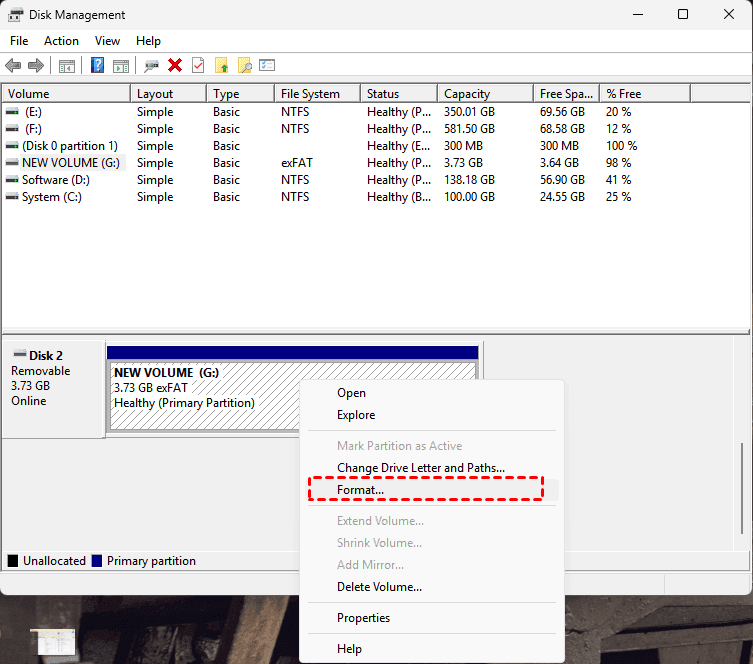
Warning: This erases ALL data on the drive, so back up anything important first.
Way 7. Check Disk for Errors
Corrupted sectors on your drive can trigger all kinds of weird errors. Running Check Disk (CHKDSK) scans and repairs these issues, potentially saving you from a full-blown disaster.
1. Open Command Prompt as administrator.
2. Type this command, replacing "e" with your actual drive letter:
chkdsk e: /f
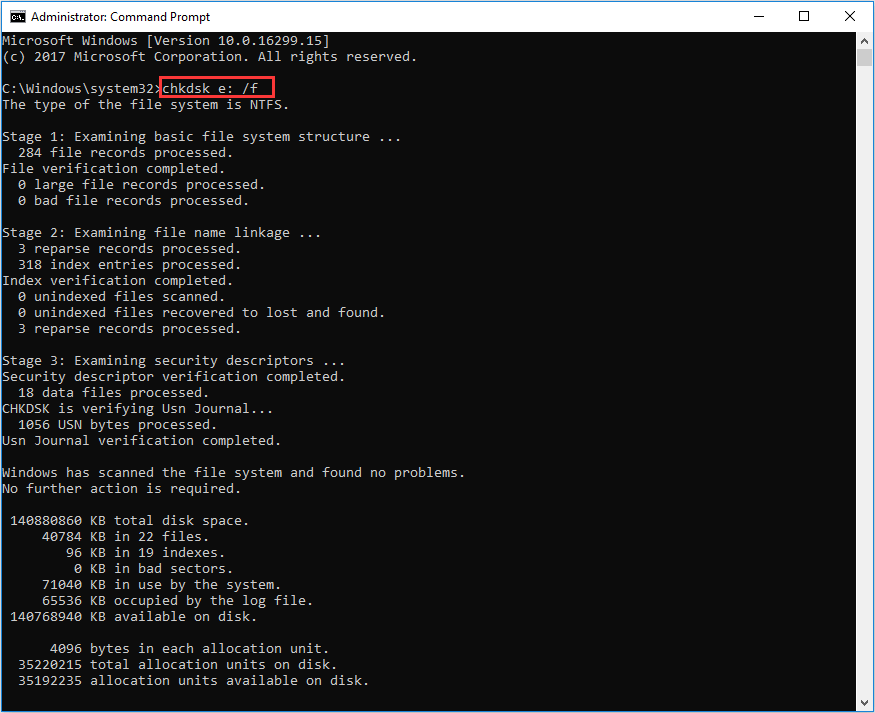
For traditional hard drives (not SSDs), you can use the more thorough /r parameter, which locates bad sectors and recovers readable information.
FAQs About The Semaphore Timeout Period Has Expired
What does "the semaphore timeout period has expired" mean?
A: It means your computer sent a request to a device (such as an external drive or network location) but did not receive a response within the allowed time. The system stopped waiting and returned a timeout error.
How do I fix error 0x80070079, the semaphore timeout period has expired?
A: Start with simple fixes: try another USB port or cable, restart your PC, or copy files in smaller batches. If the issue continues, update drivers, temporarily disable the firewall/antivirus, run the Hardware and Devices troubleshooter, or convert FAT32 drives to NTFS.
Why does this error keep happening on my external hard drive?
A: Repeated errors often indicate connection or hardware issues, such as a faulty USB cable, damaged enclosure, or failing drive. Testing the drive on another computer or using a different enclosure can help identify the cause.
Can this error cause data loss?
A: Yes. Communication failures with a drive may lead to file corruption or make the drive unreadable. If important files are affected, stop using the drive and attempt data recovery before further troubleshooting.
How do I recover files from an external drive with this error?
A: Use reliable data recovery software. Install it on another drive, scan the affected external drive, preview the results, and recover files to a different location to avoid overwriting data.
Is this error a sign that my hard drive is failing?
A: Not always. It can be caused by connection problems, driver issues, or software conflicts. However, if it appears alongside unusual noises or frequent disconnections, the drive may be failing.


Stay Updated With Our
Latest Tips
Add us as a preferred source on Google to never miss helpful guides.