
How to Enable Previous Versions Windows 10 in 2 Ways
Need to restore an old file? Our tutorial shows you how to enable previous versions Windows 10 by setting up Shadow Copies. We cover the requirements to successfully turn on previous versions Windows 10 for any local drive on your PC.
By Delores / Updated on January 4, 2026
How to Enable Previous Versions in Windows 10? It Says No Previous Versions
Windows 10 previous versions - there are no previous versions available ?!
I have a couple of Windows 10 Pro machines that have been running for months/years.
I realized a file I need isn't on the machine. Of course, for some reason, my backup drive (ShadowProtect). seems to be having a problem, so I can't get to the images on that drive.
Right-clicking on the C and D drives, choosing Properties, then clicking on the previous versions tab, it says there are no previous versions available… Same result on another machine also.
For 1 PC, right-clicking on this PC, properties, system protection, it shows the C drive has protection on. That's previous versions? Clicking on configure, turning on system protection is on. And it has 25% / 25GB max usage and 6GB current usage.
For the machine that would have the file, it is running a newer version of Windows? Right-clicking this PC gets a settings page for the system. Don't know where the drive protection settings are.
What am I doing wrong to not have previous versions?
THANKS!
- Question from community.spiceworks.com
Windows 10 has a feature that allows you to revert things to a previous state, called the previous version. Learning how to enable previous versions in Windows 10 is the key to your critical files. This powerful, yet often overlooked, feature can mean the difference between a minor hiccup and a major data disaster.
You can restore files and folders to a state from yesterday, last week, or even last month. Let's demystify this tool and make it work for you.
What Is the "Previous Versions" Feature in Windows 10?
The Previous Versions feature isn't magic, but it's clever. It's your computer's automatic historian for your personal files. Once you enable the system protection for your drives. It works by harnessing a background technology called Volume Shadow Copy Service (VSS). In simple terms, VSS takes periodic snapshots—called shadow copies—of your files at specific points in time. These snapshots capture the state of a file or folder whenever a System Restore point is created or on a scheduled basis.
Besides, you can also use the previous versions after you set up File History. File History uses the NTFS Change Journal (USN Journal) to track file changes and copy entire files to a backup location. Thus, File History offers a user-friendly way to get past file versions; it often leverages underlying file system tracking.
How Windows Creates Previous File Versions Automatically
How to automatically create previous file versions? Windows doesn't record every single keystroke. Instead, it creates these versions at logical moments.
- The most common trigger is the creation of a System Restore point. This happens automatically before significant system events like installing a new program or a Windows update.
- You can also create them manually.
- Additionally, if the feature is configured, it can create shadow copies on a daily schedule.
This means that when you right-click a file, select 'Properties', and go to the 'Previous Versions' tab, you’re presented with a list of these historical snapshots from which you can restore. The beauty is its seamlessness; it works quietly in the background, requiring no effort from you until the moment you need it.
However, you might find that there is no system restore point, previous versions, etc, if the service isn't running or configured. Now, let's find out the right steps to enable previous versions.
Enable Previous Versions in Windows 10/11
The process to turn on previous versions in Windows 10, 11 is straightforward, but it requires a few specific steps in the right order. Here’s your actionable walkthrough.
Way 1. Enable System Protection (System Restore Point)
Enabling system protection can protect your system files and personal files. If needed, try the following steps.
Step 1. Configuring System Protection for Your Drives
System Protection is off by default for most non-system drives (like your D: or E: drive), and sometimes needs a nudge even for the C: drive.
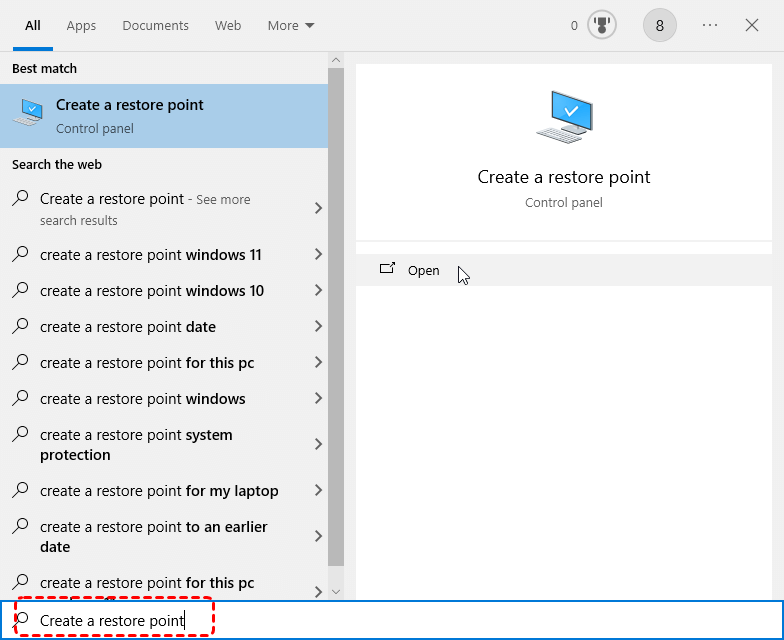
1. To begin, press the Windows key + S and type "Create a restore point".
2. Click it.
3. This opens the System Properties window, directly to the 'System Protection' tab.
4. Select the drive where your important documents, photos, or project files are stored (e.g., Local Disk (C:)), and click the Configure… button.

5. A new dialog box will appear. Tick "Turn on system protection".
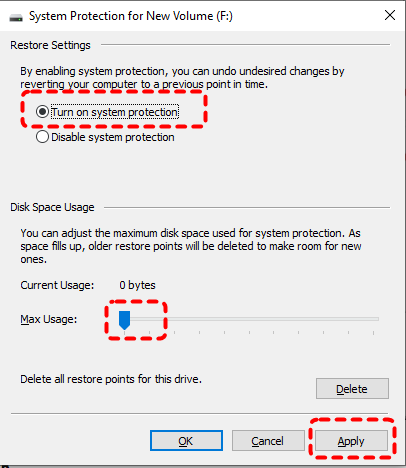
6. Hit Apply > OK to take effect.
Tip: Simply having protection "On" is what instructs Windows to start building the library of previous versions you can call upon later.
Step 2. Allocate Disk Space for Restore Points
Now, with protection turned on, you have control over resources.
1. In the 'Configure' window, you’ll see a slider for 'Disk Space Usage'.
2. This determines how much of your drive's capacity is dedicated to storing these system restore points and their associated shadow copies (your previous file versions).
Tip: A llocating too little (like the default minimum) means your history will be very short, as old versions are purged to make room for new ones. A good rule of thumb is to allocate between 5% and 10% of the drive's total space.
3. Click 'Apply', then 'OK'.
Windows will now begin creating restore points and, in doing so, populating the "Previous Versions" tab for files on that drive.
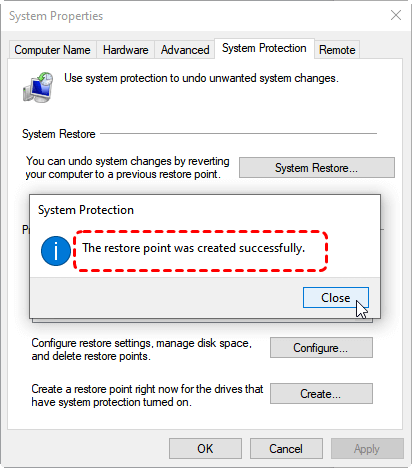
To immediately create a restore point to start the history, go back to the main System Protection tab and click 'Create'. Name it something like "Initial_Previous_Versions_Setup".
Way 2. Enable File History
Besides, Windows 10 and 11 also provide File History to restore your personal files once you set it up. Here is how to enable File History in Windows 10, 11:
1. Ensure you have an external hard drive connected to your PC or a stable network location ready. This destination will store all your backup files.
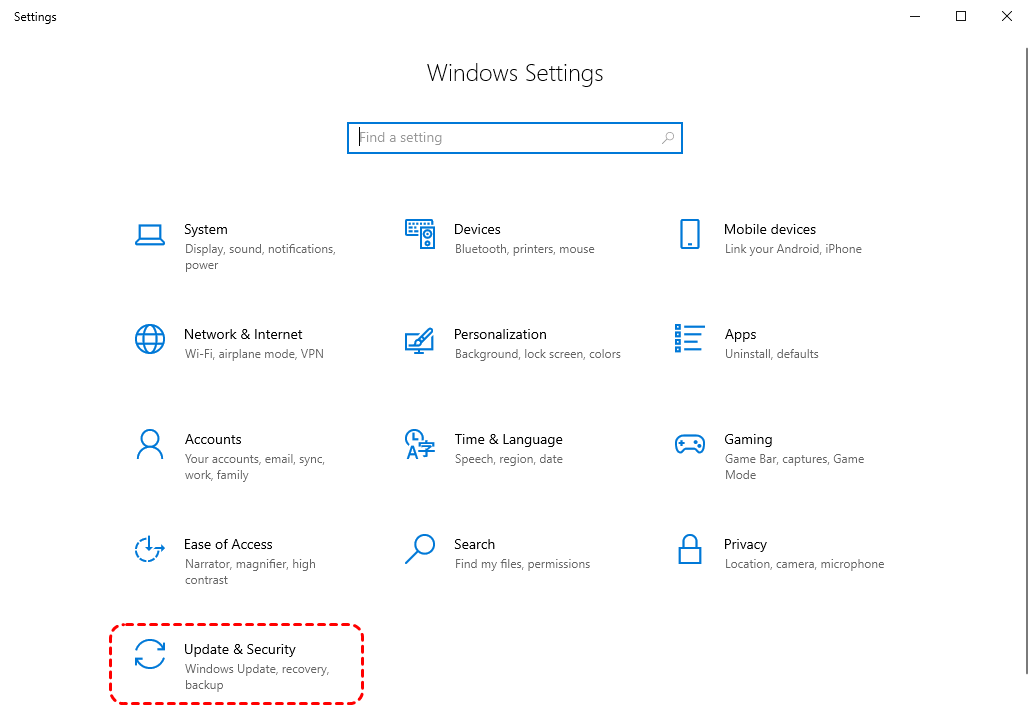
2. Next, open your backup settings by navigating to Start > Settings > Update & Security > Backup.
3. Turn on Automatically back up my files, and Windows will automatically enable "Back up using File History".
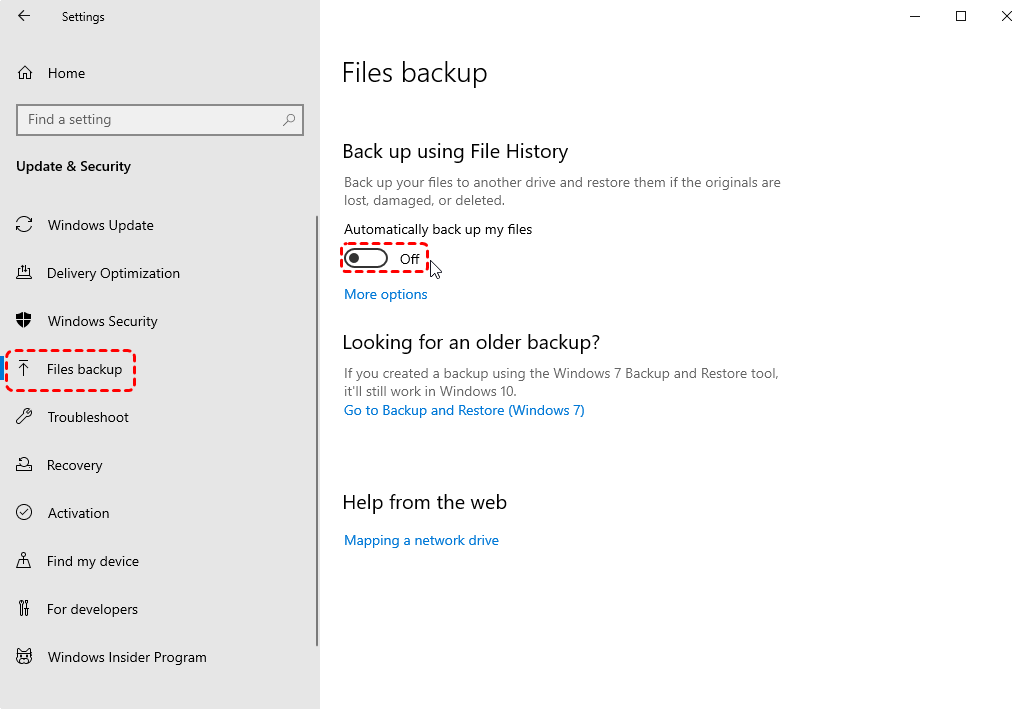
Or you can search for File History in the Windows search box and enable File History.
How to Access and Use Previous Versions for Recovery?
Restoring Files via the "Previous Versions" Tab
1. Navigate to the file you want to recover, or to the folder where it used to be.
2. Right-click on it and select 'Properties'.
3. Click on the 'Previous Versions' tab.
4. You will see a list of available versions, each with a date and time stamp.
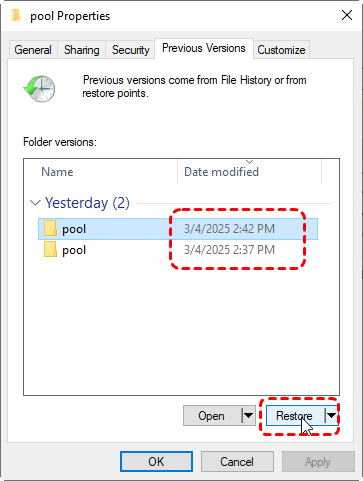
5. Clicking 'Restore' will prompt a warning—confirm it, and your file is reverted. It's that simple.
Tip: You can also click 'Open' to view the contents and verify it's the right one.
Troubleshoot No Previous Versions in Windows 10
Finding an empty "Previous Versions" tab can be frustrating. It usually means one of the underlying services isn't functioning as it should. Let's troubleshoot the most common culprits methodically.
Common Reasons "Enable Previous File Versions Windows 10" Fails
First, double-check the obvious: Is System Protection truly On for the specific drive in question? Go back to the System Protection tab and verify.
Second, has enough time passed since you enabled it? If you just turned it on five minutes ago, there won't be any history. Wait for a scheduled restore point or create one manually.
Third, the feature only works on local NTFS-formatted drives. It does not work on network drives, FAT32 drives, or cloud storage locations (like OneDrive's online-only files). The files you're trying to recover must be stored locally.
Fix: Check that the Volume Shadow Copy Service is Running
This is the heart of the operation. If the VSS service is stopped, nothing works.
1. Press Windows key + R, type services.msc, and press Enter.
2. In the Services window, scroll down and find 'Volume Shadow Copy'. Double-click it.
3. The 'Startup type' should be set to 'Automatic'.
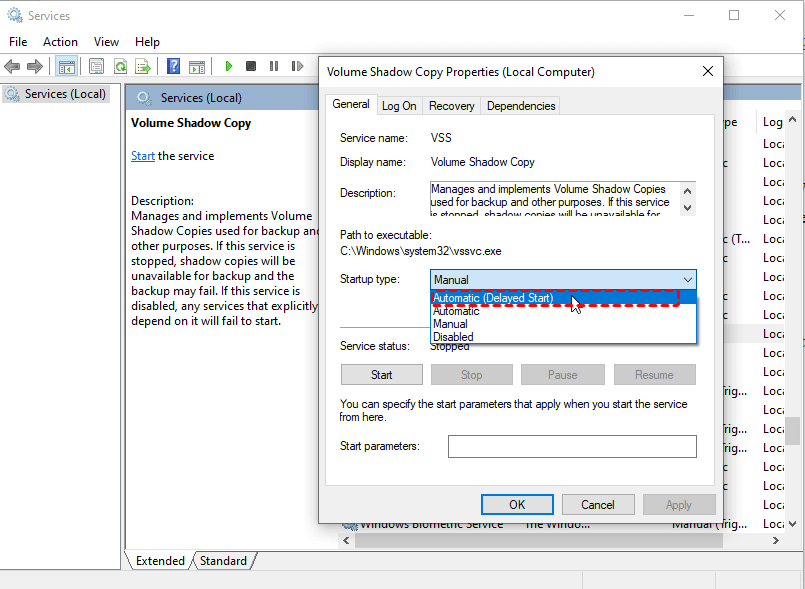
4. If the 'Service status' is not 'Running'. Click the 'Start' button. Then click 'Apply' and 'OK'.
5. Do the same for the 'Microsoft Software Shadow Copy Provider' service.
6. Restart your computer and create a new manual restore point.
This often resolves the issue and populates the tab.
FAQs About Previous Versions in Windows 10
Why is my "Previous Versions" tab empty or missing?
A: The tab is usually empty for four reasons. First, System Protection is likely turned off for that drive—enable it in System Properties. Second, you may need to create a manual restore point to start the history. Third, ensure the Volume Shadow Copy Service is running in services.msc. Finally, the feature only works for files stored locally on NTFS-formatted drives; it won't work for network or cloud-synced files.
Does enabling previous versions for my C: drive also protect files on my D: drive?
A: No. System Protection is configured per drive. Enabling it on C: only protects files on the C: drive. You must separately enable it for your D: drive in System Properties if you want version history for files stored there.
I deleted a file. Can I use Previous Versions to get it back?
A: Yes. Navigate to the folder where the file was, right-click it, and go to Properties > Previous Versions. Open a previous version of the folder from before the deletion, find your file inside, and copy it to a safe location.
How far back do previous versions go? How long are they kept?
A: History length depends on allocated disk space, not time. When the reserved space fills, Windows deletes the oldest versions to make room. More allocated space means a longer history. You can adjust this limit in System Protection settings.
What's the difference between "Previous Versions" and "File History"?
A: "Previous Versions" uses local System Restore points for quick, same-drive recovery. "File History" is a dedicated, continuous backup that copies your files to a separate external or network drive for more robust protection. Using both provides the best safety net.
Recover Missing Files from Windows 10 Easily
If your files got deleted or corrupted and there are no previous versions to restore, what to do to recover your files? Fortunately, you can try a comprehensive data recovery software, MyRecover, which recovers fast.
With MyRecover, you can enjoy:
- Deep & Complete Scanning: Performs both a quick scan and a deep, sector-by-sector search to find files lost from deletion, formatting, or corruption.
- Recovers Original Structure: Restores files with their original names and folder organization, making it easy to find what you need.
- Preview Before Recovery: Lets you view photos, documents, and other files to verify they're intact before restoring them.
- Wide Format Support: Recognizes and recovers over 1000 file types, from documents and emails to photos and videos.
- Safe & Read-Only: Operates without writing to your source drive, preventing further data loss or overwriting.
- User-Friendly: Simple, guided interface requires no technical skill. Just select your drive, scan, preview, and recover.
Therefore, you can follow the detailed instructions to recover missing files in Windows 10 with MyRecover:
1. Download and install MyRecover on your computer, then launch it.
2. Tap Deleted Files Recovery, choose the drive you need to recover, and hit Scan while pointing at it.

3. Wait for the scanning to complete and hit OK to confirm.
4. Preview and choose the files you need, and hit Recover.
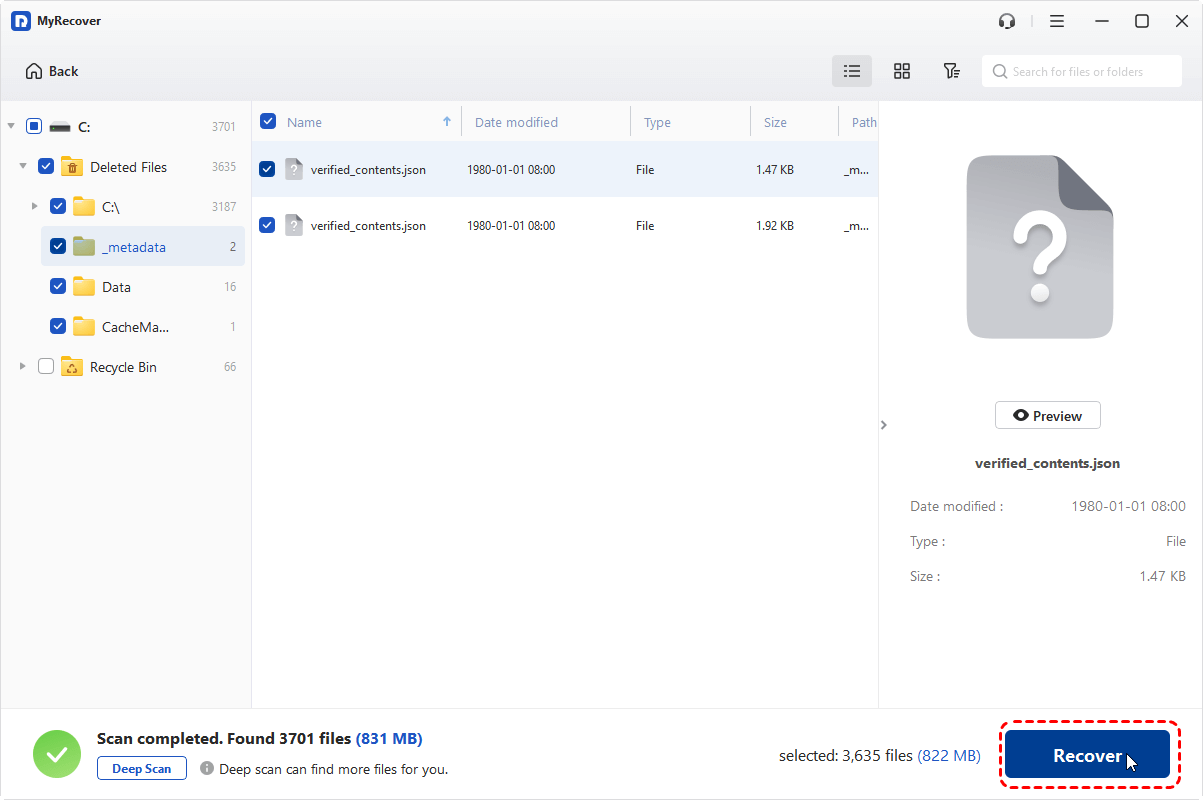
5. Select a safe location to save these recovered files.
- Tips:✎...
- MyRecover uses a quick scan by default. If you can’t find missing files in this quick scan mode. You can also try a deep scan to find all possible files, then recover them all at once.
- Your missing files will be sorted by file type on the left side once scanned, find files quickly. Besides, you can filter files by file name, file size, and file path, etc.
- You can recover files for unlimited computers with MyRecover Technician if required.

- Recover Deleted Files Easily with Simple Clicks
- 1000+ File Formats Supported
- Support HDD, SSD, External Hard Drive, USB Drive, SD Card, etc.
- Quickly Find Files Using File Types, Name, Size, etc.
- Preview Files Before Recovering
- Recover Unlimited Data


Stay Updated With Our
Latest Tips
Add us as a preferred source on Google to never miss helpful guides.