 MyRecover



How to Recover Deleted Files from USB without Software | 4 + 2 Ways
If you accidentally deleted files from your USB, flash drive, or pen drive, then never miss out this page. Here you can discover proven methods to recover deleted files from USB without software! No matter which method you prefer - built-in Windows 10 solutions like File History, Windows File Recovery, or Command Prompt tricks, all get recovered!

By Delores / Updated on August 4, 2026


Help! How to Recover Deleted Files from USB without Software?
How to Recover Lost/Deleted Files from USB Drive without buying anything?
I am trying to recover a lost file I accidentally deleted on my flash drive. I have been trying to recover it for a day now. I am not a technically adept computer user and rely on what I can read and do to fix any screw-ups I do online. I recently deleted a file on my flash drive. All the methods I have tried don't work. There is no " Restore Previous Version " option on my drive.
Is there a way to restore it? The cmd feature doesn't work; the codes you're supposed to use seem like it restores all kinds of files, and it might restore info I already have. Just need to restore one file. If I have to do it in more than one trip its OK.
- Question from reddit.com
When you delete files from a USB drive, they don't go to the Recycle Bin because the Recycle Bin is a feature designed for files deleted from your computer's internal storage. USB drives, external hard drives, and other removable storage devices operate differently, and Windows does not route deleted files from these devices to the Recycle Bin by default. So, you cannot directly restore deleted USB flash drive files from the Recycle Bin as normal.
Instead, when you delete a file from a USB drive, it is typically marked as "deleted" and the space it occupies becomes available for new data. However, the file itself is not immediately erased from the drive. It remains on the USB drive until new data overwrites it.
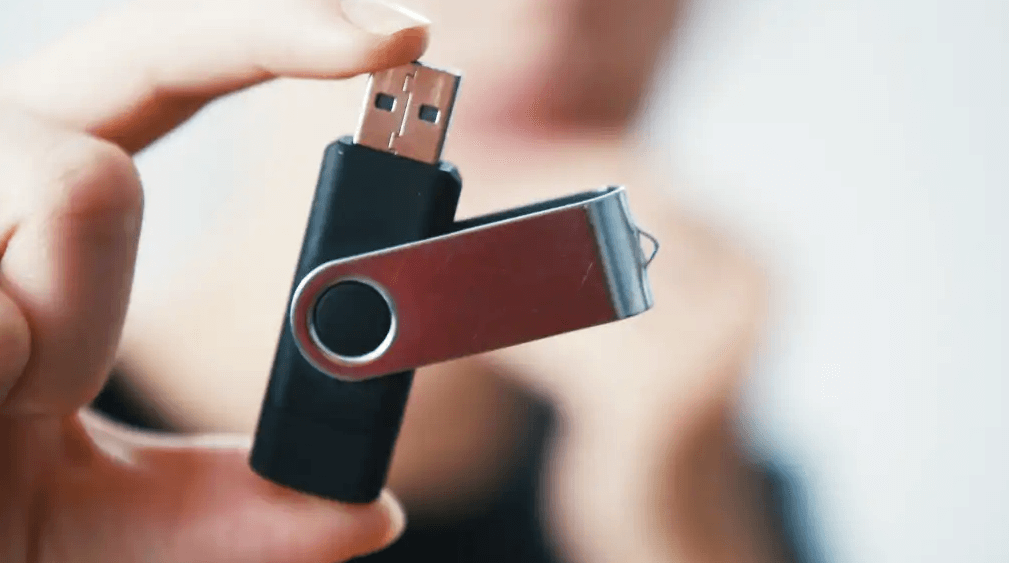
So, can you really recover deleted files from a USB without software? Yes — in most cases, as long as the drive is physically healthy and you stopped using it quickly.
What Actually Happens When You Delete a File from a USB Drive?
It depends on the file system your drive uses, and the difference matters when you pick a recovery method:
| File system | Typical use | What deletion changes | Recovery outlook |
|---|---|---|---|
| FAT32 | Sticks up to 32 GB, universal compatibility | The first byte of the directory entry is replaced with 0xE5, and the cluster chain in the FAT is released | Good — but the first character of the filename is lost |
| exFAT | Sticks 64 GB and larger, 4 GB+ files | The directory entry is marked unused; the allocation bitmap frees the clusters | Good, filenames usually survive |
| NTFS | Sticks reformatted for Windows-only use | The $MFT record is flagged as free; the $Bitmap releases the clusters | Best — full metadata often recoverable |
In all three cases the file contents are untouched. That is the entire reason recovery is possible at all — and the entire reason writing new data to the drive is so destructive.
Why Deleted USB Files Don’t Go to the Recycle Bin?
Windows only provisions a $RECYCLE.BIN folder on volumes that the storage driver reports as fixed disks. A USB flash drive is reported as removable media, so File Explorer bypasses the Recycle Bin entirely and issues a real delete. This is by design: removable drives get unplugged constantly, and Windows won’t maintain a recovery cache on a volume that may vanish at any moment.
Two exceptions are worth knowing, because they are free wins:
- Some external USB hard drives and SSD enclosures report themselves as fixed disks. Those do get a hidden $RECYCLE.BIN folder on the drive itself.
- Files deleted while the drive was mapped as a network location may sit in the host machine’s bin instead.
How to Recover Deleted Files from USB without Software? 4 Ways
Although you cannot restore deleted files from pen drive by Recycle Bin, there are two other methods to help with the USB file recovery without downloading any software.
Which Method Should You Try First?
Don’t work through all seven in order — match the symptom to the method. Each attempt costs you nothing but time, but the sooner you land on the right one, the less risk of the data being overwritten.
| Your symptom | Most likely cause | Try Method |
|---|---|---|
| Folders replaced by .lnk shortcuts; free space unchanged | Shortcut virus hide your files | Attrib |
| Drive shows the correct used space but appears empty | Hidden / system attributes set | Attrib |
| “The disk is not formatted” / RAW / 0 bytes | File system corruption | CHKDSK |
| External USB hard drive, deleted in Explorer | Drive reports as fixed — hidden bin exists | Recycle Bin |
| The files also lived in Documents / Desktop / OneDrive | A backup or version snapshot may exist | File History |
| Genuinely deleted, no backup, nothing hidden | File system entry removed | Winfr or MyRecover |
| You’re on a Mac | Different OS, different rules | Trash, Terminal, or Time Machine |
Way 1. Check the Recycle Bin and the Hidden Bin on the Drive
Yes, we know — the whole premise is that USB deletions skip the Recycle Bin. But this 30-second check pays off often enough that it should always be first.
A. Check your PC’s Recycle Bin
If the drive was ever mounted as a fixed disk, or if you deleted the files after copying them to your PC, they may be sitting there. Open the Recycle Bin, sort by Original Location, and scan for your USB drive letter.
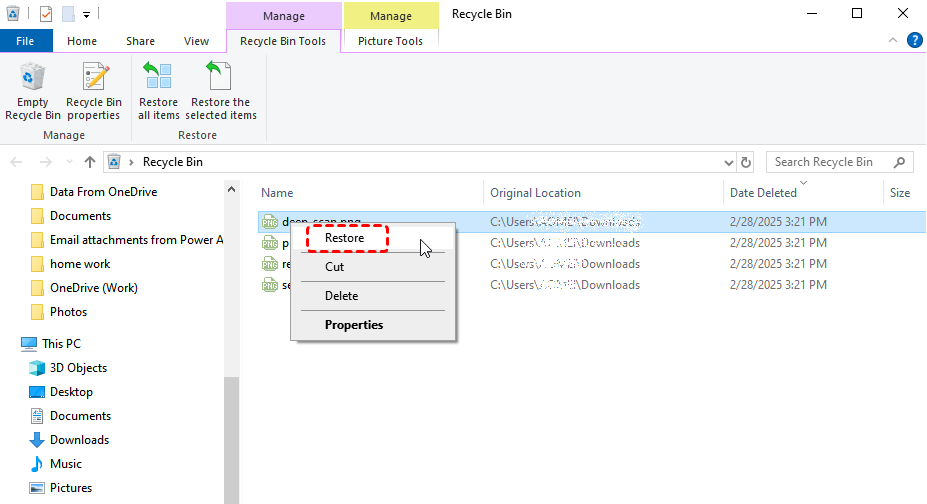
B. Check the hidden bin folder on the USB drive itself
Depending on the file system and Windows version, an external drive that reports as fixed keeps deleted items in one of three folders on the drive:
- $RECYCLE.BIN folder on NTFS drives on Windows Vista and later (including Windows 11)
- RECYCLER folder on NTFS drives on Windows XP / 2000
- RECYCLED folder on FAT32 drives
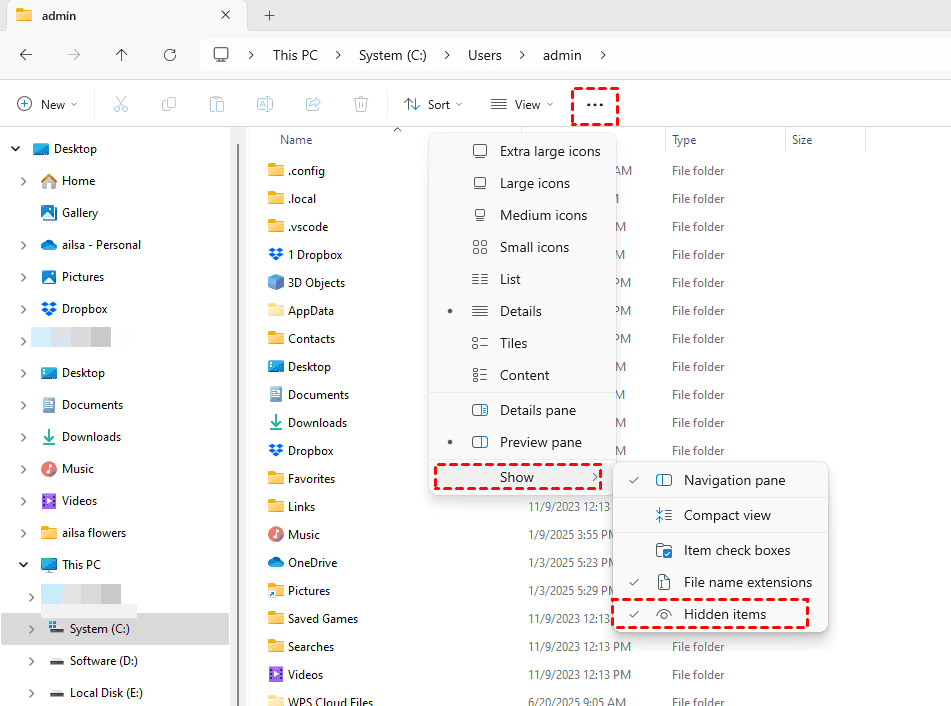
To show hidden and protected $RECYCLE.BIN folder:
1. In File Explorer, open the View tab > Show > tick Hidden items.
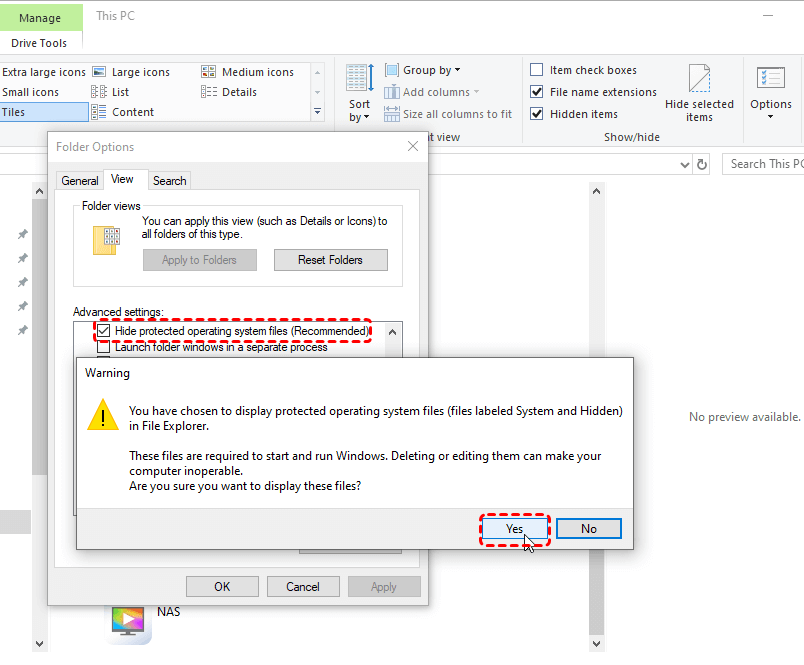
2. Then go to Options > View and untick Hide protected operating system files (Recommended). Confirm the warning.
3. Open your USB drive, and look for one of the three folder names above (usually $RECYCLE.BIN). It will appear greyed out.
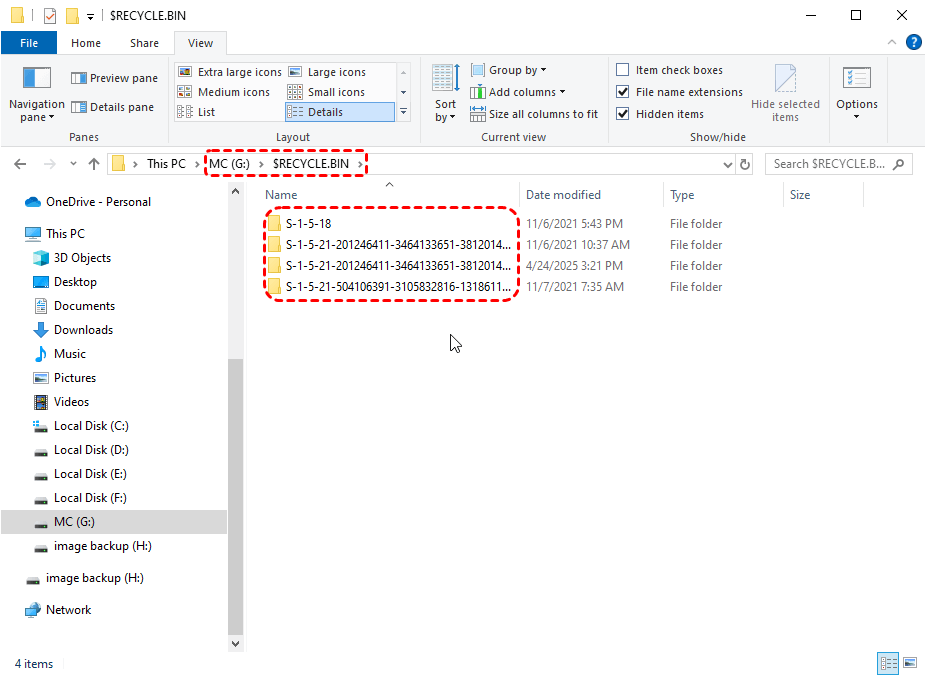
4. Open the folder, locate your files and copy them to your PC. Don’t drag — copy, so the drive stays untouched.
Tip: Turn Hide protected operating system files back on when you’re done. Leaving it off makes it easy to delete something Windows actually needs.
Way 2. Unhide Files with the Attrib Command in CMD
This is the single most effective “no software” method, and it reveals files that were never deleted in the first place, just hidden.
Use this when:
- Your folders were replaced by shortcuts with the same names
- The drive shows plenty of used space but looks empty
- The stick was recently plugged into a public, school, or office PC
- An antivirus quarantined something and files disappeared afterwards
1. Open File Explorer and confirm the letter assigned to the USB drive — for example E:. Then note the drive letter.
2. Press Win + S, type cmd, right-click Command Prompt and choose Run as administrator. On Windows 11 you can also use Windows Terminal (Admin).
3. Type the following, replacing E with your drive letter, then press Enter:
attrib -h -r -s /s /d E:\*.*
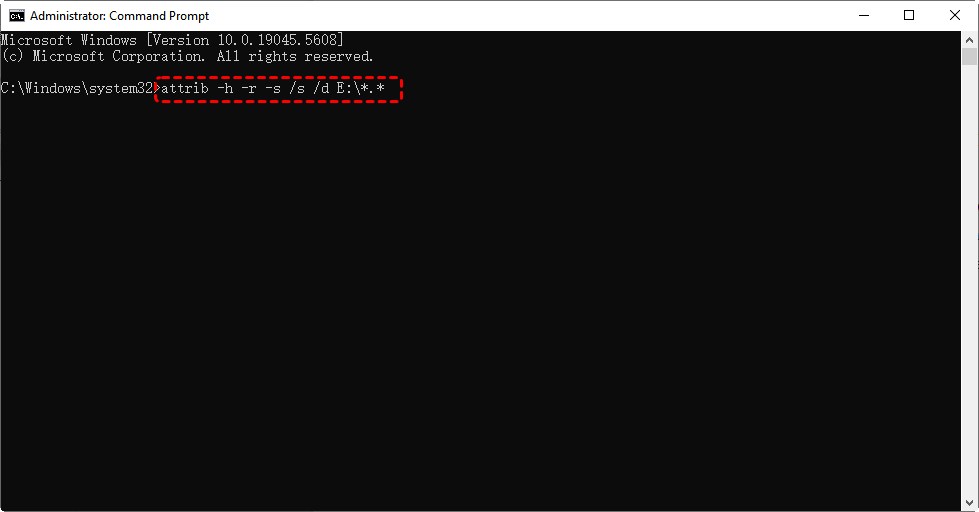
- -h: Removes the hidden attribute
- -r: Removes read-only
- -s: Removes system
- /s: Applies to all matching files in subfolders
- /d: Includes folders, not only files
4. There is no progress bar and no confirmation message. On a large drive it can take a minute or two. When the prompt returns, it’s finished.
5. Reopen the USB drive in File Explorer. Previously hidden folders should now be visible with normal (not greyed out) icons.
Troubleshooting attrib:
- “Access denied” — you’re not in an elevated prompt. Close it and reopen as administrator.
- “The media is write protected” — check the physical lock switch on the stick, then see our guide on removing write protection from a USB drive.
- “File not found” — the drive letter is wrong, or the files really are deleted rather than hidden. Move on to Method 5.
- Delete the leftovers. Once your files are back, remove any stray .lnk shortcuts and any autorun.inf in the drive root, then run a full antivirus scan — otherwise the next PC you plug into re-hides everything.
Way 3. Repair the File System with CHKDSK and Rescue .CHK Files
When a USB stick is yanked out mid-write or loses power, the file system index can end up inconsistent. Files still occupy clusters, but the directory no longer points at them properly. chkdsk rebuilds those links.
Important: chkdsk /f writes to the drive. On a severely corrupted volume it can discard data it can’t reconcile instead of saving it. If the files are irreplaceable, run a read-only recovery scan first and use chkdsk only if that comes back empty.
1. Open an elevated Command Prompt.
2. Run chkdsk on the USB drive (E: for example):
chkdsk E: /f : fixes file system errors
chkdsk E: /f /r : also locates bad sectors (much slower)
- Use /f on its own first. Add /r only if the drive is also throwing read errors — on a 128 GB stick it can run for hours.
3. Look inside the FOUND.000 folder. Any fragments chkdsk salvages are written to a hidden folder in the drive root called FOUND.000 (then FOUND.001, and so on), containing files named FILE0000.CHK, FILE0001.CHK…
4. Convert .CHK files back to real files. A .CHK file is your original data with the wrong extension. Copy the folder to your PC, then rename the extension to what you expect — .docx, .jpg, .pdf, .mp4 — and try opening it.
Way 4. Recover Deleted Files from USB via Windows File History
If you have enabled Windows File History feature before data loss and add the flash drive to the File History backup plan, you can use it to recover deleted files from USB flash drive.
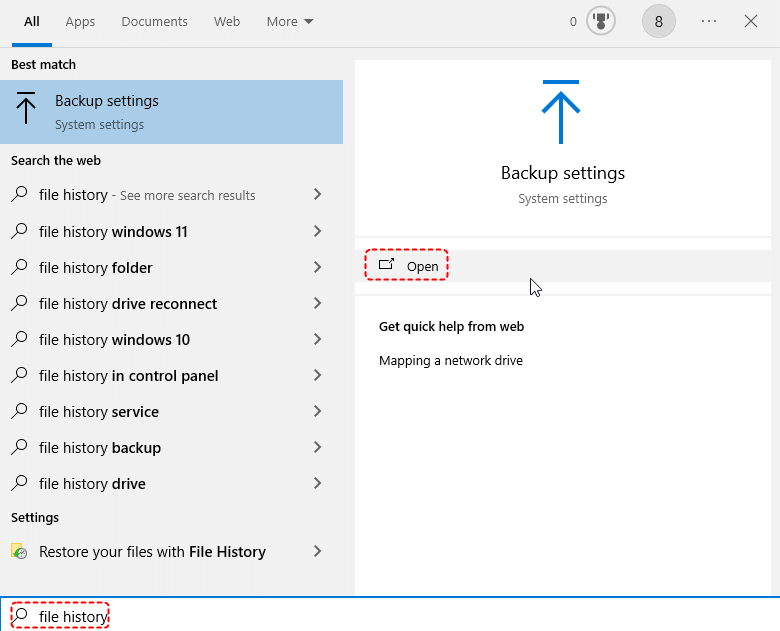
Step 1. Type and search "File History" in the Windows search bar, then click "Open".
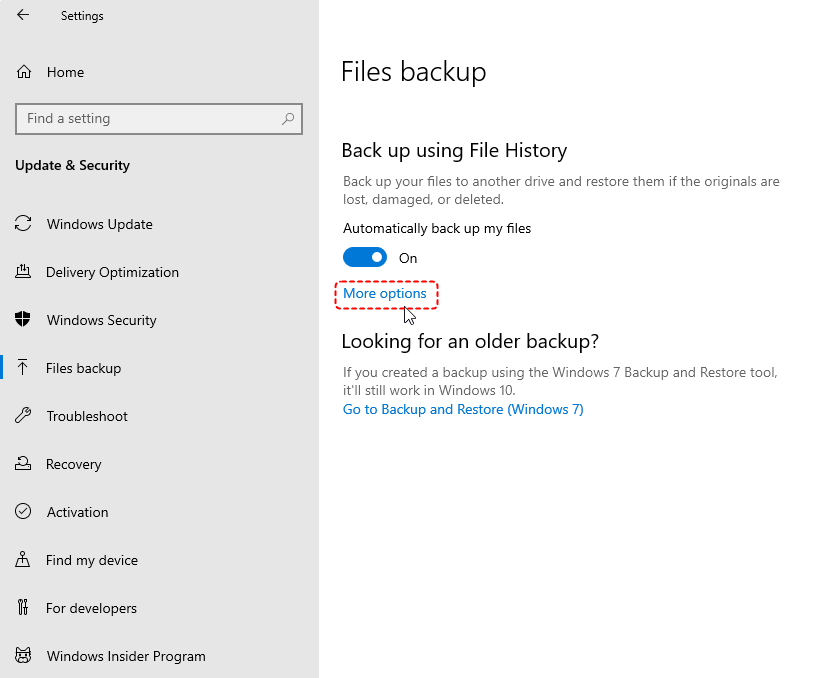
Step 2. Select "More options".
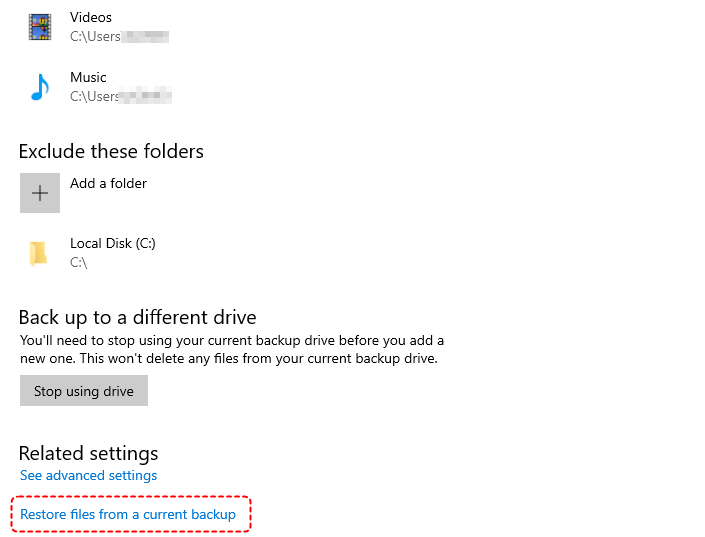
Step 3. Scroll down the page and click on "Restore files from a current backup".
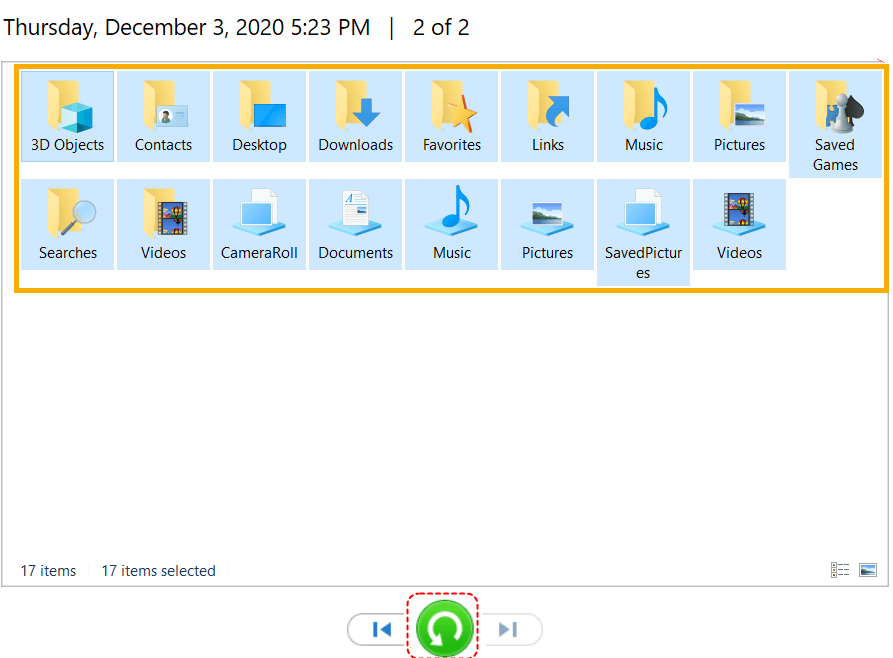
Step 4. In the File History window, you can select a file/folder, multiple files/folders, or all folders from the backup drive to restore it. Finally, click the "Restore" icon to start restoring your files.
How to Recover Deleted Files from USB with Software? 2 Ways
There are 2 ways you can find to recover deleted files from your USB with reliable software.
Way 1. Recover Files from USB via Windows File Recovery (winfr)
Windows File Recovery, developed by Microsoft, is designed to recover lost files that have been deleted from your local storage device (including internal drives, external drives, and USB devices) and can’t be restored from the Recycle Bin.
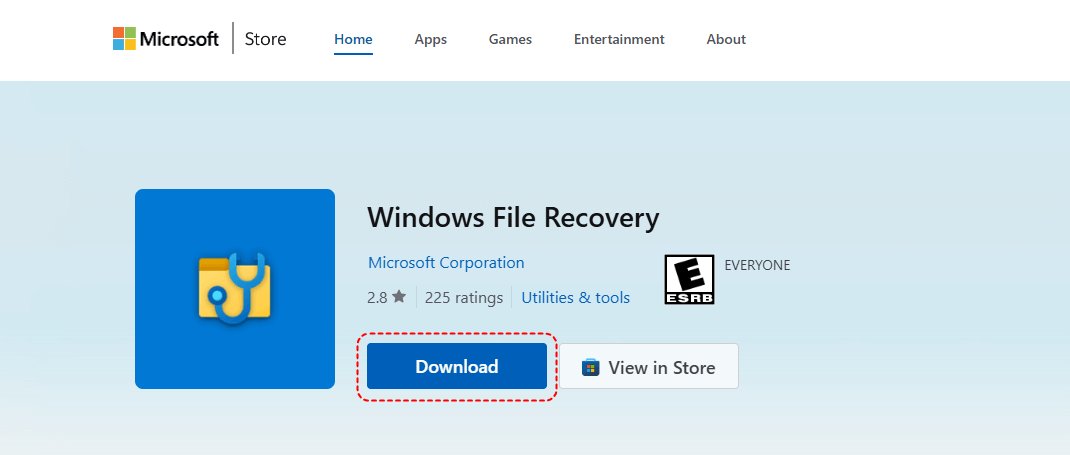
Step 1. Download it from Microsoft store and follow the on-screen instructions to finish the setup process.
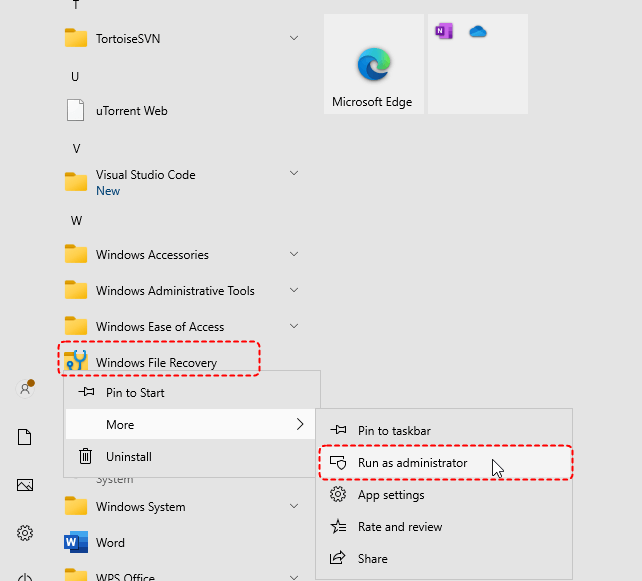
Step 2. Select Windows File Recovery from the start menu and choose "Run as administrator".
Step 3. In the opened Command Prompt window, you can run the following command to restore data deleted from USB flash drive.
winfr H: D:\test /regular [recover files from H partition to a "test" folder in D partition]
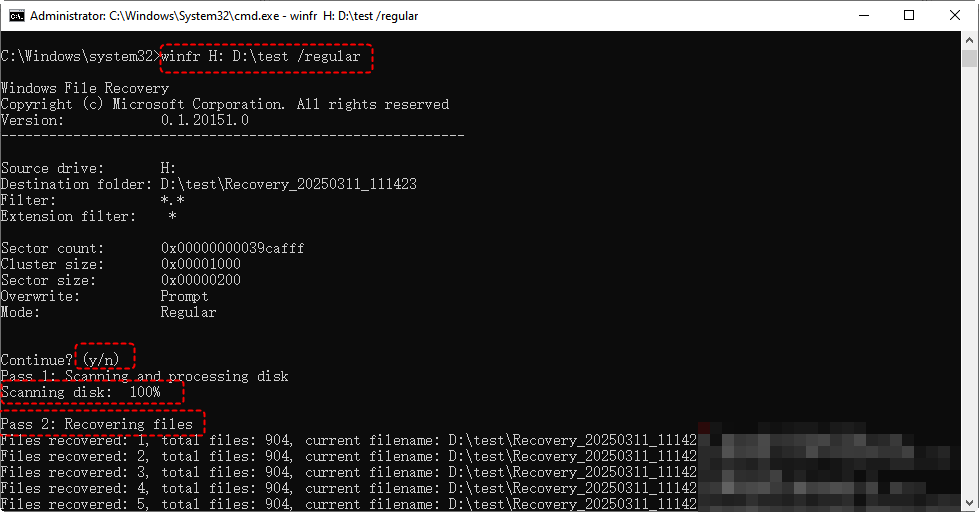
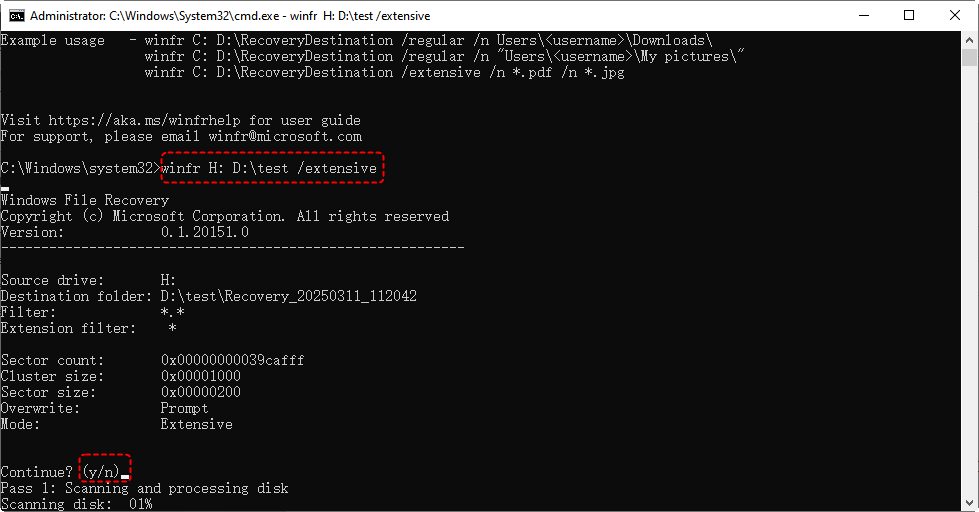
If you want to perform a deeper scan and recover data from formatted or corrupted USB flash drive, use the "extensive" mode: winfr H: D:\test /extensive
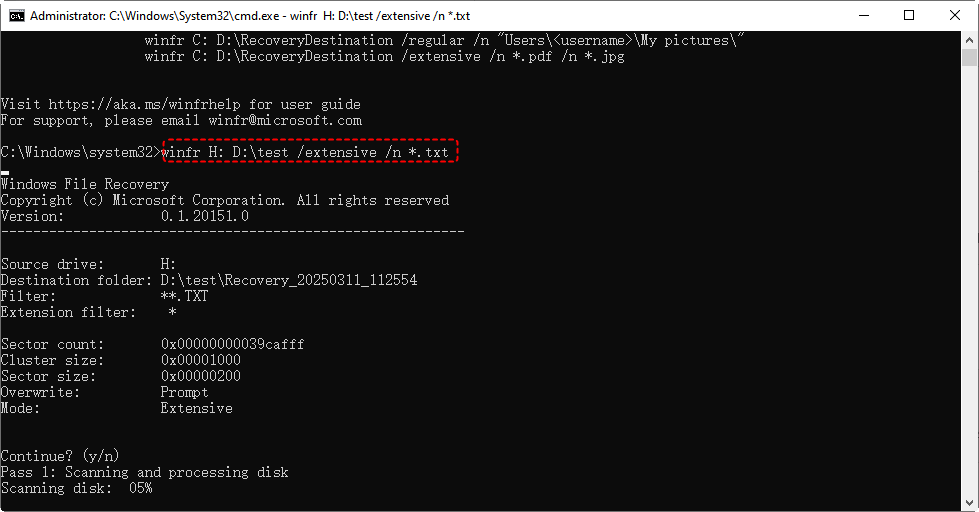
To recover specific types of files such as txt files, add "n" parameter: winfr H: D:\test /extensive /n *.txt
Way 2. Recover Deleted Files from USB with MyRecover
While Windows File History and Windows File Recovery are free options to recover deleted files from USB without software, they have significant limitations: File History requires prior setup (most users don’t enable it for USB drives), while Windows File Recovery relies on complex command-line inputs, which can be intimidating for non-technical users.
This is where MyRecover shines—specialized data recovery freeware designed to simplify USB recovery with zero technical hassle. Its key advantages over above two tools including:
💥No Pre-Backup Needed: Recovers files even if you never enabled File History or have made any other backup.
💥Intuitive Interface: No command-line commands—just point, click, and recover.
💥Broad Compatibility: Works with all USB brands (SanDisk, Samsung, Kingston, etc.) and file systems (NTFS, FAT32, exFAT).
💥Deep Scan Technology: Retrieves files lost due to accidental deletion, formatting, or corruption.
FREE Data Recovery Software with Highest Recovery Rate
How to Recover USB Files in 4 Clicks with MyRecover
Step 1. Download & Install: Get MyRecover from the official site (no admin rights required). Connect your USB drive and ensure it can be detected by Windows.
Step 2. Scan Your USB: Launch MyRecover, tap USB/SD Card Recovery, and select your USB drive. Click “Scan” to initiate a quick scan.
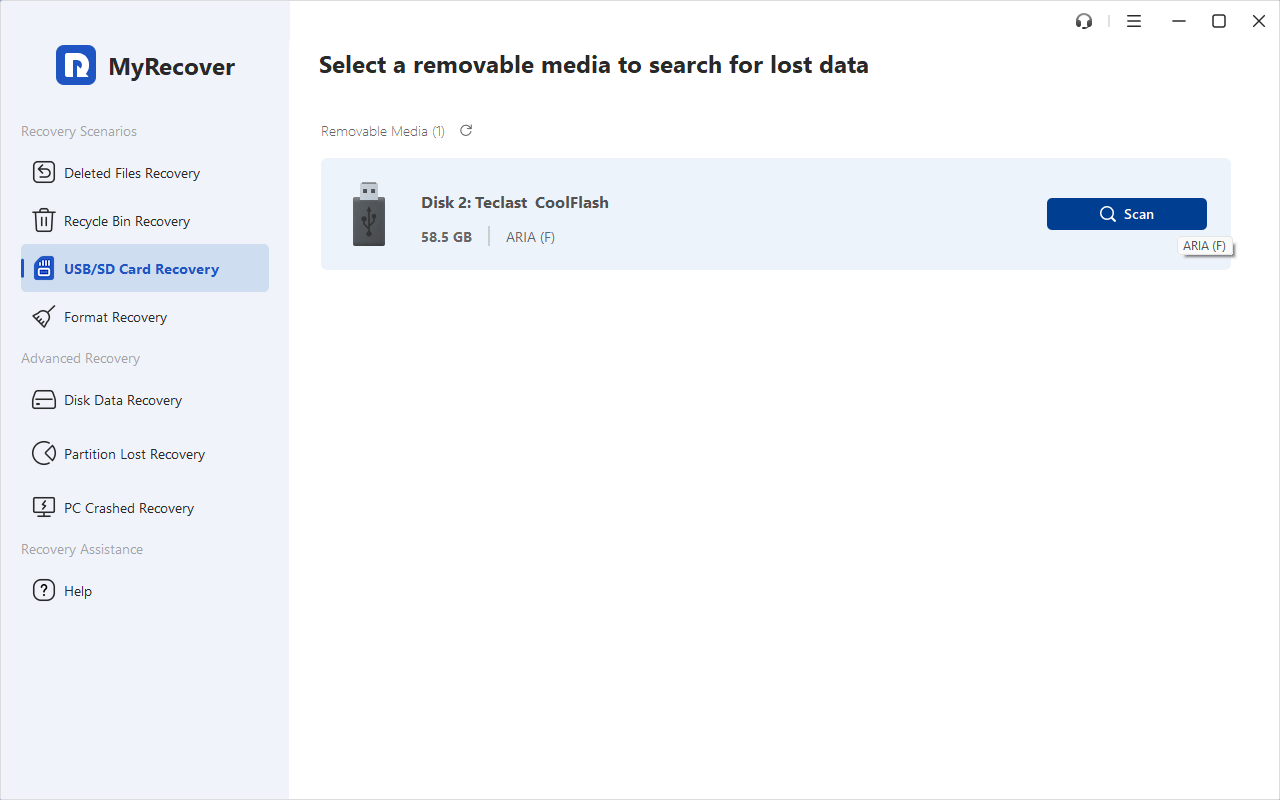
Step 3 (Optional). If necessary, you can switch to "Deep Scan" manually.
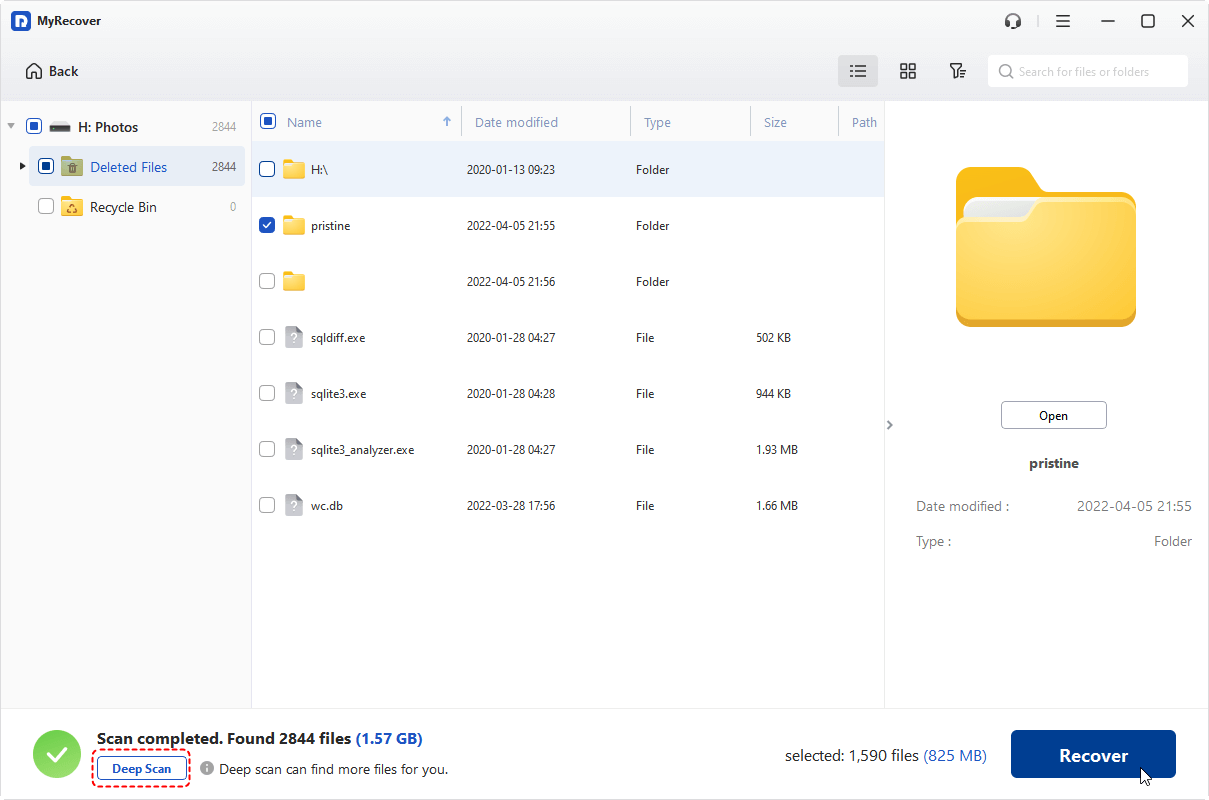
Step 4. Recover Instantly: Select what you need and click Recover. Save them to a secure location (not the original USB).
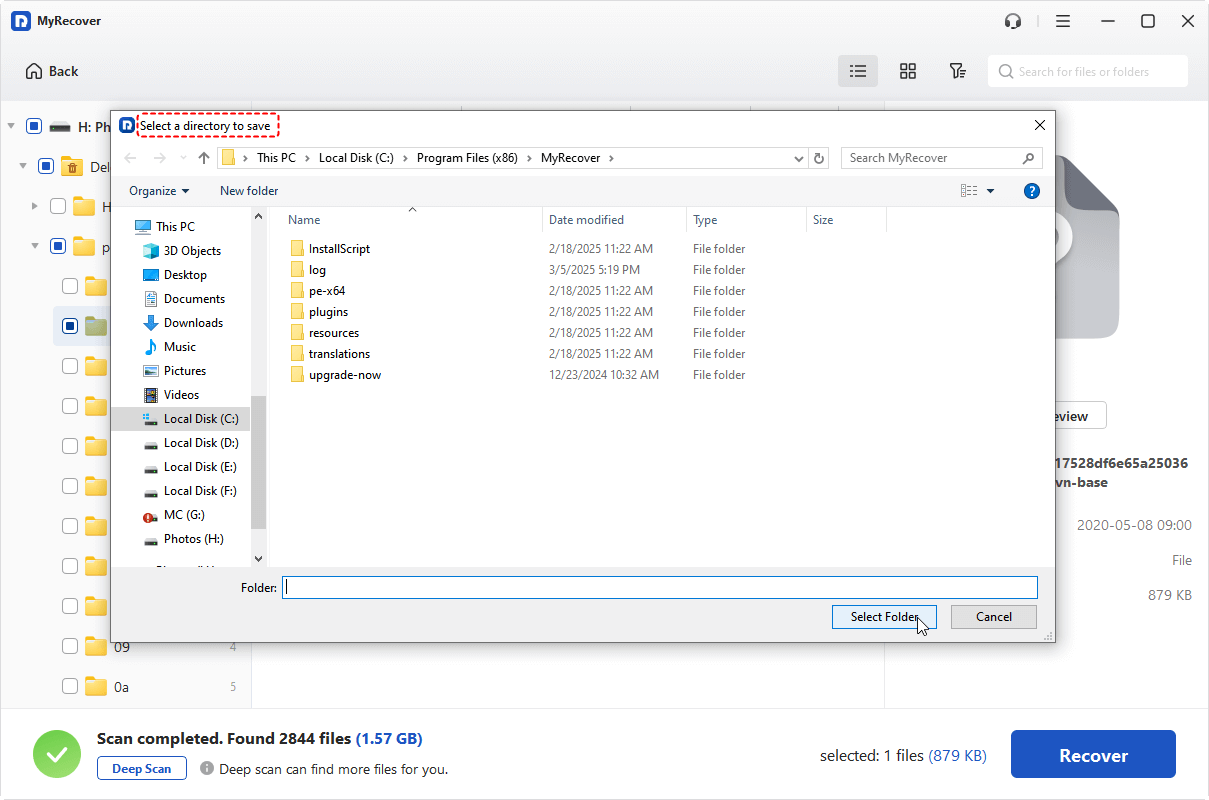
- Notes:✎...
- To preview and verify recoverable files (documents, photos, videos, etc.) before restoring, please upgrade to Professional edition.
- Besides, if you need to recover files from unlimited computers or recover files from a crashed computer, upgrading is your best choice.
- You can also filter files on the top right after scanning, like searching file name, size, and modified date to find what you need quickly.
 MyRecover
 - Recover Deleted Files Easily with Simple Clicks
- 1000+ File Formats Supported
- Support HDD, SSD, External Hard Drive, USB Drive, SD Card, etc.
- Quickly Find Files Using File Types, Name, Size, etc.
 100% Secure
Recover Deleted USB Files on a Mac Without Software
macOS behaves completely differently, and in your favour. When you delete a file from an external volume in Finder, macOS doesn’t erase it — it moves it into a hidden .Trashes folder on that same volume. The file physically stays on the USB stick.
Way 1. Check the Trash with the drive connected
1. Reconnect the same USB drive to the same Mac. This matters. Trash contents for an external volume only appear while that volume is mounted.
2. Click the Trash icon in the Dock. Right-click any file you recognise and choose Put Back to return it to its original folder on the USB drive.
Way 2. Inspect .Trashes directly in Terminal
If Finder shows nothing, the folder may still contain data.
Run these commands to find your deleted USB files:
- cd /Volumes/YOUR_USB_NAME
- ls -la
- ls -la .Trashes/501/
Tip: # 501 = the first user account UID
Copy anything you find to your home folder with cp -R rather than moving it.
Way 3. Time Machine
Time Machine can include external drives, but only if the drive was mounted during a backup and was never added to the exclusion list.
Open the folder where the files lived, launch Time Machine from the menu bar, scroll back through the timeline and click Restore.
FAQs About Recover Deleted USB Files without Software
1. Is it actually possible to recover data from USB without software?
Only in limited cases—if files are just hidden (not deleted), or if you have a Windows backup (Previous Versions/File History). Permanently deleted files usually require software.
2. Why don't deleted USB files go to the Recycle Bin?
Windows bypasses the Recycle Bin for removable drives. Deleted files are immediately marked as gone, with no built-in safety net.
3. How can CMD help while recovering files from USB without software?
The attrib command unhides files hidden by viruses: attrib -h -r -s /s /d X:\*.*But this does not recover genuinely deleted files.
4. What about Windows File Recovery?
It's a free Microsoft command-line tool (install from the Store). Use: winfr F: D: /extensive (USB drives need the /extensive mode). Save recovered files to a different drive.
5. Can I use "Previous Versions" to recover deleted USB files?
Rarely useful for USBs—this only works if your system was actively backing up that specific drive. Check via Properties > Previous Versions.
6. What's the #1 rule after deletion?
Stop using the USB immediately. Any new data can overwrite your deleted files. Always save recovered files to a separate drive.
To Sum Up
While with built-in tools in Windows 11/10, you can recover deleted files from USB without software. Besides, you can also recover them with software, like Windows File History, Windows File Recovery. However, their limitations—such as mandatory pre-backups or command-line complexity—make them impractical for most users.
MyRecover eliminates these hurdles entirely. With its intuitive interface, deep-scan technology, and compatibility across all USB brands and file systems, it’s the fastest, most reliable way to recover lost data—no backups or technical skills required. Whether your files were accidentally deleted, formatted, or corrupted, MyRecover ensures they’re retrieved safely and efficiently.

Stay Updated With Our
Latest Tips
Add us as a preferred source on Google to never miss helpful guides.
 Add as preferred source >>