
How to Turn on Auto Save in Excel: Full Step-by-Step Guide
If you’re wondering how to turn on Auto Save in Excel to help you prevent data loss and improve your workflow efficiency, this guide will walk you through the complete process of enabling AutoSave in Excel, including requirements such as using Microsoft 365 and saving files to OneDrive or SharePoint. By following this guide, you can ensure your spreadsheets are always protected and maintain a more efficient and reliable workflow when working in Excel.
By Aria / Updated on May 9, 2026
Introduction
AutoSave is a crucial feature in Excel and other Office applications like Illustrator that helps protect your work by automatically saving changes in real time. Instead of relying on manual saves, AutoSave ensures that your latest edits are continuously updated, reducing the risk of losing important data due to unexpected crashes, power outages, or accidental closures. For users working on critical spreadsheets, this feature significantly improves efficiency and data security.

However, many users encounter confusion when trying to enable AutoSave. They may not see the AutoSave toggle in Excel or find that the feature is grayed out or not working as expected. These issues make it unclear how to properly activate the function. This guide will walk you through the complete, step-by-step process of how to turn on Auto Save in Excel, helping you quickly enable the feature and ensure your files are always saved automatically.
How to Turn on Auto Save in Excel on Windows & Mac
Since AutoSave depends on a valid file location, account connection, and supported formats, it’s essential to verify these prerequisites before enabling it to ensure proper functionality.
- The file is stored on OneDrive or SharePoint.
- Make sure you have an active Microsoft 365 subscription.
- The file format is neither XLS nor CSV.
Now, you can track the following instructions to correctly enable Auto Save based on your operating system.
Step 1. Open your Excel workbook and click "File" > "Save As".
Step 2. Choose OneDrive or SharePoint as the save location.
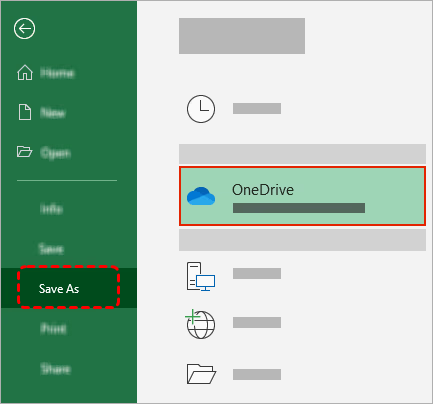
Step 3. Sign in to your Microsoft account if prompted.
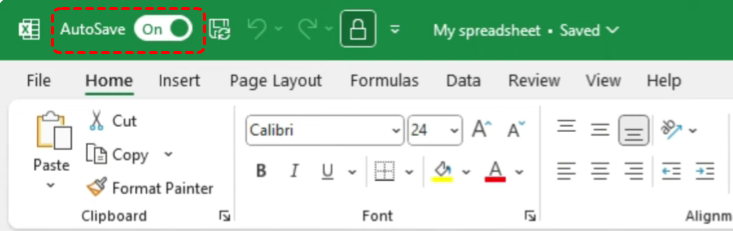
Step 4. After saving, toggle the "AutoSave" switch at the top-left corner to "On". Perhaps, you may find that AutoSave has already been turned on automatically once you save the file to OneDrive or SharePoint.
Step 5. Confirm that changes are saved automatically as you edit the file.
Why Can't I Turn on Autosave for an Excel File Already in OneDrive?
"I have Excel files that are already in my OneDrive, but not at the top level, e.g, C:\Users\User1\OneDrive\Documents-OneDrive\Medical\Diabetes\GlucoseReadings.xlsm. When I try to turn on Autosave, it says I need to upload the file, but when I click the button that pops up with my account name, it uploads a new copy, and doesn't save the version information."
- Question from Anonymous
Even if you’ve met all three requirements above but you may still fail to enable AutoSave, the issue is usually related to account settings, file conditions, or application configuration. There are other potential causes that may block the AutoSave feature from turning on.
❌Not signed into the correct Microsoft account: Even if the file is in OneDrive, AutoSave won’t work unless you are signed into Excel with the same account that owns or has access to the file.
❌File format is not supported: AutoSave only works with modern formats like .xlsx, .xlsm, or .xlsb. Older formats such as .xls will disable the feature.
❌File is opened in compatibility or read-only mode: If the workbook is marked as read-only, protected, or opened from an email attachment, AutoSave cannot be turned on.
❌Workbook contains unsupported features: Certain legacy features, shared workbook settings, or add-ins may prevent AutoSave from functioning properly.
❌Outdated Excel version: AutoSave requires a Microsoft 365 subscription. If you are using an older standalone version like Excel 2016, the AutoSave toggle may not be available.
❌Sync or connection issues with OneDrive: If OneDrive is not syncing correctly or is disconnected, Excel cannot enable AutoSave even if the file location is correct.
How to Restore Unsaved or Overwritten Excel Files Using Auto Save
Even with AutoSave enabled, there are times when you may accidentally close a workbook without saving, or an older version of your file may be overwritten. Fortunately, Excel’s AutoSave features allow you to restore unsaved changes or revert to previous versions, minimizing data loss and workflow disruption.
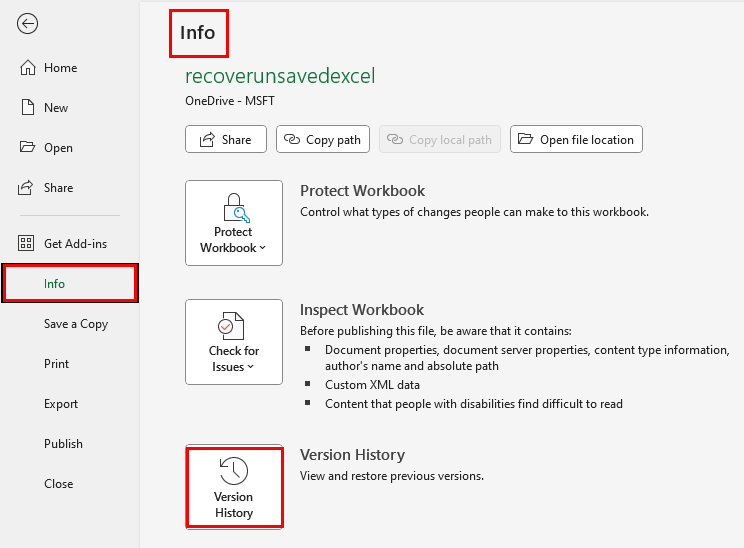
Step 1. Launch Excel and click "File" > "Info", then select "Version History".
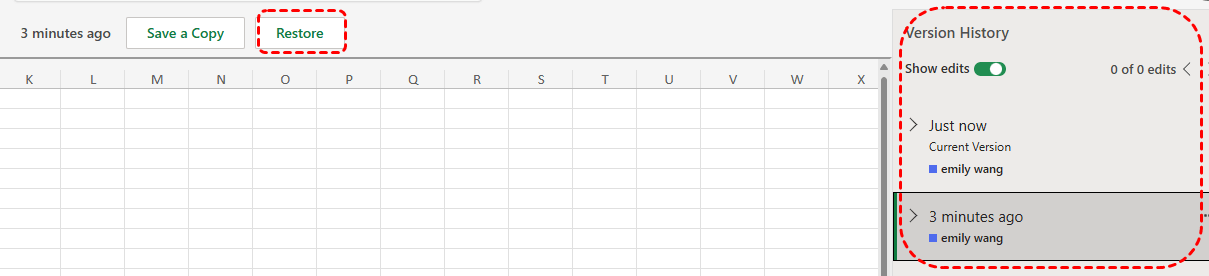
Step 2. Browse the list of unsaved files and select the one you need.
Step 3. Select "Restore" to revert the workbook to that version, or "Save a Copy" to create a copy without overwriting the current file.
"Auto Save" VS "Auto Recovery"
If you don't have a Microsoft 365 subscription, don't worry. Microsoft also offers a feature similar to AutoSave called AutoRecover. AutoRecover helps protect files in case of a crash. If you reopen the file after a crash, a version of the file with your latest changes appears in a Document Recovery pane.
While both AutoSave and AutoRecover aim to protect your work in Excel, they serve different purposes and operate in distinct ways. AutoSave is proactive, continuously updating your file as you work, whereas AutoRecover acts as a safety net, storing temporary versions in case the application closes unexpectedly. By knowing how each functions, you can better manage your files and prevent data loss.
| Feature | Purpose | When it Works | Scope | Key Notes |
| AutoSave | Continuously saves changes in real time | As you edit a workbook stored in OneDrive or SharePoint | Entire file | Requires Microsoft 365; instant save without user intervention |
| AutoRecover | Creates backup copies of unsaved work | After a crash, forced closure, or unsaved exit | Temporary versions | Available in all Excel versions; does not replace saving manually or via AutoSave |
| ✅ Using both together offers the best protection: AutoSave keeps your current work continuously safe, while AutoRecover can help retrieve anything lost during unforeseen crashes. | ||||
How to Enable Auto Recovery in Excel
Even if the AutoSave feature isn’t available, Excel’s AutoRecover feature provides essential protection by periodically saving copies of your workbook. Enabling AutoRecover ensures that if Excel crashes, closes unexpectedly, or you accidentally exit without saving, you can recover most of your recent work.
Step 1. Open Excel and click on "File" > "Options" to access the Excel Options dialog.
Step 2. Select "Save" from the left-hand menu to view AutoRecover settings.
Step 3. Check the box labeled "Save AutoRecover information every" and set a preferred interval, e.g., every 5 or 10 minutes.
Step 4. Ensure the box of "Keep the last AutoRecovered version if I close without saving" is checked to retain unsaved changes after an unexpected closure.
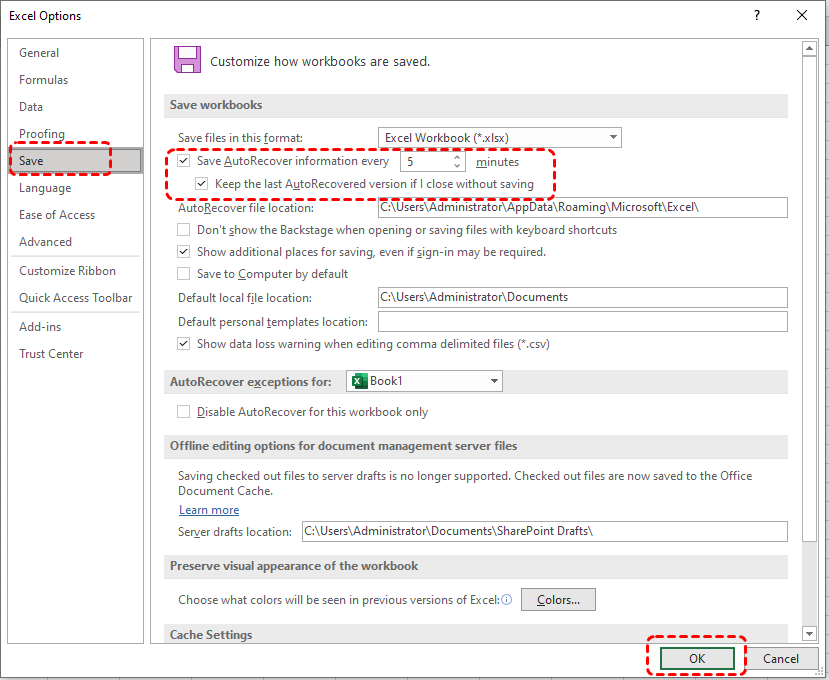
Step 5. Click "OK" to save your settings. Excel will now automatically create backup versions according to your specified interval.
With AutoRecover enabled, you can open the "Document Recovery" pane after a crash or unexpected closure and restore the most recent version of your workbook, complementing AutoSave where available and enhancing overall data protection.
How to Recover Deleted Excel Files on Windows
Even with AutoSave and AutoRecover enabled, data loss can still occur in certain situations, such as accidental deletion, emptied Recycle Bin, or file corruption. In these cases, native Excel features may not be enough to retrieve your lost files. This is where professional recovery tools become valuable. One such solution is MyRecover, a specialized data recovery software designed to scan your system deeply and restore deleted or lost files quickly and safely.
By intelligently locating Excel files that were removed or overwritten, MyRecover helps users recover important work without relying solely on backups or version histories. Its advanced scanning algorithms distinguish it from basic recovery attempts, increasing the likelihood of restoring complete, intact Excel workbooks. With it, you can confidently recover deleted spreadsheets even if AutoSave and AutoRecover cannot assist.

- Recover deleted & lost files from HDD, SSD, USB, SD card, camera as you need.
- Support 1000+ formats of photos, videos, docs, archives, emails, compressed files, etc.
- Reliable rescue for deletion, formatted disk, emptied Recycle Bin, system crashes and more.
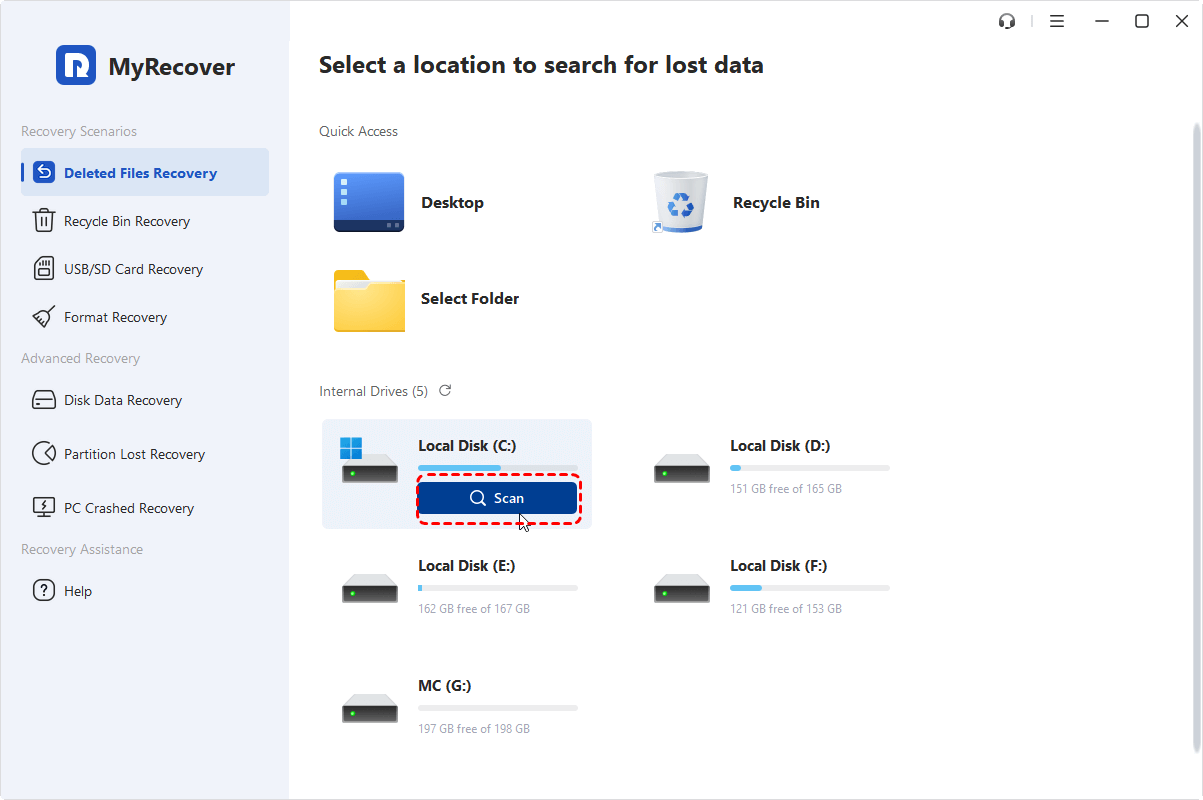
Step 1. Download and install MyRecover on your Windows supported computer from the official website or Microsoft Store.
Step 2. Launch the app and select the drive where your Excel files were originally stored, then click "Scan" to begin a quick search for deleted or lost files.
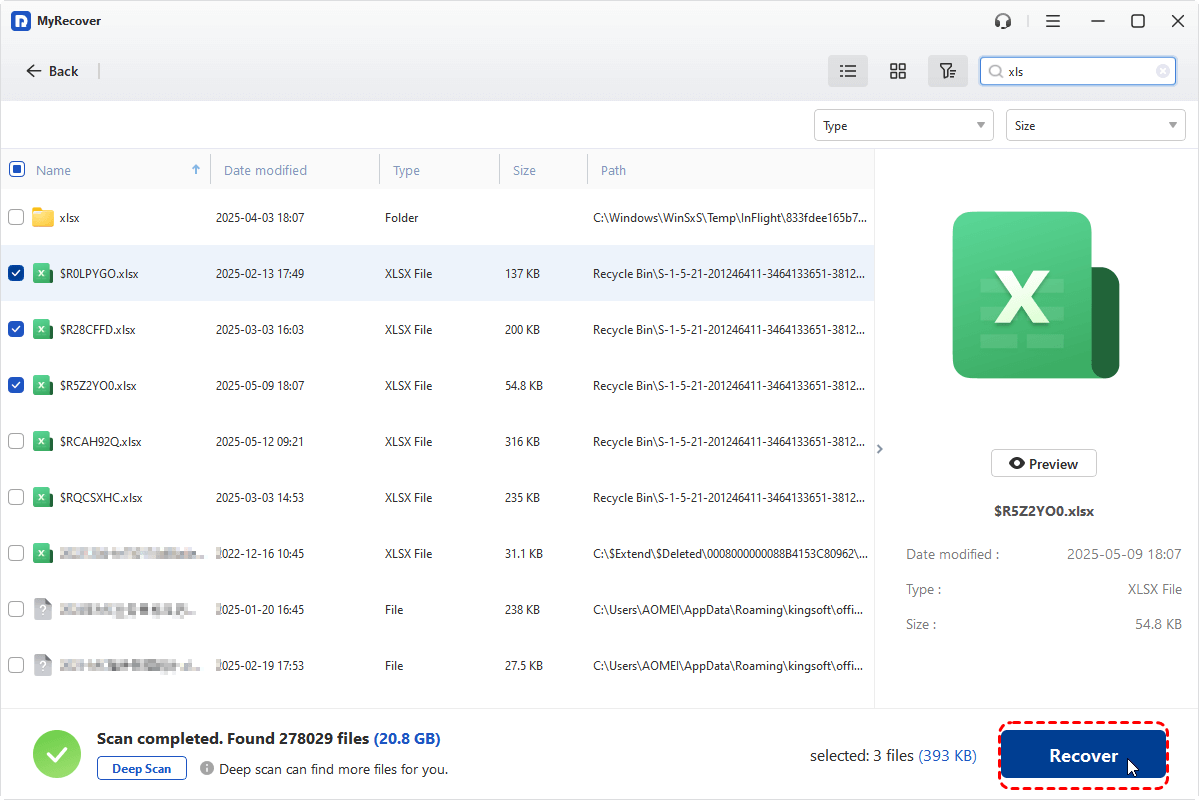
Step 3. Once the scan completes, browse the results and locate the Excel files you need, then click "Recover" to restore them.
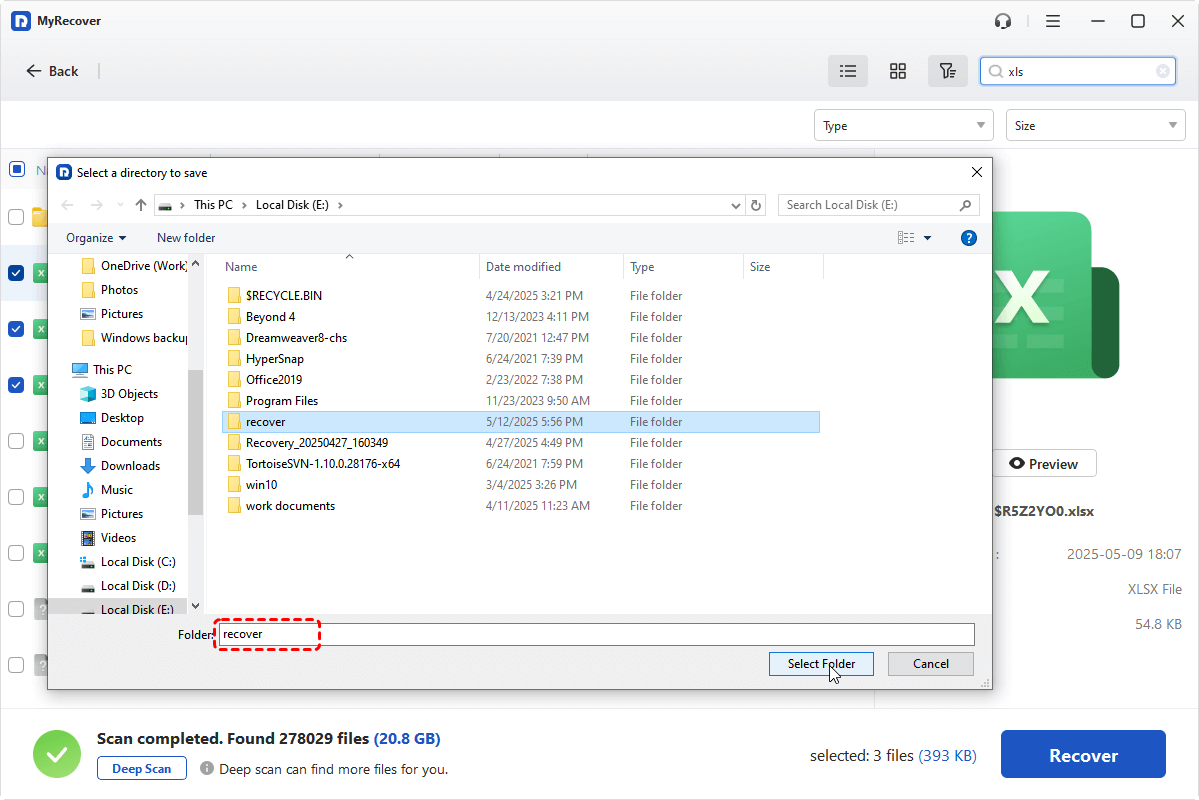
Step 4. Select a safe location to save the recovered files, ensuring your data is preserved.
When the process is done, the message "Files have been recovered successfully" will pop up. Then, you can access the recovered files in the destination folder by clicking on the "Browse" button.

The End
Enabling AutoSave in Excel is a crucial step for protecting your work in real time, reducing the risk of losing data due to crashes, power outages, or accidental closures. When AutoSave isn’t available, AutoRecover serves as a safety net by periodically creating backup copies, allowing you to recover unsaved work after unexpected interruptions. Only by properly combining the two can you maximize the protection of your worksheet.
Despite these built-in protections, situations such as accidental deletions, corrupted files, or lost versions can still occur. In these cases, professional tools like MyRecover provide an additional layer of protection, allowing you to recover deleted or overwritten Excel files efficiently and reliably. You can also upgrade to the MyRecover Professional edition to file content preview feature. In addition, it even allows you to retrieve files from a computer that won’t boot, helping you recover important data even in serious system failure scenarios.


Stay Updated With Our
Latest Tips
Add us as a preferred source on Google to never miss helpful guides.