 MyRecover


Comprehensive Guide to Removable Media Data Recovery
Our powerful removable media data recovery software helps you quickly retrieve lost, deleted, or corrupted files from USB drives, SD cards, and external storage devices. This advanced tool offers secure scanning and seamless restoration for all removable media types.

By Vera / Updated on May 13, 2026


Introduction to Removable Media Data Recovery
Removable media—including USB flash drives, SD cards, and external hard drives—has revolutionized how we carry data. However, their greatest strength (portability) is also their greatest weakness. Because these devices are frequently plugged into different computers, exposed to physical movement, and subjected to "hot-plugging" (unplugging without ejecting), they are significantly more susceptible to data loss than internal drives.
Whether you are a photographer who just lost a day’s worth of shots or a student with a corrupted term paper on a thumb drive, understanding the mechanics of removable media data recovery is essential. This guide explores the "why" and "how" of getting your files back, ranging from built-in system tools to professional-grade data recovery software.
Common Types of Removable Media & Their Vulnerabilities
Removable media comes in many forms. Knowing the type of device you’re dealing with helps you pick the right recovery method.
1️⃣USB Flash Drives
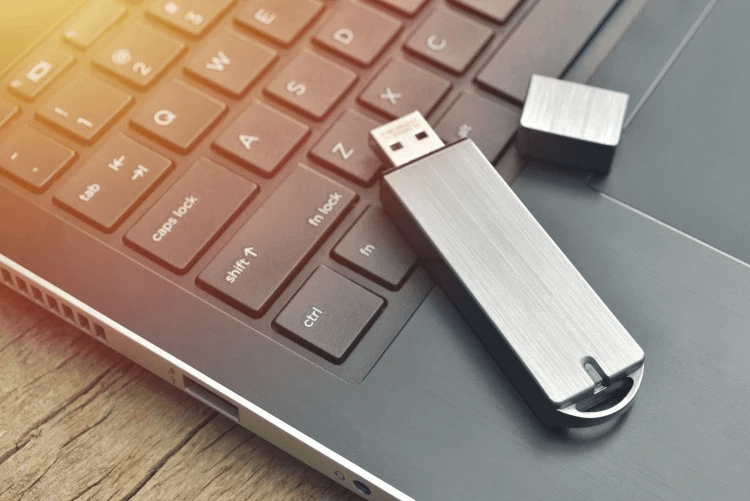
The trusty USB stick is still king for quick file transfers. But because it’s so portable, it’s also prone to loss, damage, and accidental formatting.
2️⃣External Hard Drives (HDD/SSD)
External hard drives store massive amounts of data, making them ideal for backups. Unfortunately, a single drop or sudden power loss can lead to corruption.
3️⃣SD and MicroSD Cards
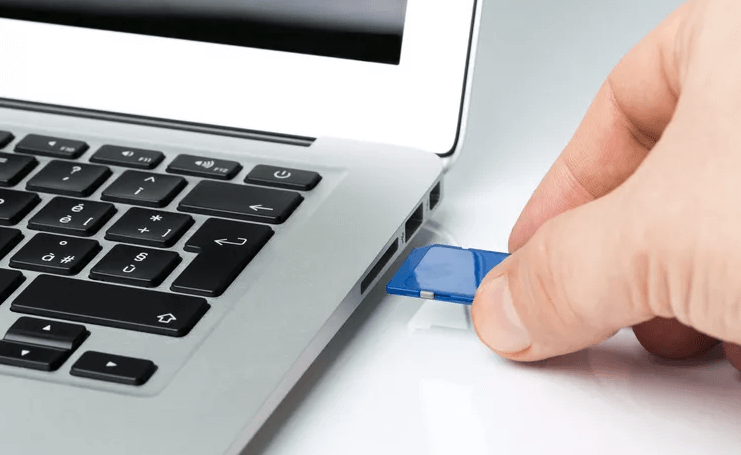
Whether in your camera, phone, or drone, SD cards store priceless media. But a bad connection or improper ejection can leave files unreadable.
- ★ You may want to know:
4️⃣Optical Discs (CD/DVD/Blu-ray)
Though less common today, optical discs can still hold critical archives. Scratches or aging, however, can make them difficult to read.
Why Data Loss Happens on Removable Media?
Knowing the "why" behind data loss helps you prevent it in the future.
- ❗Accidental Deletion or Formatting: The most common human error. On removable media, files deleted usually bypass the Recycle Bin, making them harder to find.
- ❗File System Corruption (RAW): If the "Table of Contents" (FAT32, exFAT, or NTFS) of your drive is corrupted, Windows will prompt you to "Format the disk before you can use it."
- ❗Improper Ejection: Pulling a drive out during a write cycle can leave "phantom" files or a corrupted partition table.
- ❗Physical Wear and Tear: Removable devices have a limited number of "write cycles" before the memory chips degrade.
- ❗Malware and Virus Attacks: Infected devices can corrupt or encrypt your files, making them inaccessible.
5 Proven Methods for Removable Media Data Recovery
Before jumping into complex software, it is wise to start with built-in system utilities. These methods address "logical" errors—situations where the data is still there, but the operating system has lost the path to find it.
Method 1. Use Command Prompt (Repairing Logical Pathing)
This method is ideal when your files haven't been deleted, but are "missing" due to malware or minor file system glitches. We use the CHKDSK command to repair the drive's structure and the Attrib command to strip away "hidden" or "system" flags that viruses often apply to your files to make them invisible to File Explorer.
1. Connect Your Removable Media: Plug your USB drive, SD card, or external HDD into your PC.
2. Open Command Prompt as Administrator: Press Windows + S, type cmd, then right-click Command Prompt and select Run as Administrator.

3. Check the Drive Letter: Open This PC and note the drive letter assigned to your removable media (e.g., E: or F:).
4. Run CHKDSK to Repair Errors: Type: chkdsk E: /f (replace E: with your drive letter). Press Enter and wait — this fixes file system errors.
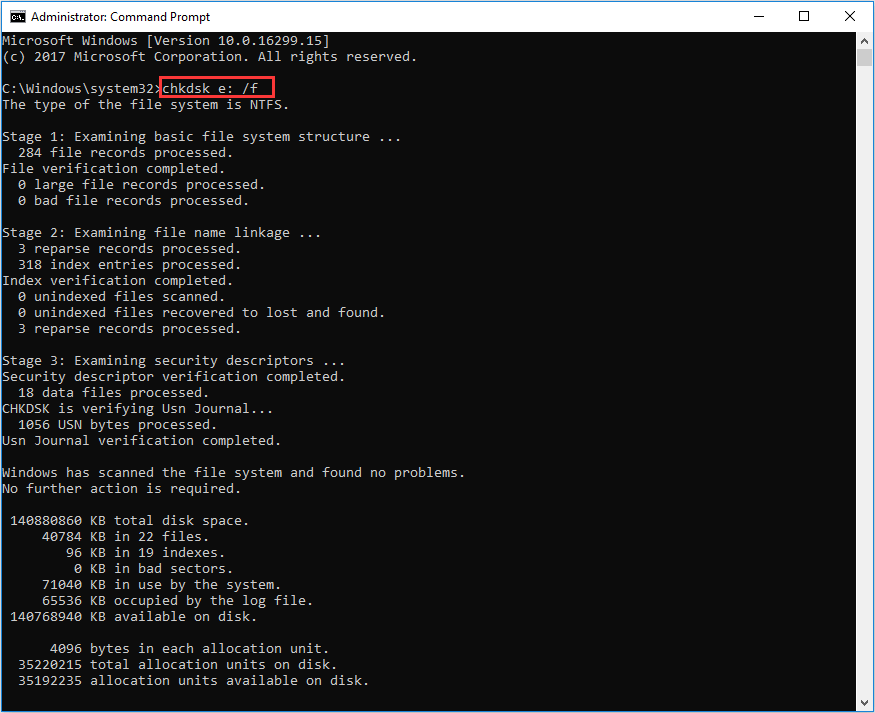
5. Use Attrib Command to Unhide Files: Type: attrib -h -r -s /s /d E:\*.* (again replace E: with your drive letter). Press Enter — this removes hidden/system attributes so files become visible.
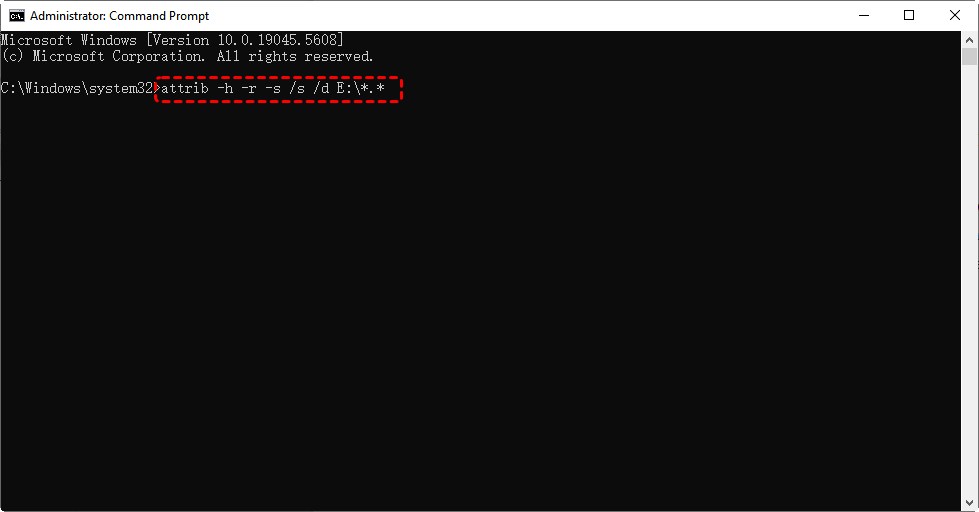
6. Check Your Drive: Go back to File Explorer to see if files have reappeared.
If the Command Prompt reports that it "cannot open volume for direct access" or if the files are truly deleted (not just hidden). In this case, you need an actual recovery tool to scan the drive's "unallocated" space.
Method 2: Windows File Recovery (Official Microsoft Deletion Fix)
If you’ve accidentally deleted files or formatted your drive, Microsoft provides a free command-line utility called Windows File Recovery. It is more powerful than the Attrib command because it looks for file signatures on the storage itself.
Steps:
1. Download Windows File Recovery from the Microsoft Store.
2. Open the app and use the Extensive mode (best for USBs/SD cards): winfr D: E: /extensive.
3. This scans drive D: and saves recovered files to a folder on your E: drive.
While WinFR is great for finding individual files, it often struggles if the entire drive has become "RAW" or the partition table is destroyed. If Windows can't even "see" your drive properly, you need to move to a partition-level repair tool.
Method 3: TestDisk (For RAW Drives & Partition Failures)
When a drive becomes "RAW," the "Table of Contents" that tells Windows how to read the data is broken. TestDisk is a powerful open-source tool designed to fix these structural errors and bring entire lost partitions back to life. You can use this tool if Windows asks you to "Format the disk before you can use it" or the drive shows as RAW.
Steps:
1. Run TestDisk: Launch the program and select [Create] to start a new log.
2. Select Drive: Choose your removable media from the list.
3. Analyze: Select the partition table type (usually [Intel] or [EFI GPT]) and choose [Analyse].
4. Quick Search: Use [Quick Search] to find lost partitions.
5. Recover: If it finds your lost partition, you can press 'P' to list files or 'Write' to fix the partition table and bring the drive back to life.
TestDisk is highly effective but has a steep learning curve—one wrong keystroke can make data loss permanent. For users who prefer a safer, "point-and-click" experience with higher success rates, professional software is the recommended next step.
Method 4: Professional Recovery with MyRecover (The Best All-in-One Solution)
When command-line tools are too complex or fail to find deep-seated data, MyRecover serves as the most comprehensive solution. It combines the file-searching power of WinFR with the partition-repair logic of TestDisk into a single, user-friendly interface. Unlike standard Windows repairs, MyRecover is designed to handle the specific quirks of external storage, such as SD card "RAW" errors, USB formatting accidents, and accidental "Shift+Delete" operations that bypass the Recycle Bin.
🤔Why MyRecover is specifically effective for Removable Media:
 MyRecover
- 🍀Handles Unrecognized File Systems: If your SD card shows as "RAW," MyRecover’s Deep Scan can still identify file signatures (like .JPG or .MOV) and piece them back together.
- 🍀High-Speed External Scanning: Optimized to scan through USB 3.0/3.1 interfaces quickly, saving you hours compared to generic tools.
- 🍀Signature-Based Recovery: It recognizes over 1000+ file types, which is vital for photographers and videographers using specialized camera formats on SD cards.
- 🍀User-Friendly Interface: Perfect for beginners and pros alike. It helps you see files before you recover them.
 100% Secure
Here’s a simple walkthrough to get your files back.
Step 1: Download and Install MyRecover
Head to the official MyRecover website and download the software. Installation takes just a few clicks.
Step 2: Connect the Removable Media
Plug your USB drive, SD card, or external HDD into your computer. Make sure it’s recognized by your system.
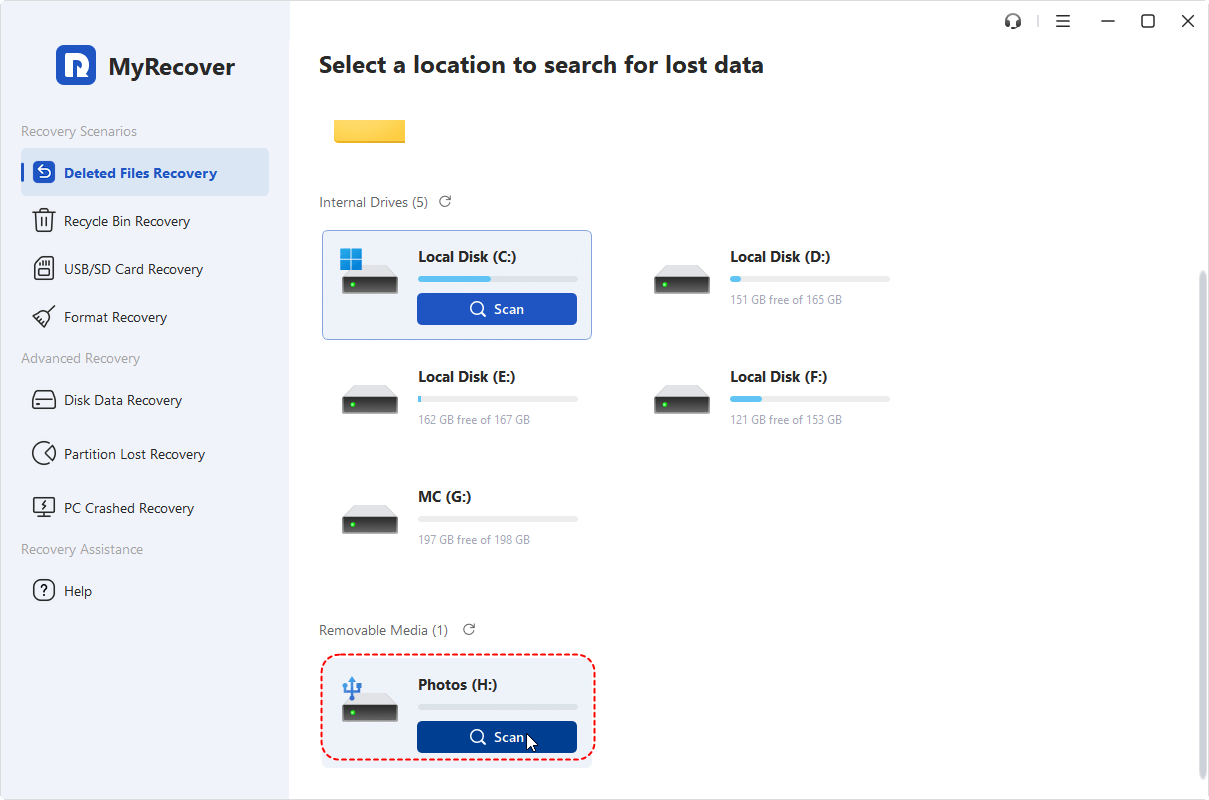
Step 3: Scan for Lost Files
Launch MyRecover and select the connected removable media. Choose between a quick scan (default) or a deep scan for more thorough results.
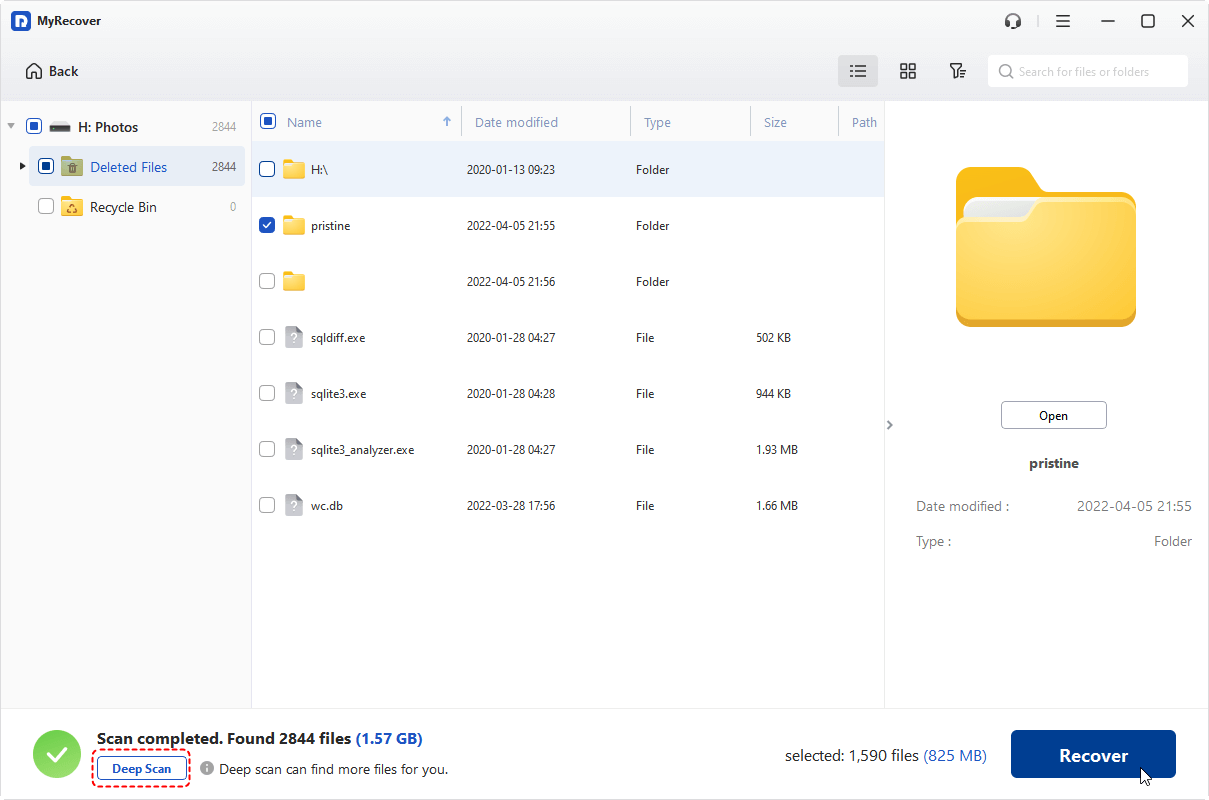
Step 4: Preview and Recover Data
After scanning, preview the recoverable files. Select the ones you want and click "Recover" to save them to a safe location.
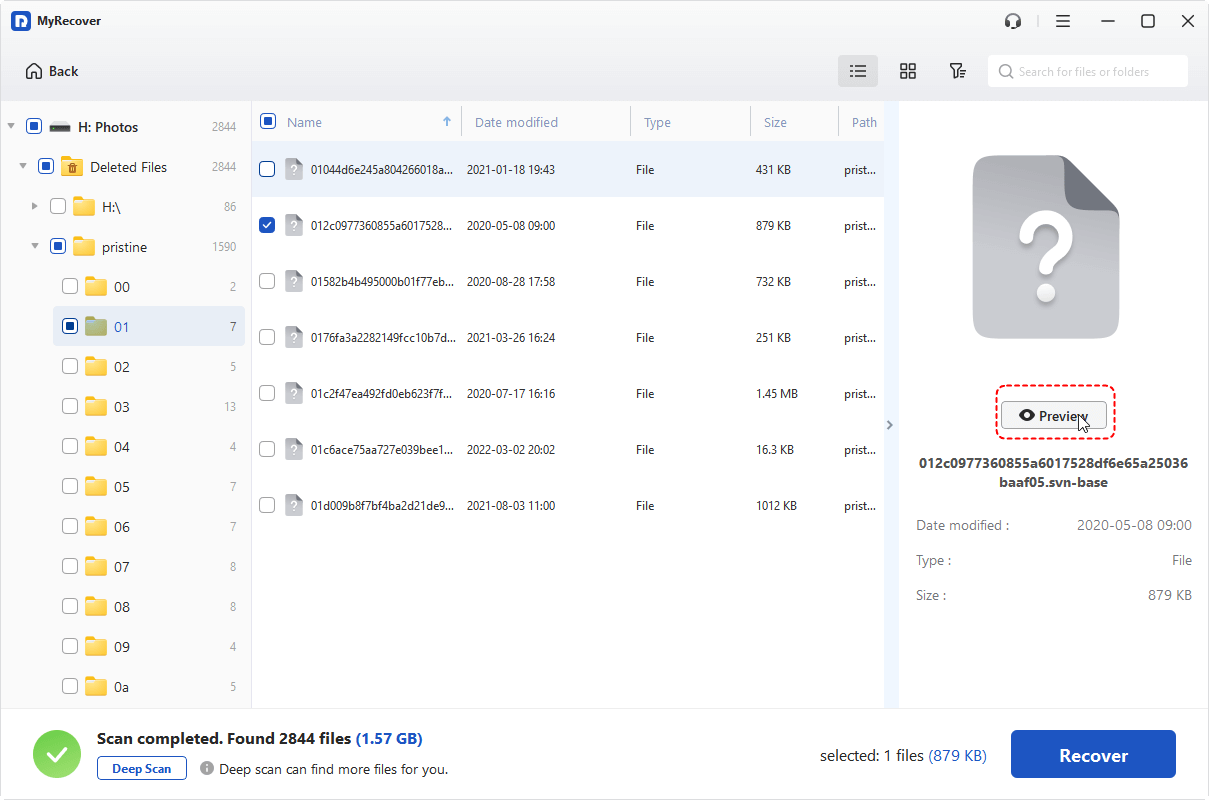
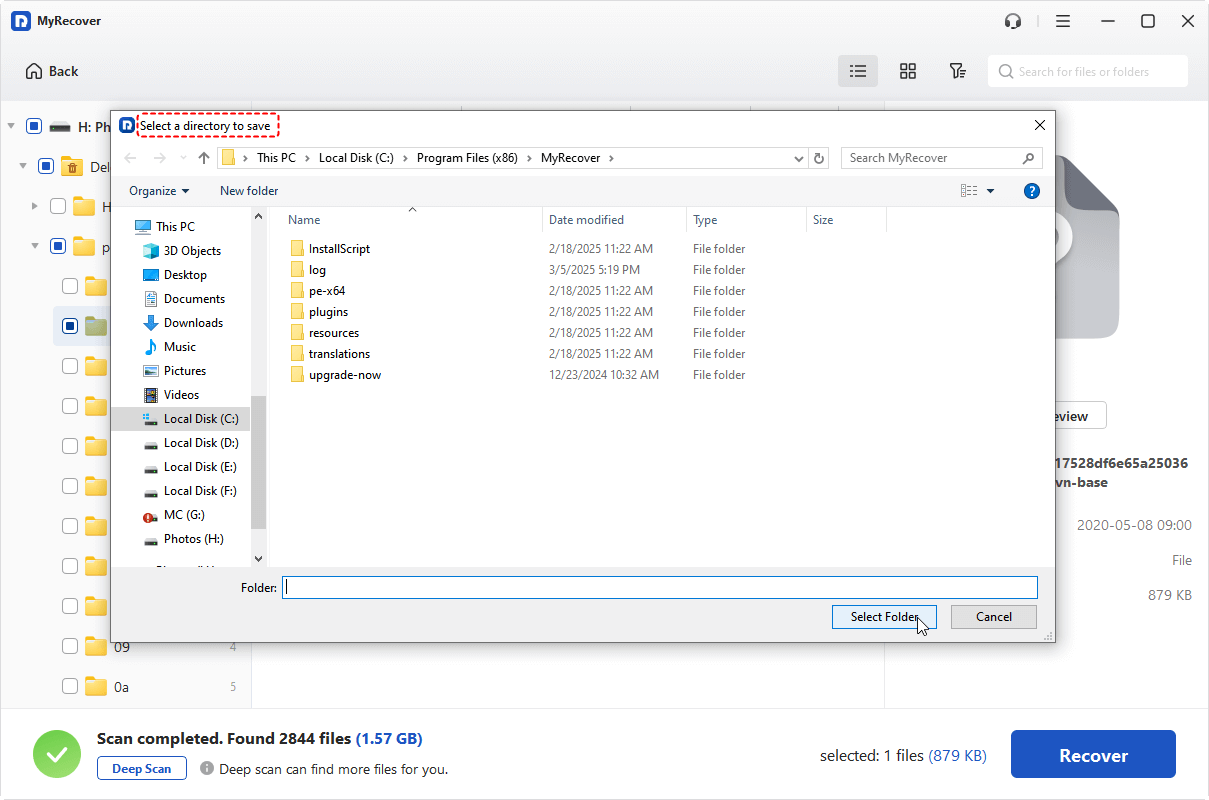
In addition to removable media data recovery, MyRecover can also be used to perform partition data recovery, such as recovering an accidentally deleted boot partition on Windows 11/10/8.
Software can work miracles, but it depends on the data still physically existing on the drive. If the drive is physically destroyed or the data has been overwritten, your only remaining option is your redundancy plan.
Method 5. Restore from Backups (The Redundancy Approach)
This is the most reliable method if you have a "Point-in-Time" copy of your data. It relies on data redundancy. If the primary version on the USB is gone, you pull the secondary version from a secure location.
1. Identify Your Backup Source:
- Cloud services (Google Drive, Dropbox, OneDrive, iCloud).
- Local backups (an external hard drive or NAS).
2. Access the Backup: Log in to your cloud storage account or connect your backup drive.
3. Locate the Files: Search for the filenames or browse the folders.
4. Restore or Download Files:
- Cloud: Select the files and click Download.
- Local drive: Copy the files back to your main device or removable media.
Conclusion
Data loss on removable media is a high-stakes situation, but it’s rarely permanent. By starting with logical repairs like CMD, checking your backups, and finally utilizing a specialized tool like MyRecover, you have a high statistical chance of success. The key is to stop writing new data to the device immediately. Act fast, use the right tools, and you’ll have your precious files back in no time.
Frequently Asked Questions (FAQ)
1. Why does my computer ask me to "format the disk" as soon as I plug in my USB?
This usually happens when the "File System" (the map of your data) is corrupted. The data is often still there, but Windows can't read the map. Do not format it. Instead, use MyRecover to scan the drive; it can often bypass the corrupted map and extract the files directly.
2. Can I recover files from a USB drive that is physically broken or bent?
If the green circuit board (PCB) or the connector is snapped, software cannot help. You will need a professional hardware data recovery service that can perform "Chip-off" recovery, where they desolder the memory chip and read it in a specialized programmer.
3. Does "Quick Format" erase all my data on an SD card?
No. A Quick Format only deletes the "index" of the files. The actual data remains on the card until it is overwritten by new photos or files. This is why you should stop using the card immediately to maximize recovery success.
4. Is it possible to recover overwriten data on a flash drive?
Generally, no. Once a specific "cell" in flash memory is written over with new data, the old electrons are gone. This is why it is vital to perform recovery with MyRecover as soon as you notice the loss.
5. Can I use MyRecover on a MicroSD card from an Android phone?
Yes, provided you connect the card to a PC using a card reader. If the card was formatted as "Portable Storage," MyRecover can easily scan and retrieve photos, videos, and documents. If it was "Internal/Encrypted Storage," recovery is much more complex.
6. Is there a way to prevent data loss from your removable media in the future?
Here’s how to protect your removable media going forward.
- ⭐Regular Backups: Make backing up to cloud storage or another drive a habit. It’s the simplest insurance policy against data loss.
- ⭐Safely Removing Devices: Always eject your devices before unplugging them. It takes seconds but saves hours of frustration.
- ⭐Using Reliable Antivirus Programs: Keep malware at bay by running reputable antivirus software. This stops infections before they corrupt your files.

Stay Updated With Our
Latest Tips
Add us as a preferred source on Google to never miss helpful guides.
 Add as preferred source >>