
Size of Recycle Bin Windows 11: How to Check & Adjust It Easily
The Recycle Bin in Windows 11 is an essential feature that temporarily stores deleted files, but over time, it can take up a significant amount of disk space. You’ll learn how to view the current capacity, change the maximum size, and manage settings to avoid data overflow. We also cover how to recover files from the Recycle Bin if you’ve deleted them accidentally, ensuring that your data remains safe.
By Aria / Updated on January 4, 2026
Introduction
How to view total size of items deleted in recycle bin?
In recycle bin I can see the folders and sizes of individual folders in detail view. But when I select more than two folders, I cannot see the combined folder or file size of both. The preview pane is useless as it does not show the size of recycle bin items, just the size of currently selected item in the bin. Is there a way to view total size of multiple selected items in recycle bin?
- Question from Tabibitho
The Recycle Bin is an indispensable feature on Windows, as it can temporarily store all deleted files in the system. If you regret deleting a file, you can restore it to its original location from the Recycle Bin. However, as you use your computer more and more, the volume of deleted data keeps growing, and the size of Recycle Bin will soon be full.
Therefore, many users find themselves needing to monitor the size of Recycle Bin to ensure that disk space is not excessively occupied by deleted files. This is particularly useful when you're running low on disk space or want to ensure that you're not unknowingly storing too large files in Recycle Bin. Fortunately, checking and adjusting the size of Recycle Bin is quite simple, and there are multiple ways to do it depending on your preferences and the tools you prefer using.
How to Check the Size of the Recycle Bin in Windows 11
If you're using Windows 11, checking the size of the items stored in the Recycle Bin is an easy task. There are two methods to help you check the size of Recycle Bin on Windows 11 or 10.
Using Recycle Bin Properties
The Recycle Bin properties page allows you to see the current size and set limits for the Recycle Bin. This will give you a quick overview of the storage consumed by deleted items in your Recycle Bin. Here's how you can access it:
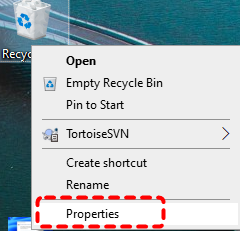
Step 1. Right click on the Recycle Bin on your desktop and select "Properties".
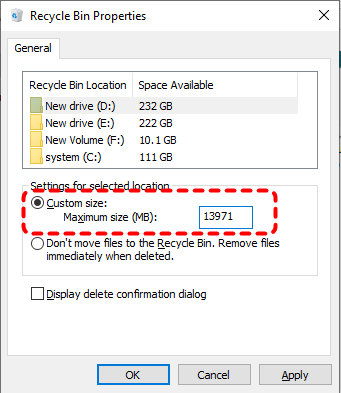
Step 2. In the Recycle Bin Properties window, you will see the currently maximum size of the Recycle Bin under the "General" tab. You can adjust the size of the Recycle Bin here if needed.
Using Disk Cleanup
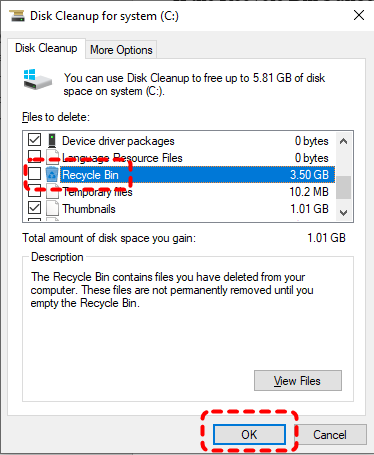
Another way to check and manage the size of the Recycle Bin is through the Disk Cleanup utility. The utility will calculate how much space can be freed up on your drive. Look for Recycle Bin in the list of files, and it will show the amount of space being occupied by deleted files.
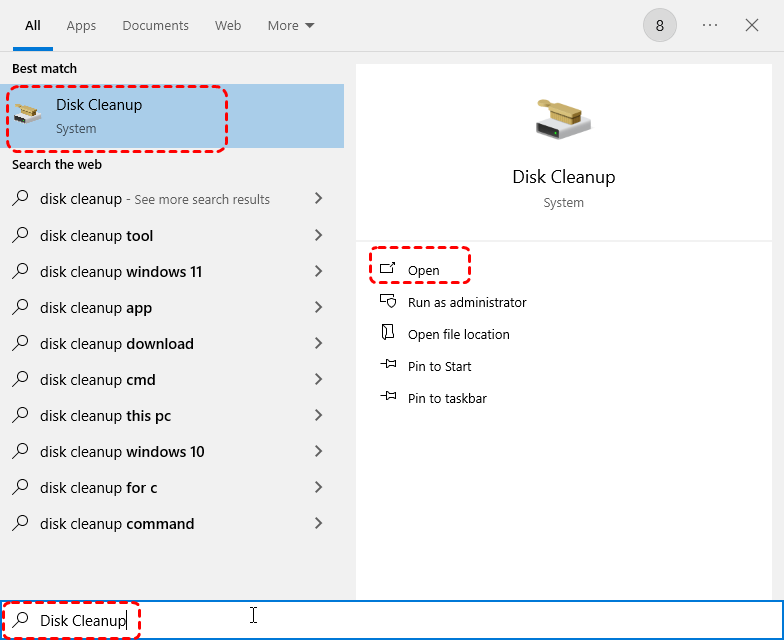
Step 1. Input "Disk Cleanup" in the Start menu and open it.
Step 2. Select the drive for which you want to check the Recycle Bin size.
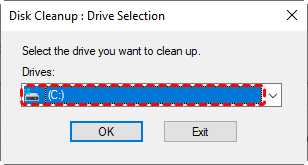
Step 3. Scroll down and locate the Recycle Bin option, then you can see the size of Recycle Bin.
How to Adjust the Size of the Recycle Bin in Windows 11
You may want to change the size of Recycle Bin if the Recycle Bin is taking up too much space or if you need to allocate more space for deleted files. Windows 11 provides several options to adjust the maximum size of the Recycle Bin. Let's explore them one by one.
Change from Recycle Bin Properties
As mentioned above, you can adjust the maximum size of Recycle Bin in "Properties". Here's how:
Step 1. Open the Recycle Bin Properties window as previously.
Step 2. Under the "Settings for selected location", select "Custom size" and enter the desired Recycle Bin reserved space (MB) in the "Maximum size" input box (1024 MB = 1 GB). The system-recommended size is usually about 5% to 10% of the total size of the partition.
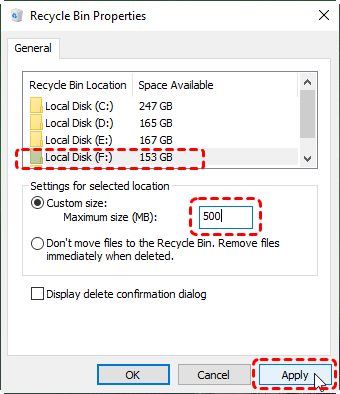
Step 3. You can also choose to permanently delete files instead of moving them to the Recycle Bin.
Step 4. Click "Apply" and "OK" to save the changes.
Change Maximum Size for Recycle Bin in Registry Editor
Additionally, advanced users can adjust the Recycle Bin’s storage capacity by modifying the Windows Registry Editor. Modifying the registry can have unintended consequences, so make sure you back up your registry settings before making any changes.
Step 1. Press "Win" + "X" and choose "Windows PowerShell (Admin)" to open it.

Step 2. Enter the following command "Get-CimInstance Win32_Volume | Format-List DriveLetter, DeviceID" to list all of the drives and the device ID GUID.
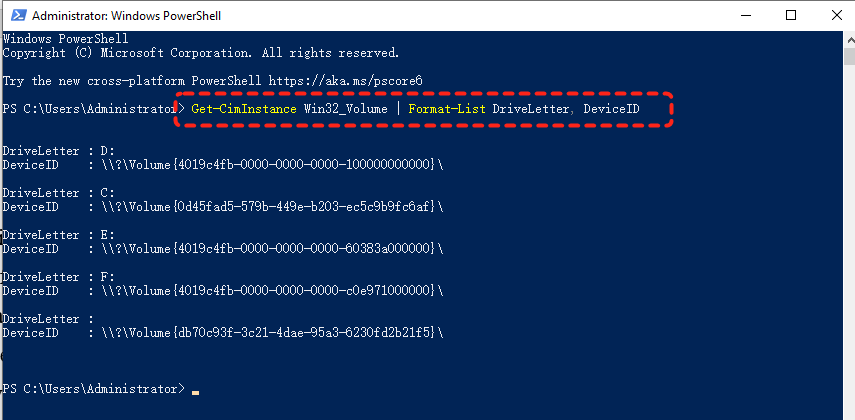
Step 3. Make note of the DeviceID GUID (such as "{f91b62c7-8867-482a-9ca4-f071e53cc9b2}") that matches the drive letter (like "C:") for which you want to change the maximum size of its Recycle Bin.
Step 4. Press "Win" + "R" to open Run dialog, type "regedit" and press "Enter" key to open Registry Editor.
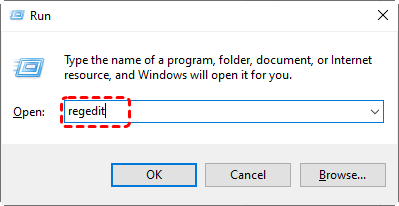
Step 5. Navigate to the following path:
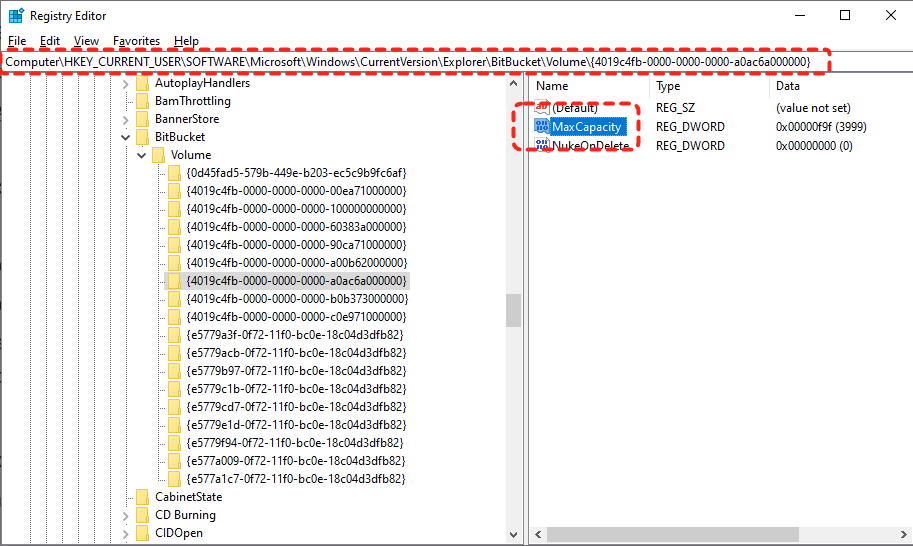
HKEY_CURRENT_USER\Software\Microsoft\Windows\CurrentVersion\Explorer\BitBucket\Volume\
Step 6. Locate the GUID of which drive you want to change the size of Recycle Bin, and double click on the "MaxCapacity" to modify it.
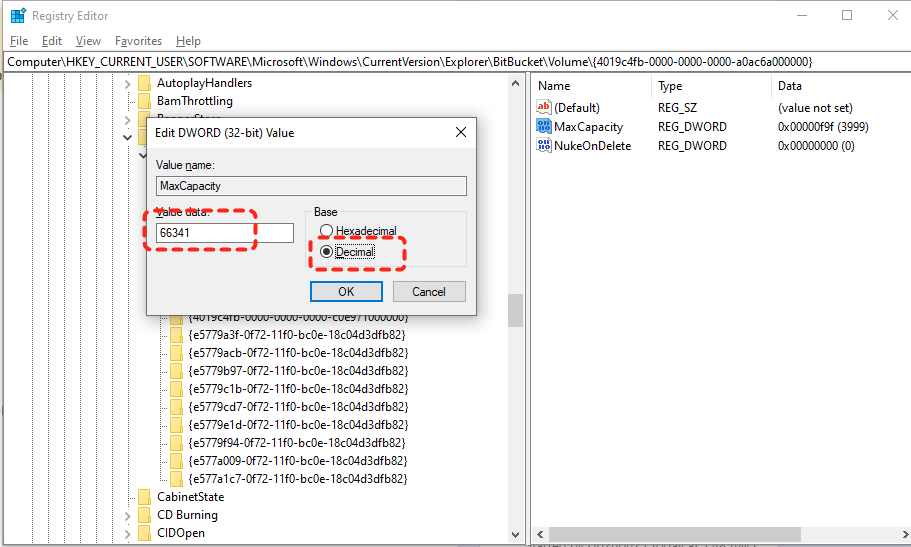
Step 7. Set the desired maximum size (MB) for your Recycle Bin in the "Value data" and select "Decimal" under "Base" section, then click "OK" to save the changes.
How to Recover Files Permanently Deleted from Recycle Bin
However, the Recycle Bin is not omnipotent. Files deleted with the "Shift" + "Delete" shortcut will not go to the Recycle Bin; instead, they will be permanently removed from your computer directly. Sometimes, files may be permanently deleted from the Recycle Bin due to mis operation when you try to restore them. Does this mean these files can never be recovered? Not at all, the professional data recovery software like MyRecover can come to the rescue.
Here are the standout features of MyRecover:
✅No Command Line Needed – Simple GUI (graphical interface) for easy file recovery.
✅Smart Filtering – Recover files by type, date, or size with precision.
✅500+ Devices Support – Recover files from all types of devices like SSD, HDD, USB flash drive, SD card, cameras, game console drives and more.
✅Handle 500+ Data Loss Scenarios – Recover from deleted partition, formatted hard drive, emptied Recycle Bin, system crash, virus attack, etc.
✅Supports over 1,000 file types – Including documents, photos, videos, audio, archives, and Outlook data files.
✅OS Compatibility – Work not only on Windows 11 /10, but also on Windows 8.1/ 8/ 7 and all Servers.
Step 1. Download and install MyRecover on your computer from Microsoft Store, avoid installing it on the drive with lost files.
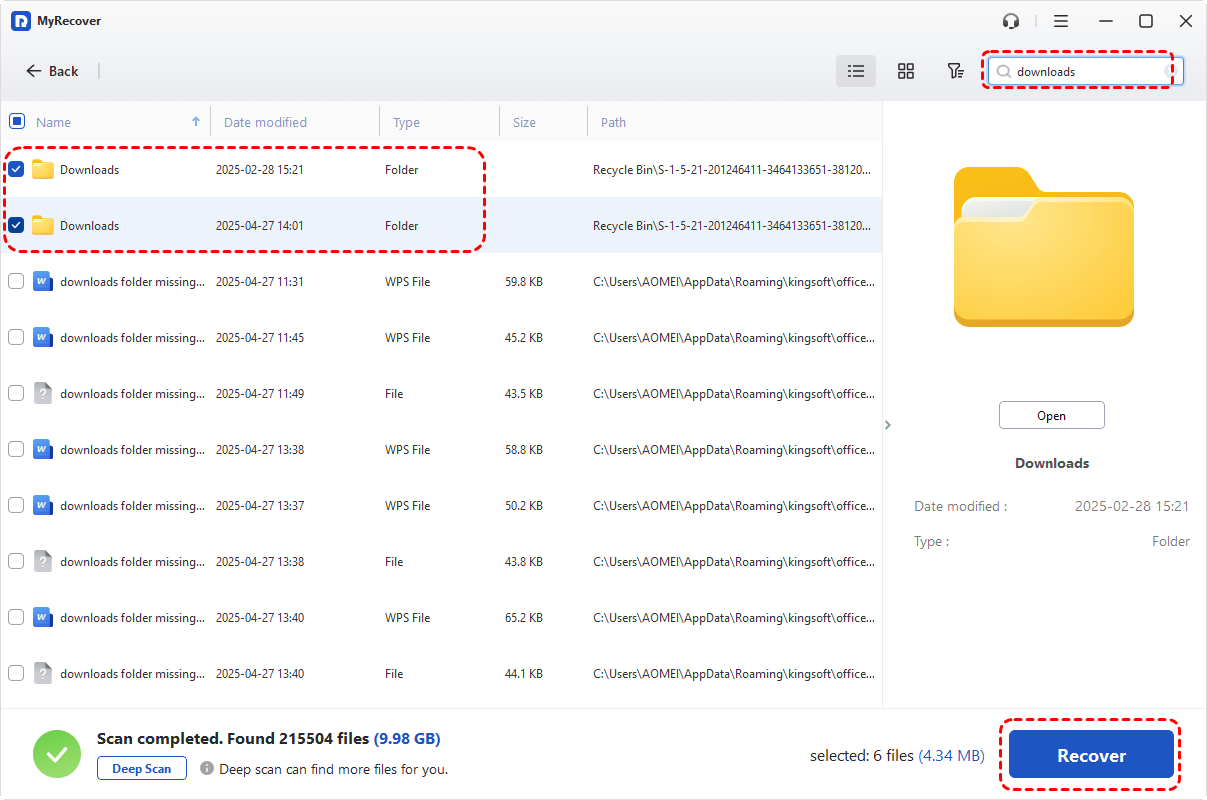
Step 2. Run the app and select the drive to scan for lost files, then click "Scan".

Step 3. After the scan finishes, choose the files you wish to recover from the recoverable lists and click "Recover" to get them back.
MyRecover Free offers up to 500MB of data recovery at no charge, perfect for small recoveries. If you're looking for unlimited recovery, real-time file previews, and the capability to recover data from a system that won’t boot, MyRecover Professional edition gives you everything you need to ensure your data is safe.
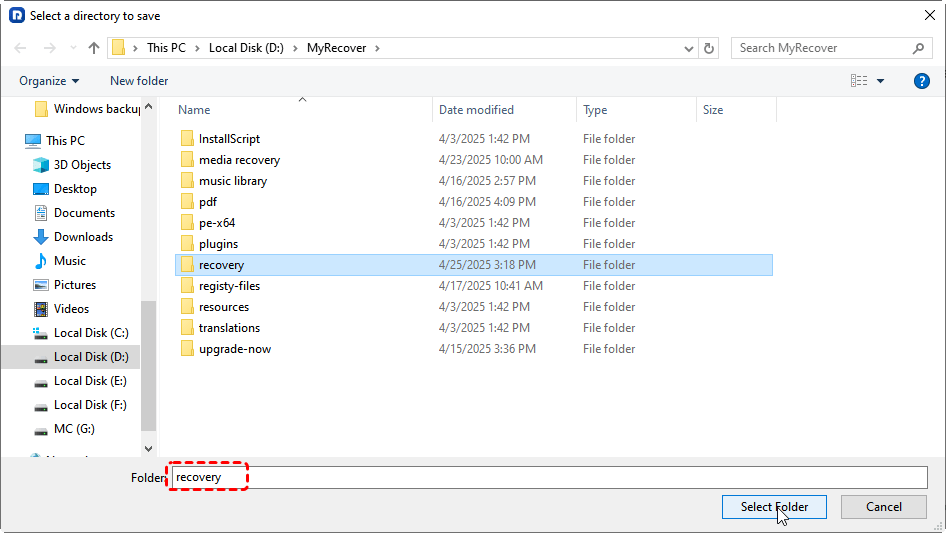
Step 4. Select a safe location to save the recovered files.
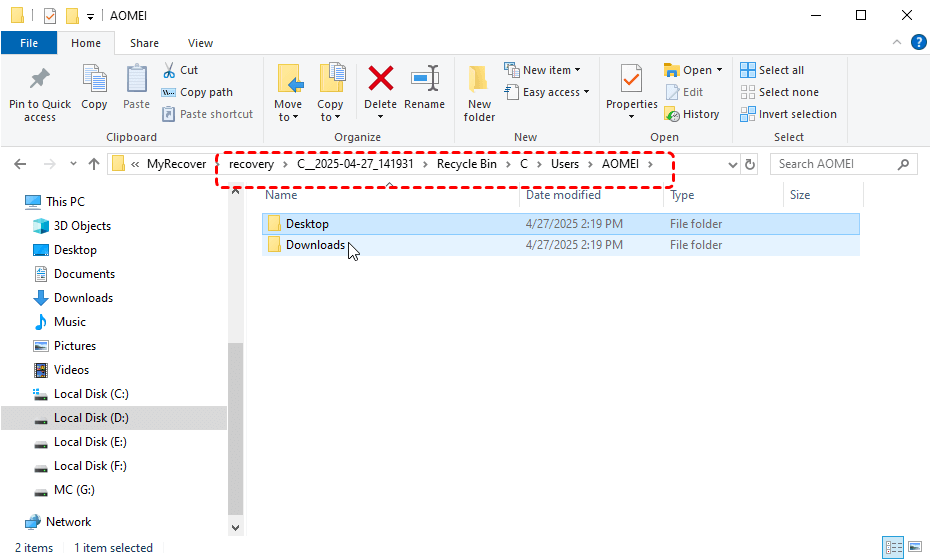
Once the process is done, the message "Files have been recovered successfully" will pop up. Then, you can check the recovered files by clicking on the destination folder path or "Browse" button.
Conclusion
By this point, you should now know how to check and modify the size of the Recycle Bin. This can help you manage your disk space more efficiently. By using the methods outlined above, you can keep your Recycle Bin in check and recover deleted files when needed.
For those who need to recover files that are permanently deleted or lost, MyRecover is a reliable and effective tool to get your data back. Whether it's from the Recycle Bin, a formatted drive, or even a corrupted USB, MyRecover ensures you can recover important files with ease.


Stay Updated With Our
Latest Tips
Add us as a preferred source on Google to never miss helpful guides.