
10 Fixes: The Requested Operation Was Unsuccessful Code 10
"The requested operation was unsuccessful" signals driver or hardware conflicts. This article tackles the error with registry fixes and driver rollbacks, helping you diagnose corrupted drivers versus a failing USB controller for an immediate solution.
By Delores / Updated on March 16, 2026
The Requested Operation Was Unsuccessful!
My Wi-Fi driver cannot start with a Code 10 and then a Code 45, and I keep getting a "Please wait" screen when I boot up my PC.
I cannot use my Wi-Fi for some reason. I'm getting the following errors in Device Manager with my Wi-Fi adapter: "This device cannot start. (Code 10){Operation Failed} The requested operation was unsuccessful." and then "Currently, this hardware device is connected to the computer (Code 45). To fix this problem, reconnect the hardware device to the computer." once I restart my PC. This is a built-in Wi-Fi adapter because I have an ASUS TUF GAMING B650 PLUS.
I also keep getting a black screen with a spinning loading circle and then a blue screen that says "Please wait" with another loading circle whenever I start up my PC. This did not happen before, and it makes the startup take longer.
- Question from learn.microsoft.com
If you’ve landed here, you might be dealing with the same frustrating error: "This device cannot start. (Code 10) {Operation Failed} The requested operation was unsuccessful." Don't worry, you are in the right place.
We’ll figure out why Windows generates this error, how to restore normal functionality, and—crucially—how to save your data if things go wrong. By the time we’re done, you’ll be equipped to tackle this error head-on, whether it involves a malfunctioning USB port or a Wi-Fi adapter that has stopped working.
About “The Requested Operation Was Unsuccessful” Error
So, what exactly does it mean? In fact, it indicates that Windows could not complete a specific action involving your hardware. You instructed the system to perform a task, such as accessing a USB drive or initializing a network card, and while Windows attempted to execute the command, the connected device failed to respond as expected.
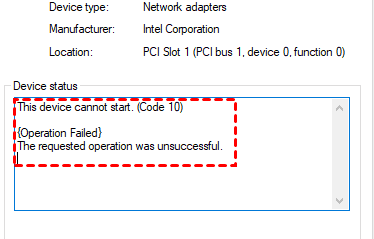
You will typically encounter this message in Device Manager. When a device is experiencing issues, a small yellow triangle appears next to it. Opening the device's properties and viewing the "Device status" field usually shows the text "The requested operation was unsuccessful," often accompanied by a "Code 10" or "Code 43" reference.
It can occur across various categories:
- USB devices: Flash drives, external hard drives, printers, and similar peripherals.
- Network adapters: Both integrated Wi-Fi cards and Ethernet ports.
- Audio devices: Sound cards, headsets, or speakers.
- Bluetooth hardware: Wireless accessories like earbuds or mice.
Reasons for The Requested Operation Was Unsuccessful
Before fixing the error, it helps to understand what causes it. The "requested operation was unsuccessful" message usually comes from one of three sources.
- Driver Corruption. When you see operation failed, the requested operation was unsuccessful, this specific code points to a low-level driver failure. It means the driver software crashed or became corrupted.
- Power Management in USB Errors. Windows sometimes disables USB ports to save power by suspending the "Root Hub". When you connect a device, the system fails to reactivate the port properly, triggering this error.
- System File Corruption. Core system files can become damaged after a bad update or improper shutdown.
10 Fixes for Operation Failed: The Requested Operation Was Unsuccessful
Way 1. Diagnose Event Viewer for Specific Failure Points
Windows maintains detailed logs of system events through a tool called Event Viewer. To access it:
1. Type "Event Viewer" in the Start menu search bar.
2. Navigate to "Windows Logs" followed by "System".
3. Look for error entries marked with red icons that correspond to the time you connected your device.
4. These logs often identify the specific driver that failed, allowing you to target your troubleshooting efforts more precisely.
Way 2. Reinstall and Update the Universal Serial Bus Controllers
Windows manages all your USB ports through something called "controllers." Sometimes, they just need a kick.
1. Press Windows + X and select Device Manager.
2. Scroll down and expand the category Universal Serial Bus controllers.
3. You’ll see several entries like "USB Root Hub" and "Generic USB Hub." Right-click on each one and select Uninstall device.
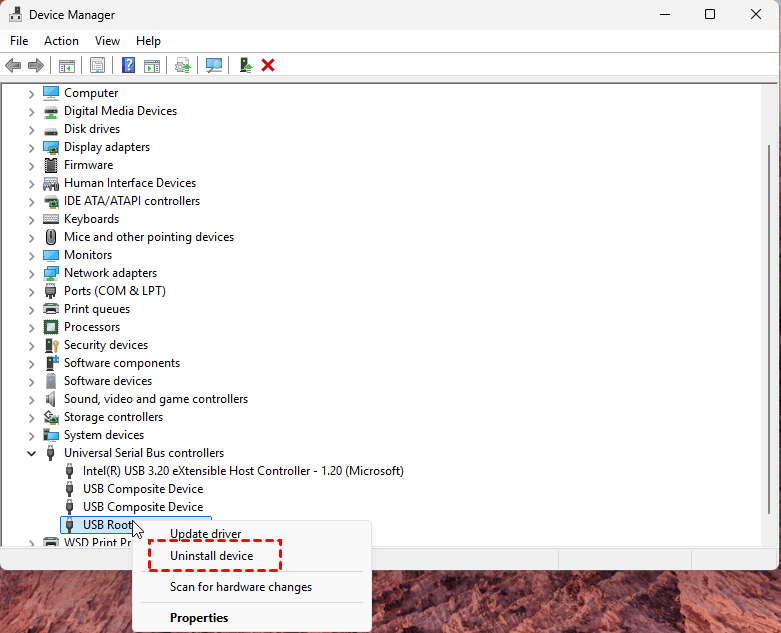
4. Then click Action at the top of Device Manager, and choose Scan for hardware changes.
Windows will immediately rescan and reinstall all those controllers fresh.
Way 3. Disable USB Selective Suspend to Prevent Power Drops
This is especially effective for laptops.
1. Open the Control Panel (type it in the Start menu).
2. Go to Hardware and Sound > Power Options.
3. Next to your selected power plan, click Change plan settings.
4. Then, click Change advanced power settings.
5. In the new window, scroll down to USB settings > USB selective suspend setting.
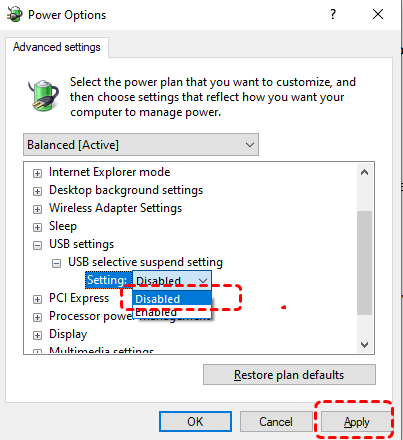
6. Set it to Disabled for both "On battery" and "Plugged in", and click Apply and OK.
Way 4. Check for Hidden Devices That Cause Conflicts
Sometimes, old drivers for devices you don’t even use anymore can cause conflicts. Uninstall them manually:
1. In Device Manager, click on View in the top menu and select Show hidden devices.
2. Expand "Universal Serial Bus controllers" or "Disk drives" again. You might now see grayed-out entries for devices you’ve unplugged in the past.
3. Right-click and uninstall any grayed-out or old entries that look suspicious.

Way 5. Adjust the Network Adapter Power Management Settings
Just like with USB, Windows loves to turn off your Wi-Fi to save power. The problem is, sometimes it forgets to turn it back on.
1. Open Device Manager.
2. Expand Network adapters.
3. Find your wireless adapter (it will have words like "Wireless," "Wi-Fi," or "WLAN" in the name).
4. Right-click it and select Properties.
5. Go to the Power Management tab.
6. Uncheck the box that says "Allow the computer to turn off this device to save power".
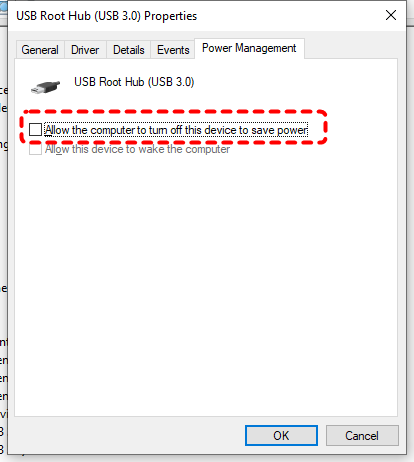
7. Click OK.
Way 6. Flush DNS and Reset TCP/IP Stack for Connectivity
If the adapter is working but still acting up, let’s reset the network settings.
1. Open Command Prompt as an administrator (right-click Start > Windows Terminal (Admin)).
2. Then, run these commands one by one, hitting Enter after each:
ipconfig /flushdns (This clears the DNS cache).
netsh int ip reset
netsh winsock reset
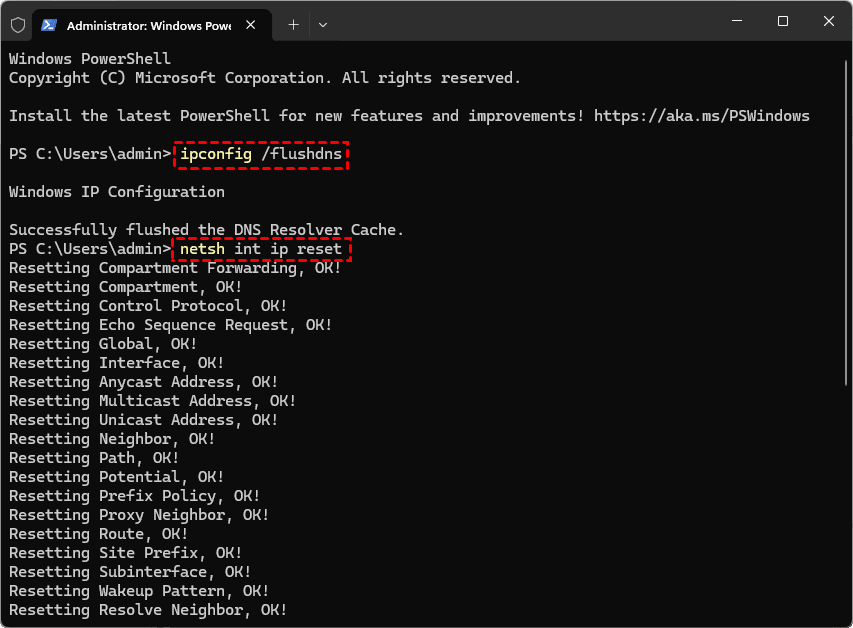
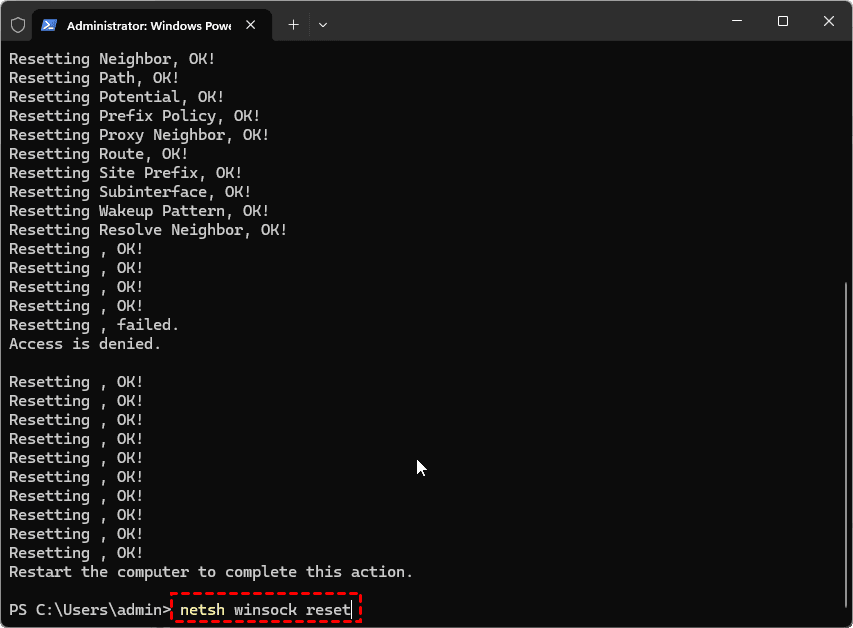
These commands tell your network settings to take a chill pill and start over. After running them, restart your PC.
Way 7. Manually Install Older WiFi Drivers for Windows 11
Sometimes, rolling back the driver can fix the problem.
1. Go back to your network adapter’s Properties in Device Manager.
2. Click the Driver tab.
3. If the Roll Back Driver button is available, click it. This reverts to the previous version that worked.
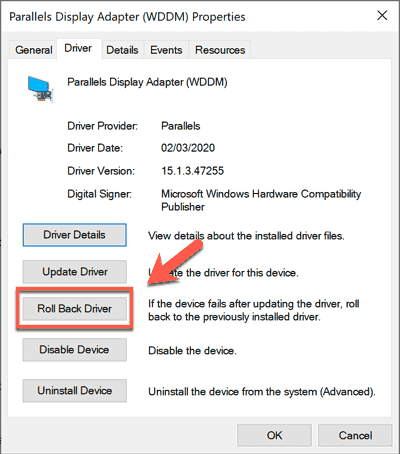
If it’s grayed out, you might need to visit your laptop manufacturer’s support site (like Dell, HP, or Lenovo) and download an older driver specifically made for Windows 11.
Way 8. Use the Command Line to Fix Corrupted System Files
If drivers aren’t the problem, maybe Windows itself is sick. We can fix that using SFC and DISM commands.
1. Open Command Prompt as an administrator.
2. First, let’s fix the image that Windows uses to repair itself. Type:
DISM /Online /Cleanup-Image /RestoreHealth and press Enter.
This tool scans and fixes component store corruption. It might take 15-20 minutes.
3. Once that’s done, run the System File Checker:
sfc /scannow
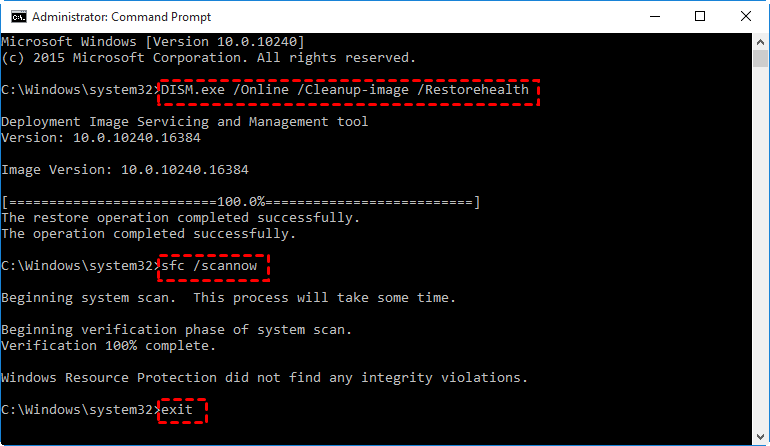
The SFC tool will scan all protected system files and replace corrupted ones with a cached copy.
Way 9. Perform a Clean Boot to Isolate Software Conflicts
Sometimes, third-party software—especially antivirus programs or VPNs—can interfere with hardware. A clean boot starts Windows with a minimal set of drivers and startup programs, helping you isolate the conflict.
1. Press Windows + R, type msconfig, and hit Enter.
2. On the Services tab, check "Hide all Microsoft services" then click Disable all. This turns off third-party services.
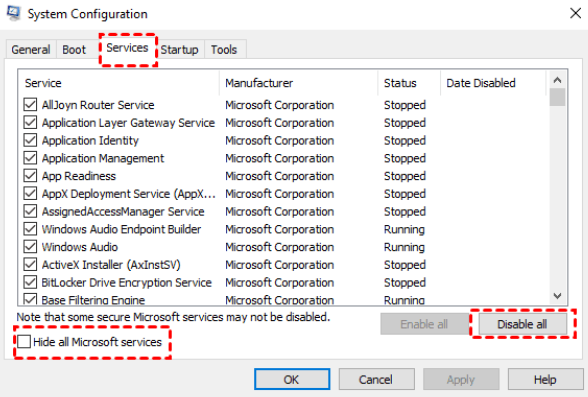
3. Go to the Startup tab and open Task Manager. Disable all startup items.
4. Close Task Manager, click OK, and restart.
If the error disappears in this clean boot state, you know a background program was the culprit. You can then slowly re-enable services until you find the culprit.
Way 10. Edit the Registry to Remove Obsolete Device Entries
The Windows Registry is a database that holds low-level settings for the OS and your devices. Sometimes, old filter drivers get stuck in there.
⚠️ Warning: Messing up the registry can break Windows. Back it up first (File > Export in Registry Editor).
1. Press Windows + R, type regedit, and hit Enter.
2. Navigate to this path:
HKEY_LOCAL_MACHINE\SYSTEM\CurrentControlSet\Control\Class
3. Under "Class", you’ll see folders with long, weird names (GUIDs). Each represents a type of device.
4. Find the one for your problematic device. For USB issues, you’re looking for the USB GUID. A quick Google search for "Device Manager GUID list" can help.
5. In the right pane, look for entries named UpperFilters or LowerFilters. If they exist, right-click and delete them.
Recover Files from the Drive That Blocks Access
What if the device showing this error has your vacation photos or that big work presentation? You can’t access the files because Windows won’t even recognize the drive. Don’t panic. There’s still hope, and it comes in the form of data recovery software like MyRecover.
Even if a device shows the requested operation was unsuccessful, the data is often still physically on the drive. MyRecover is designed to bypass the broken Windows drivers and talk directly to the hardware.
Key Features of MyRecover:
- User-Friendly Interface.
- Deep Scan Capability.
- Wide Compatibility (1000+ formats & 500+ devices).
- Preview Before Recovery.
Here are the steps for recovering files from the drive that blocks access with MyRecover:
1. Please download and install MyRecover on your computer. Connect your device if it’s external.
2. Run MyRecover, tap Disk Data Recovery, or USB/SD Card Recovery, and hit Scan while hovering over the drive. Wait for the process to complete.

3. Preview and choose the files you need, and hit Recover.
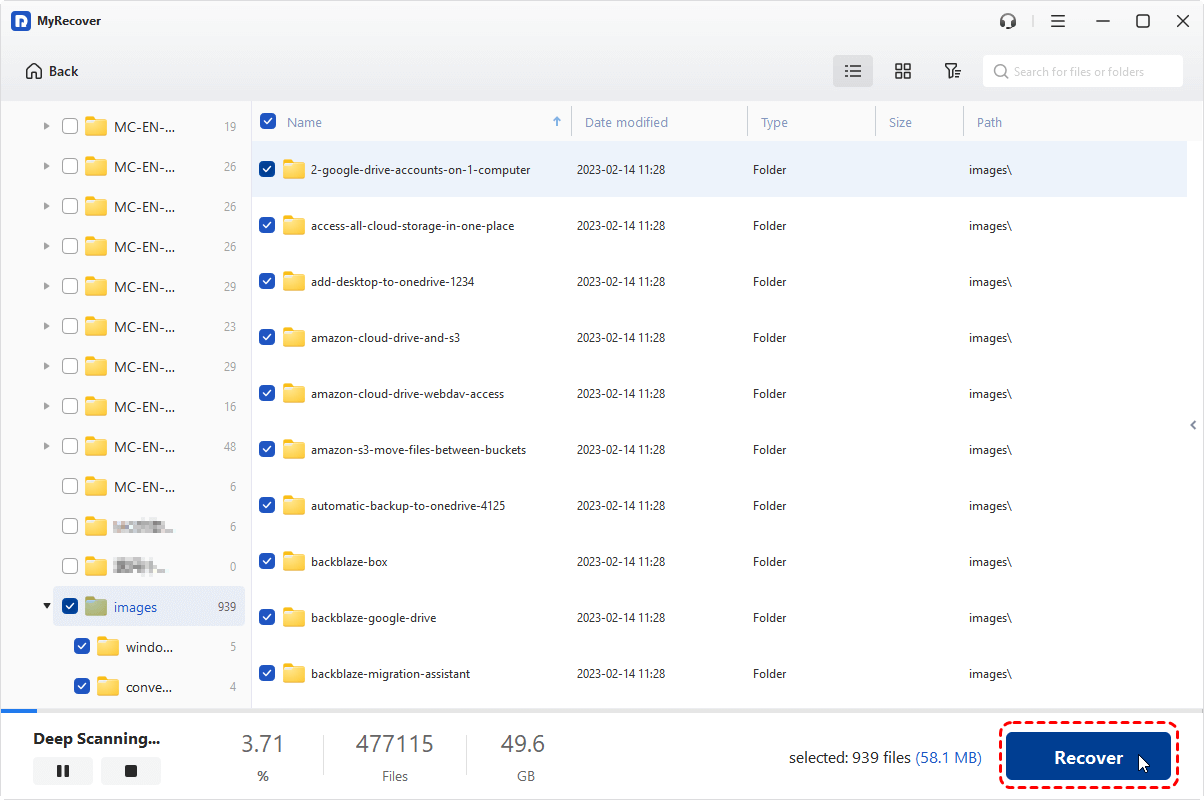
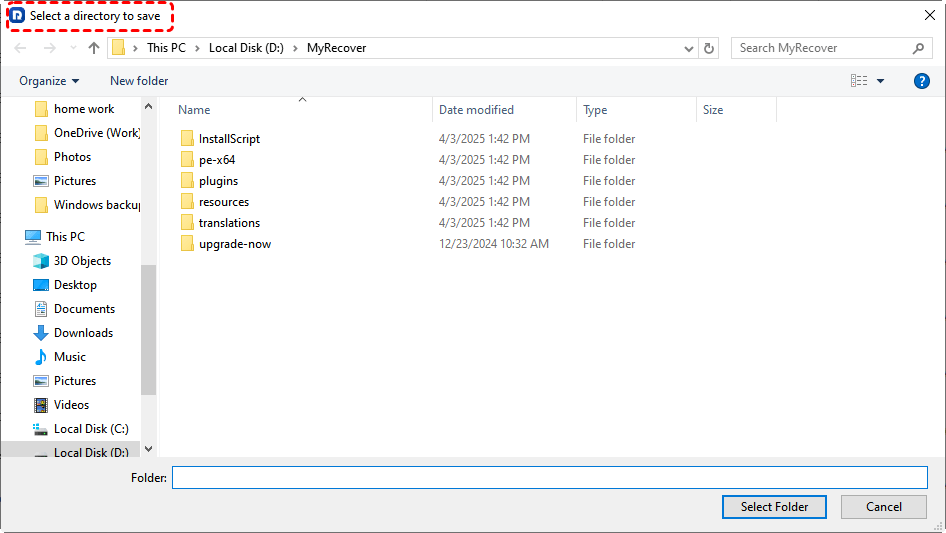
4. Opt for a new location and hit Select Folder to save them.
- Notes:✎...
- After the quick scan, MyRecover automatically proceeds to a Deep Scan. It scans every sector of the drive for recoverable data. This can take a while, depending on the drive size.
- Once the scan is done, you can filter the results by type (Pictures, Videos, Documents, etc.). Besides, you can also search the files by file name, size, modified date, extension, etc.
- Double-click on a file to preview it. Make sure your vacation video actually plays.

- Recover Deleted Files Easily with Simple Clicks
- 1000+ File Formats Supported
- Support HDD, SSD, External Hard Drive, USB Drive, SD Card, etc.
- Quickly Find Files Using File Types, Name, Size, etc.
- Preview Files Before Recovering
- Recover Unlimited Data
FAQs About The Requested Operation Was Unsuccessful
What does "the requested operation was unsuccessful" mean?
It means a connected hardware device failed to respond properly. Windows tried to communicate with it, but the device didn't answer due to driver issues, power settings, or corrupted files.
How do I fix "the requested operation was unsuccessful" Code 10?
Uninstall and reinstall the drivers. Open Device Manager, right-click the device with the yellow exclamation, select "Uninstall device," then click "Scan for hardware changes." Also, disable USB selective suspend in power settings.
Can a virus cause this error?
Yes. Malware can corrupt drivers or system files. Run a full antivirus scan, then use sfc /scannow to repair corrupted files.
Why does my USB device keep showing "This device cannot start Code 10)"?
This indicates a power or driver conflict. Uncheck "Allow the computer to turn off this device to save power" in USB Root Hub properties. If that fails, uninstall all entries under "Universal Serial Bus controllers" and restart.
Is there a way to recover data from a device showing this error?
A: Yes. Use recovery software like MyRecover. It bypasses the Windows error and reads data directly from the drive. Create a bootable USB on a working PC, boot your broken computer from it, and recover files to a safe location.
How do I fix "this device cannot start code 10 wifi windows 11"?
Update or roll back your Wi-Fi driver in Device Manager. If a recent update broke it, use "Roll Back Driver." Also, disable power-saving mode for the adapter under the Power Management tab.
Will resetting Windows fix this error?
A reset can fix it by replacing corrupted system files, but try driver and power management fixes first, as resetting is a last resort.


Stay Updated With Our
Latest Tips
Add us as a preferred source on Google to never miss helpful guides.