
How to Fix Error 0x800700df: File Size Exceeds the Limit Allowed in Windows 11/10
Encountering the 0x800700df error while copying, uploading, or sharing files can be frustrating. In this guide, you’ll learn why it happens, what triggers the limitation in Windows, and practical ways to increase file size limits and resolve the issue quickly.
By Vera / Updated on July 24, 2026
What Is Error 0x800700df?
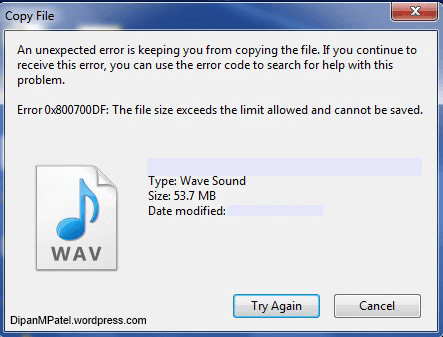
Error 0x800700df is a Windows system error that occurs when the file you are attempting to transfer exceeds the maximum allowed size configured in Windows.
This limitation typically applies to:
- Network file transfers
- WebDAV connections
- SharePoint downloads
- Mapped network drives
Think of it like a weight limit on a bridge. If the truck is heavier than the allowed limit, it cannot cross. Similarly, Windows prevents the transfer of files that exceed configured system limits.
>> Learn about other Windows system errors:
Why the 0x800700df Error Occurs: Understanding the "Safety Cap"
Understanding the root cause of the 0x800700df error makes troubleshooting much easier. This isn't a hardware failure; it is a configuration conflict
- 👉WebDAV Protocol Constraints: The most common culprit is the WebDAV (Web Distributed Authoring and Versioning) client. By default, Windows sets a file size limit of approximately 50 MB for WebDAV transfers to protect the system from being overwhelmed by massive web-based data packets.
- 👉Registry Configuration Limits: The "50 MB" rule is written directly into the Windows Registry. Even if your network speed is lightning-fast, Windows will "refuse" any file larger than this hard-coded value.
- 👉Server-Side Restrictions: In environments like SharePoint or corporate NAS drives, the server administrator may have set a maximum upload/download limit that clashes with your local Windows settings.
- 👉Interrupted Data Packets: Sometimes, a temporary spike in network latency causes the system to miscalculate the file size, triggering the 0x800700df error as a false positive.
Common Scenarios Where Error 0x800700df Appears
- ⭕Copying Files from a Mapped Network Drive: Pulling a 1GB video from a workplace server to your local desktop.
- ⭕Downloading from SharePoint: Accessing large organizational backups or high-resolution media.
- ⭕Internal Cloud Storage Syncing: Moving files through specialized enterprise cloud portals that rely on WebClient services.
How to Fix Error 0x800700df in Windows: Step-by-Step Solutions
Below are the most effective methods to resolve the issue. We start with the most permanent fix (Registry) and move toward practical workarounds.
Method 1: Increase the File Size Limit in the Windows Registry
This is the "Gold Standard" fix. It addresses the root cause by manually changing the 50MB limit to the maximum possible value (4GB). By modifying the FileSizeLimitInBytes key, we tell the Windows WebClient service to allow much larger data packets.
Use this if you frequently work with SharePoint or mapped drives and keep hitting the size wall.
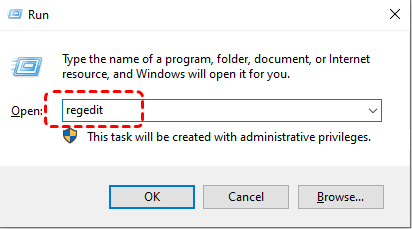
1. Press Windows + R to open the Run dialog box.
2. Type regedit, then press Enter to open the Registry Editor.
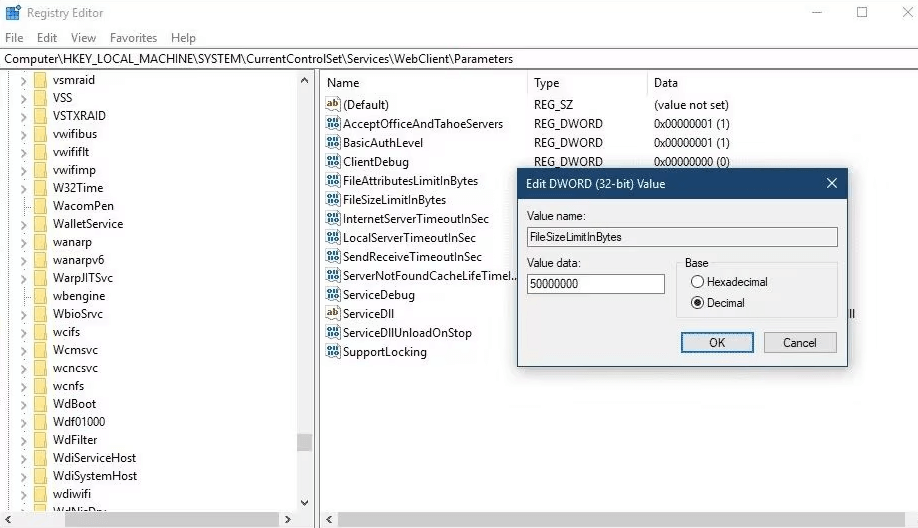
3. Navigate to the following location:
HKEY_LOCAL_MACHINE\SYSTEM\CurrentControlSet\Services\WebClient\Parameters
4. Locate the registry entry named FileSizeLimitInBytes.
5. Double-click it. Select the Decimal base.
6. Change the value to 4294967295 (This is the maximum value, roughly 4GB).
7. Click OK and Restart your computer.
Method 2: Restart the WebClient Service
Sometimes the Registry change doesn't kick in immediately, or the service itself has "frozen" while trying to process a large file. Restarting the service clears the temporary cache and re-initializes the connection parameters.
Use this if the Registry fix is already applied but the error persists, or as a quick "refresh" before trying a large transfer.
1. Press Windows + R to open the Run dialog box.
2. Type services.msc and press Enter.

3. Locate the WebClient service in the list.
4. Right-click the service and select Restart. (If it's not running, select Start).
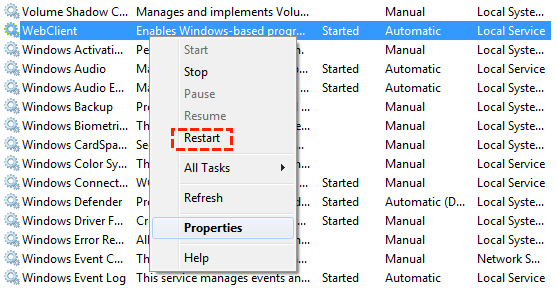
5. To ensure this doesn't happen again, double-click WebClient and change the Startup type to Automatic.
If adjusting the system settings doesn't solve the problem—perhaps due to server-side limits you cannot control—you may need to modify the file itself to "fit" through the gate.
Method 3: Compress the File Before Transfer
If a file is just slightly over the limit (e.g., 60MB when the limit is 50MB), shrinking it is the fastest solution. Compression reduces the total byte count without losing data, potentially bringing the file under the 0x800700df threshold.
Use this for documents, logs, or folders containing many small files.
1. Right-click the file or folder you want to move.
2. Select Compress to ZIP file (Windows 11) or Send to > Compressed (zipped) folder (Windows 10).

3. Attempt to transfer the resulting .zip file.
Method 4: Split the File into Smaller Segments
If the file is significantly larger than 4GB (the max Registry limit), even a Registry fix won't help. Breaking a "giant" file into several "small" pieces allows each piece to pass the 0x800700df check individually.
1. Use a tool like 7-Zip or WinRAR.
2. Right-click the file and select Add to archive...

3. Look for the "Split to volumes, bytes" option.
4. Choose a size (e.g., 1000M or 2GB) and click OK.
5. Transfer the multiple parts and "Extract" them at the destination to reassemble the original file.
Method 5: Switch to a Different Protocol (SFTP or Direct UI)
Error 0x800700df is specific to WebDAV/Mapped drives. Other protocols don't have this specific bug. Bypassing the Windows File Explorer interface bypasses the WebClient limit entirely.
- Cloud Portals: Instead of using a mapped drive, log in to the SharePoint or Cloud web interface via a browser (Chrome/Edge) and use the "Upload/Download" buttons. Browsers handle large files differently than File Explorer.
- External Media: If possible, use a physical USB 3.0 drive to move the data locally.
Data Safety: Recovering Files Lost During Failed Transfers
Sometimes, interrupted file transfers can result in missing or accidentally deleted files. For example, a failed copy operation might overwrite an existing file or leave you unable to locate the original version.
In such situations, using a professional data recovery tool can help restore lost files. One reliable option is MyRecover, a dedicated Windows data recovery tool designed to recover deleted or lost files from hard drives, SSDs, USB drives, and other storage devices.
Why MyRecover is the Best Choice for Transfer Errors:
Unlike generic recovery tools, MyRecover is optimized for the file system glitches that occur during interrupted Windows operations:

- 🌈Interrupted Transfer Recovery: Specifically designed to retrieve files that disappeared during "Cut and Paste" or "Move" operations that were halted by system errors like 0x800700df.
- 🌈Support for Large Files: It can easily reconstruct large media files (up to several TBs) that were fragmented during a failed network transfer.
- 🌈Original Format Retention: It recovers data with its original filename, path, and format, saving you hours of reorganization.
- 🌈Universal Compatibility: Works seamlessly on Windows 11/10/8/7 and supports NTFS, FAT32, and exFAT drives.
Steps to Recover Lost Files Using MyRecover
1. Download and install MyRecover on your Windows computer.
2. Launch the application.
3. Select the drive or location where the lost file was stored.
4. Click Scan to begin searching for recoverable files.
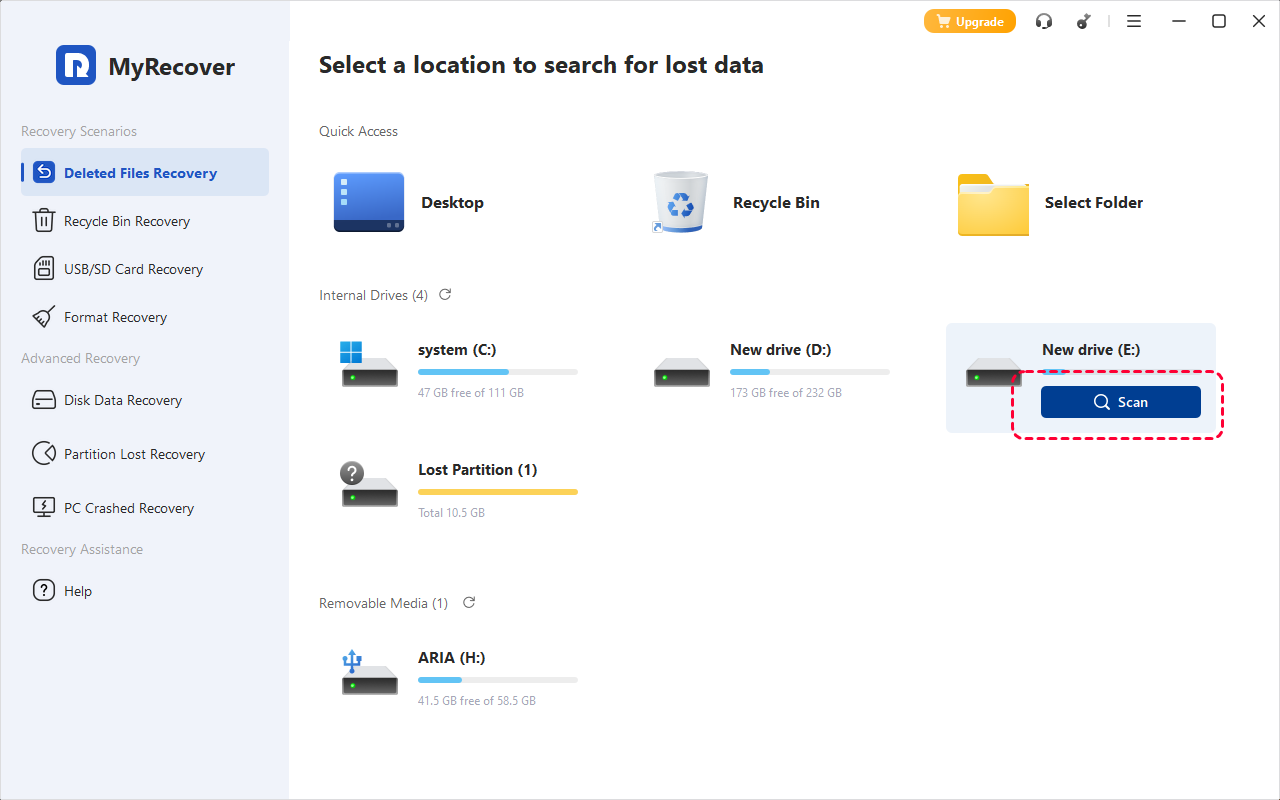
5. Review the scan results and locate the desired file.
6. Select the file and click Recover to restore it.

Using MyRecover can significantly improve the chances of retrieving files that were lost during failed transfers caused by error 0x800700df.
Conclusion
The error 0x800700df may interrupt your workflow, but it is usually caused by manageable file size limitations within Windows or network settings. By adjusting registry configurations, restarting system services, compressing files, or splitting large files into smaller segments, you can effectively resolve the problem.
Additionally, if a failed transfer results in missing files, tools like MyRecover can help recover lost data quickly and safely. With the solutions and best practices outlined in this guide, you should now be well equipped to fix error 0x800700df and handle large file transfers with confidence.
FAQ: Deep Dive into Error 0x800700df
1. Is 0x800700df the same as the FAT32 4GB limit?
No. While they feel similar, the FAT32 limit is a limitation of the disk format itself. Error 0x800700df is a software-defined limit within the Windows WebClient service. You can encounter 0x800700df even on an NTFS drive if you are using a mapped network location.
2. Why does Windows have this limit by default?
It is a security and stability measure. By limiting WebDAV transfers to 50MB, Windows prevents a malicious server or a runaway process from flooding your system memory (RAM) with massive amounts of web data, which could cause a "Denial of Service" (DoS) effect on your own PC.
3. I changed the Registry to 4GB, but my file is 10GB. What now?
The Registry value 4294967295 is the absolute maximum the WebClient service can understand (it's the limit of a 32-bit unsigned integer). For files larger than 4GB, you must use Method 4 (splitting the file) or Method 5 (using a browser/third-party FTP client).
4. Can MyRecover help if a failed transfer caused my external hard drive to become "RAW"?
Yes. When a large transfer crashes due to error 0x800700df, it can sometimes corrupt the drive's partition table, making it show as "RAW". MyRecover excels at scanning RAW partitions and extracting the data that Windows can no longer see.
5. Does this error affect USB flash drives?
Generally, no. If you are copying directly to a USB plugged into your PC, you shouldn't see this error. If you do, it’s likely you are actually copying from a network drive to the USB, and the network side is triggering the 0x800700df limit.
6. I recovered my files with MyRecover, but they won't open. Why?
This usually happens if the file was partially overwritten during the crash. When using MyRecover, ensure you use the Deep Scan feature, which looks for file signatures to reconstruct the data even if the file system directory is damaged.


Stay Updated With Our
Latest Tips
Add us as a preferred source on Google to never miss helpful guides.