
Solved: CHKDSK Cannot Continue in Read-Only Mode on Windows 10/11
Encountering the 'CHKDSK cannot continue in read-only mode' error can prevent you from fixing disk issues and accessing your files properly. This guide explains why the error appears and provides practical solutions to resolve it effectively. You’ll learn how to rerun CHKDSK with proper commands and fix drive access permissions.
By Aria / Updated on May 8, 2026
Preface
When running CHKDSK to fix disk errors, some users encounter the message "Errors found. CHKDSK cannot continue in read-only mode", which stops the repair process entirely. This often happens when trying to scan a system drive, an external disk, or a drive that is currently in use. As a result, CHKDSK can only perform a basic scan without fixing detected issues, leaving file system errors unresolved and potentially affecting system stability or data accessibility.

This error can be frustrating because it prevents you from completing essential disk repairs. In some cases, unresolved disk issues may lead to slower performance, corrupted files, or even data loss if left unaddressed. To fix the problem effectively, it’s important to understand why the "CHKDSK cannot continue in read-only mode" error pops.
Common Causes of "CHKDSK Cannot Continue in Read-Only Mode"
Knowing what prevents CHKDSK from switching from read-only mode to repair mode allows you to apply the correct solution more directly. In most cases, the issue is related to system restrictions, drive status, or incorrect command usage rather than a failure of the tool itself. Below are the most common causes:
💾 Missing repair parameters: Running CHKDSK without /f or /r only performs a read-only scan, which cannot fix detected errors.
🖍️ Drive is currently in use: If the target drive (especially the system drive) is being used by Windows or other processes, CHKDSK cannot obtain write access.
🖥️ Insufficient permissions: Running Command Prompt without administrator privileges may restrict CHKDSK from making changes to the disk.
🛡️ Write protection enabled: External drives or USB devices may be set to read-only mode, preventing any modifications.
📂 File system or disk status issues: Corrupted file systems or disk errors can sometimes lock the drive in a state where only read operations are allowed.
How to Fix "CHKDSK Cannot Continue in Read-Only Mode"
Once you understand the causes, the next step is to apply targeted fixes that allow CHKDSK to run in repair mode instead of read-only mode. The following solutions progress from basic command corrections to advanced system-level fixes, helping you systematically remove restrictions and restore full disk repair functionality.
Fix 1. Run CHKDSK with Repair Parameters
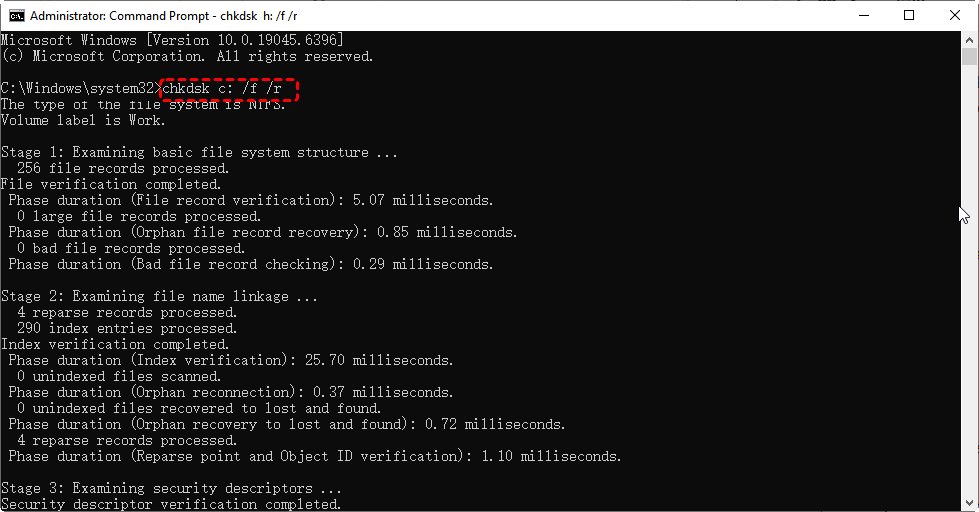
In many cases, the error occurs because CHKDSK is executed without the correct parameters. By default, CHKDSK runs in read-only mode unless you explicitly specify repair commands such as /f (fix errors) or /r (locate bad sectors). Using the correct syntax ensures that CHKDSK attempts to repair disk issues instead of only scanning.
CHKDSK /f fixes file system errors, while /r locates bad sectors and recovers readable data. /r includes /f automatically, making it more thorough but slower. Use /f for minor errors and /r when you suspect physical disk issues or data corruption for comprehensive repair.
Step 1. Type "Command Prompt" in the Start menu and right click on it, then choose "Run as administrator".

Step 2. Enter the command "CHKDSK G: /f /r" (replace G: with your actual drive letter).

Step 3. Press "Enter" and allow the scan to proceed.
Step 4. Wait for the process to complete and review the results.
Fix 2. Schedule CHKDSK on Next Restart
If the drive is currently in use (especially the system drive), CHKDSK cannot lock it for repairs. Scheduling the scan at the next restart allows Windows to run CHKDSK before the operating system fully loads, ensuring exclusive access to the disk.
Step 1. Run Command Prompt as administrator.
Step 2. Type "chkdsk C: /f /r" and press "Enter".
Step 3. When prompted, type "Y" to schedule the scan.
Step 4. Restart your computer to begin the repair process.
Fix 3. Use Elevated Command Prompt
Without administrative privileges, CHKDSK may not have sufficient permissions to modify disk structures. Running it in an elevated environment ensures full access to system-level operations and avoids permission-related restrictions.
Step 1. Locate "Command Prompt" in the Start menu, right-click it and select "Run as administrator".
Step 2. Confirm the prompt and open the elevated window.
Step 3. Re-run the CHKDSK command with repair parameters.
Fix 4. Close Active Programs Using the Drive
Open files or running programs can lock the drive and prevent CHKDSK from making changes. Closing all applications that may be accessing the drive ensures it can be scanned and repaired without interference.
Step 1. Save your work and close all running applications.
Step 2. Press "Ctrl" + "Shift" + "Esc" to open Task Manager and end the tasks that may be using the target drive.
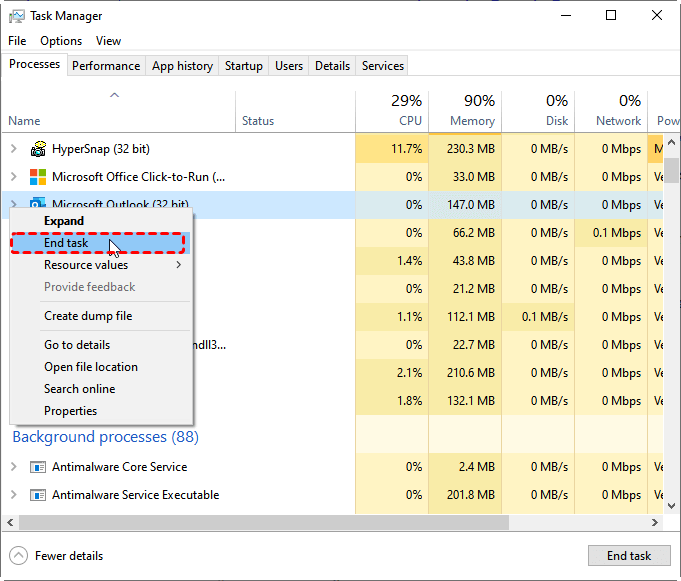
Step 3. Run CHKDSK again to check if the "CHKDSK cannot continue in read-only mode" error is resolved.
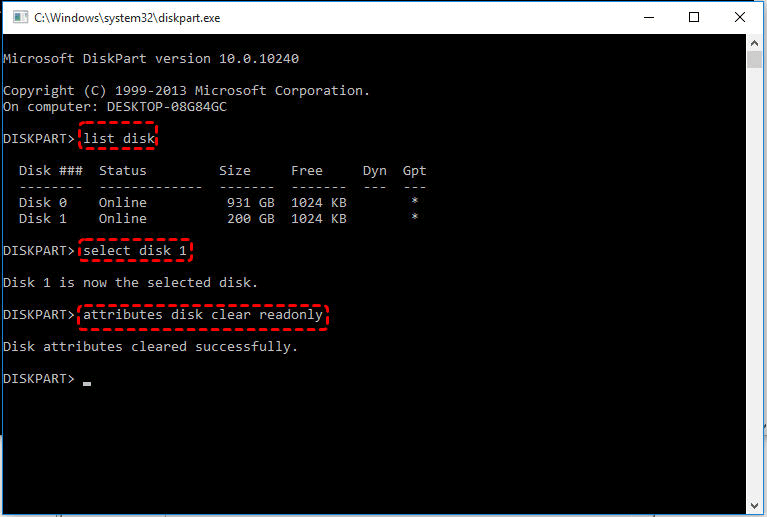
Fix 5. Remove Read-Only Attribute from the Drive
If the drive is marked as read-only, CHKDSK cannot perform write operations. Removing this attribute can restore full access and allow repair commands to execute properly. Here's how:
Step 1. Open Command Prompt and run it as administrator.
Step 2. Input the following command and press "Enter" after each one:
- diskpart
- list disk
- select disk X (Replace the letter "X" with your actual drive number)
- attributes disk clear readonly
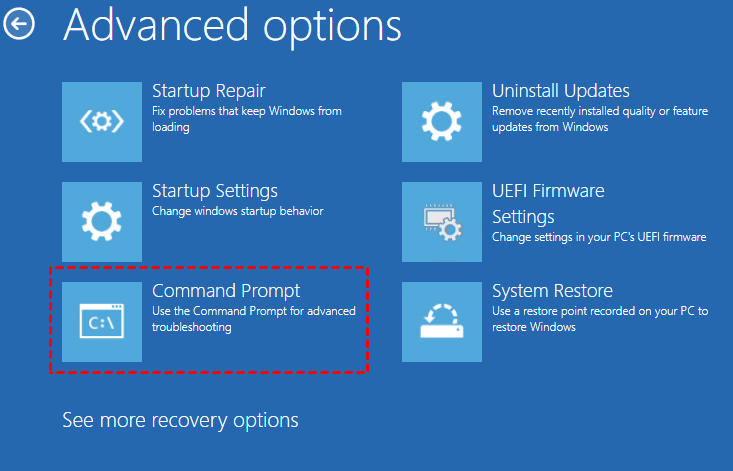
Fix 6. Use Windows Recovery Environment (WinRE)
When the system cannot release the drive or the "CHKDSK cannot continue in read-only mode" error persists after trying these solutions, running CHKDSK in Windows Recovery Environment provides a clean environment where the drive is not actively in use. This allows deeper repairs without interference from the operating system.
Step 1. Go to "Settings" > "Update & Security" > "Recovery" > "Advanced startup" and click "Restart now" to enter WinRE.
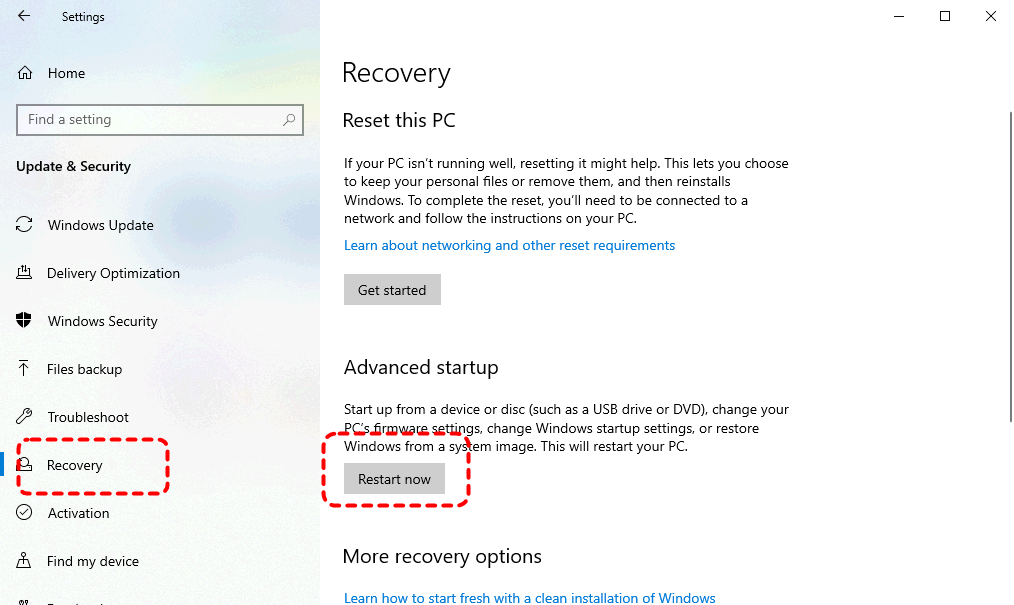
Step 2. Go to "Troubleshoot" > "Advanced options" > "Command Prompt".
Step 3. Enter the command "chkdsk C: /f /r" in the command window and hit "Enter".
Step 4. Wait for the scan to complete and restart your PC to check if the "CHKDSK cannot continue in read-only mode" error is still here.
Fix 7. Run SFC Command via Command Prompt
If system file corruption is preventing CHKDSK from functioning properly, you can try running the System File Checker (SFC) to repair critical Windows files. This helps eliminate conflicts that may cause the read-only limitation.
Step 1. Open Command Prompt and run it as administrator.
Step 2. Type "sfc /scannow" command and press "Enter".
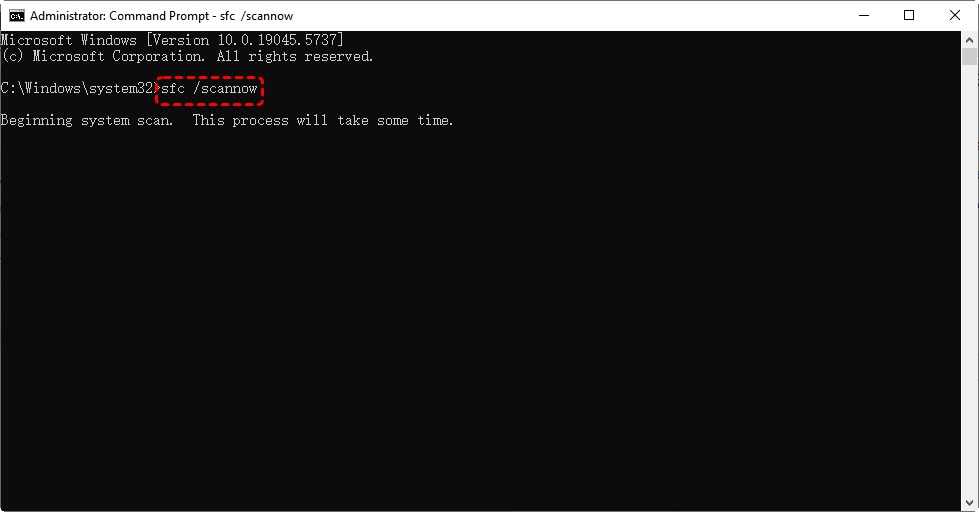
Step 3. Wait for the scan to complete and restart your computer to try CHKDSK again.
Fix 8. Check for Third-Party Interference
Security software or disk management tools can sometimes lock the drive or restrict write access. Identifying and disabling such interference can restore CHKDSK’s ability to perform repairs. Remember to re-enable the antivirus software once CHKDSK works normally.
Step 1. Temporarily disable antivirus software like Windows Defender.
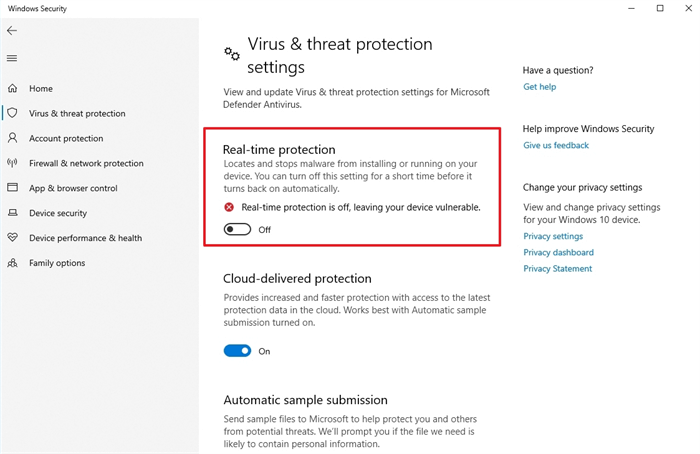
Step 2. Restart your computer and run CHKDSK again with repair parameters to check if the error persists.
How to Recover Lost Data After Error Fixing
Even after resolving the "CHKDSK cannot continue in read-only mode" error and getting CHKDSK to run properly, it’s important to keep in mind that the repair process may have altered or removed some files, especially if the file system was heavily damaged. In many cases, users only realize files are missing after the scan is complete.
If you’ve noticed lost or inaccessible files, now is the right time to act. Instead of risking further data overwrite, using a professional recovery tool like MyRecover gives you a safer way to scan the drive and recover any remaining data. The sooner you perform the recovery, the higher your chances of getting your files back. It scans the disk at a deeper level to locate recoverable data fragments that may still exist after CHKDSK operations.

- Retrieve lost files from PCs, USB drives, SD cards, and memory devices.
- Deep scan technology ensures higher recovery success rates.
- Supports recovery from formatted disks, virus attacks, and crashes.
- Support NTFS, FAT32, exFAT, ReFS in Windows 11/10/8/7 & Windows Server.
- Support 1,000+ file types, including documents, images, videos, emails, and more.
Step 1. Download and install MyRecover on your computer from Microsoft Store or its official website.
Step 2. Run the application and select the affected disk, then click "Scan" to start to identify recoverable files.

Step 3. Once the scan is completed, browse the results and filter the files you want by file type, then select the target files and click "Recover".

If the data you want to restore exceeds 500 MB, upgrading to MyRecover Professional edition will provide unlimited data recovery and file content preview. It also supports recovering files from computers that won't boot, making it a reliable solution for severe system issues.
Step 4. Choose a different location to save the recovered data to avoid overwriting.

When the process is done, the message "Files have been recovered successfully" will pop out. Then, you can access the recovered files by clicking on the "Browse" button.

Summary
The "CHKDSK cannot continue in read-only mode" error typically occurs when the tool lacks the necessary permissions or access to perform repairs on a drive. While it may initially prevent you from fixing disk issues, the problem can be resolved by applying the right approach.
By following the step-by-step methods outlined in this guide, you can systematically eliminate the causes behind the error and allow CHKDSK to run in full repair mode. In cases where disk repairs lead to missing files, using a reliable recovery solution like MyRecover can help restore important data and minimize loss.


Stay Updated With Our
Latest Tips
Add us as a preferred source on Google to never miss helpful guides.