
nvlddmkm.sys Blue Screen: Complete Guide to Causes, Fixes, and Prevention
Facing the blue screen of death nvlddmkm.sys error? This guide explains common causes, GPU driver conflicts, and step-by-step nvlddmkm.sys blue screen fix solutions to stop crashes and restore Windows performance quickly and safely.
By Vera / Updated on February 27, 2026
What is nvlddmkm.sys in Windows?
Before we fix anything, let’s understand what’s actually failing.
What Does nvlddmkm.sys Do?
The file nvlddmkm.sys is part of NVIDIA’s graphics driver. It allows Windows to communicate with your NVIDIA graphics card. Think of it as a bridge.
If that bridge collapses? Windows shuts down to prevent further damage. That shutdown is the blue screen.
Why Is It Related to NVIDIA GPUs?
Because this file belongs to NVIDIA drivers, this issue almost always affects systems using NVIDIA graphics cards.
Whether you're gaming, editing video, or running 3D software, your GPU is under load. If the driver crashes under stress, Windows triggers the blue screen of death. >> Want to know how to force Blue Screen of Death in Windows 11/10?
Common Error Messages You May See
The nvlddmkm sys blue screen may appear with messages like:
- VIDEO_TDR_FAILURE (nvlddmkm.sys)
- SYSTEM_THREAD_EXCEPTION_NOT_HANDLED
- DRIVER_IRQL_NOT_LESS_OR_EQUAL
Different names. Same root issue — graphics driver instability.
What Causes nvlddmkm.sys Blue Screen?
Let’s get to the root of the problem.
1. Corrupted or Outdated NVIDIA Drivers
This is the most common cause. Driver files may become corrupted during updates or after Windows upgrades.
2. GPU Overheating
If your graphics card runs too hot, it can crash under load. Dust buildup, poor airflow, or aging thermal paste can all contribute.
3. Faulty RAM
Bad memory modules can corrupt driver communication, making it look like a GPU issue.
4. System File Corruption
Windows relies on system files to function properly. If they’re damaged, they can conflict with your graphics driver.
5. Overclocking Instability
Overclocking pushes hardware beyond its stable limits. Even minor instability can trigger blue screens.
Before You Start: Protect Your Data
Let’s be real. Blue screen crashes can sometimes lead to data loss, especially if your system becomes unbootable.
If you’ve already lost files due to repeated crashes, you can use MyRecover, a reliable data recovery tool designed to restore deleted or lost files from crashed systems, formatted drives, or inaccessible partitions.

- Works on different devices – Hard drives, USBs, SD cards, SSDs.
- Fast scan option – Quickly finds recently deleted files.
- High success rate – Good chance of getting files back.
It’s especially useful if:
- Your PC won’t boot.
- Files disappeared after system repair.
- You had to reinstall Windows.
Always secure your important data before attempting advanced repairs. Now, let’s fix the problem.
How to Fix nvlddmkm.sys Blue Screen (Step-by-Step Standardized Guide)
Follow these solutions in order. Do not skip steps.
Method 1: Perform a Clean NVIDIA Driver Installation
This is the most effective fix in most cases.
Step 1: Uninstall Current NVIDIA Drivers
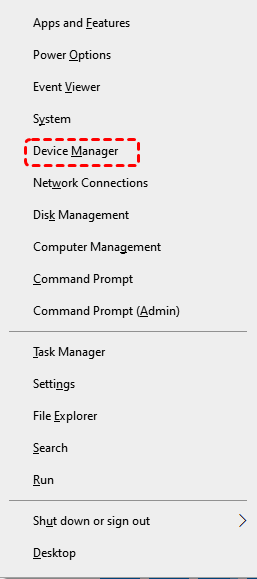
1. Press Windows + X. Select Device Manager.
2. Expand Display Adapters.
3. Right-click your NVIDIA graphics card.
4. Click Uninstall device.
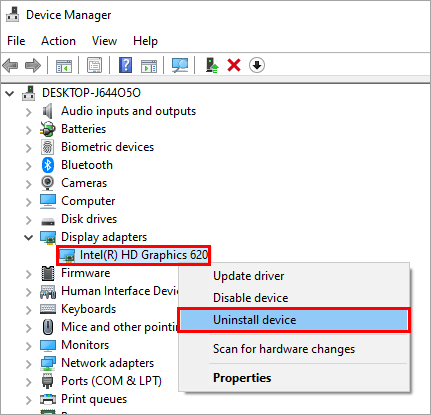
5. Check "Delete the driver software for this device". Click Uninstall.
6. Restart your computer.
Step 2: Download Latest NVIDIA Driver
1. Visit NVIDIA’s official website.
2. Enter your GPU model.
3. Download the latest stable driver version.
Avoid beta drivers for stability.
Step 3: Install Driver Cleanly
1. Run the installer.
2. Choose Custom Installation.
3. Select Perform a clean installation.
4. Complete installation.
5. Restart your computer.
Test system stability.
Method 2: Roll Back to a Previous Driver Version
If the issue started after a recent update:
1. Open Device Manager.
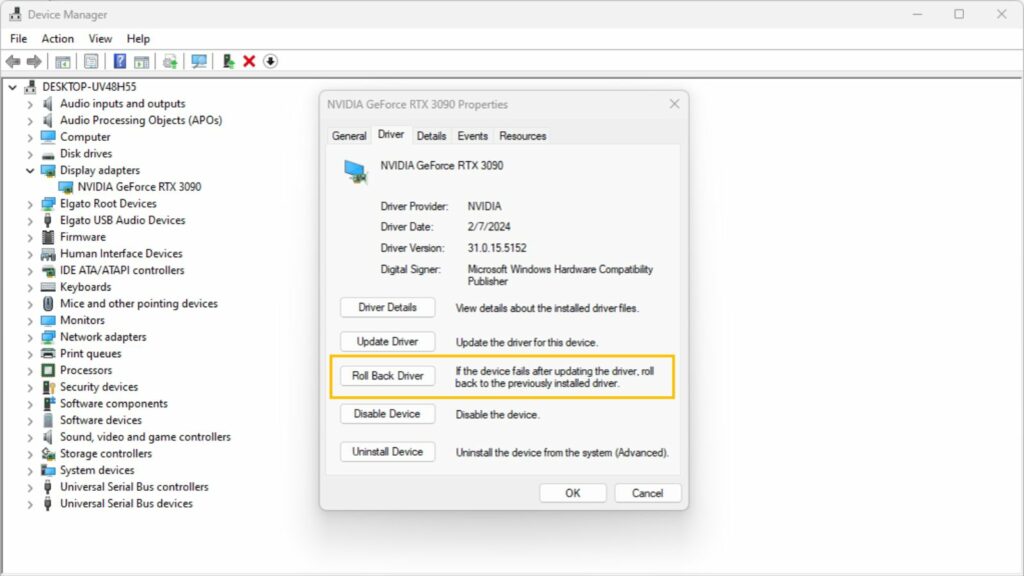
2. Right-click NVIDIA GPU. Select Properties.
3. Go to the Driver tab. Click Roll Back Driver.
4. Restart your PC.
Sometimes newer drivers conflict with certain hardware configurations.
Method 3: Run System File Checker and DISM
Corrupted Windows files can cause this issue.
Step 1: Run SFC Scan
1. Press the Windows key.
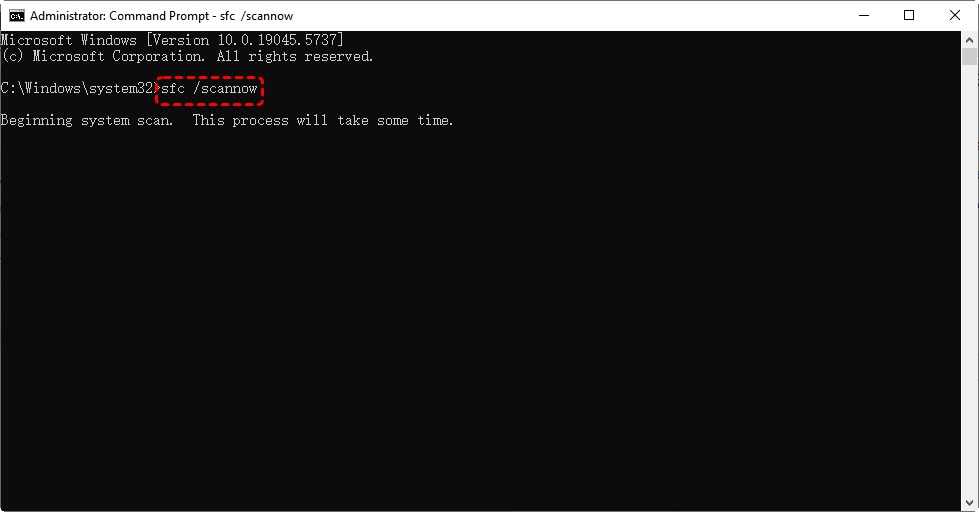
2. Type "cmd". Right-click Command Prompt. Aad select Run as administrator.

3. Type: sfc /scannow. Press Enter. And wait for completion.
4. Restart PC.
>> Look here if the SFC Scannow gets stuck.
Step 2: Run DISM Repair
If SFC finds errors:
1. Open Command Prompt as administrator.
2. Type: DISM /Online /Cleanup-Image /RestoreHealth.
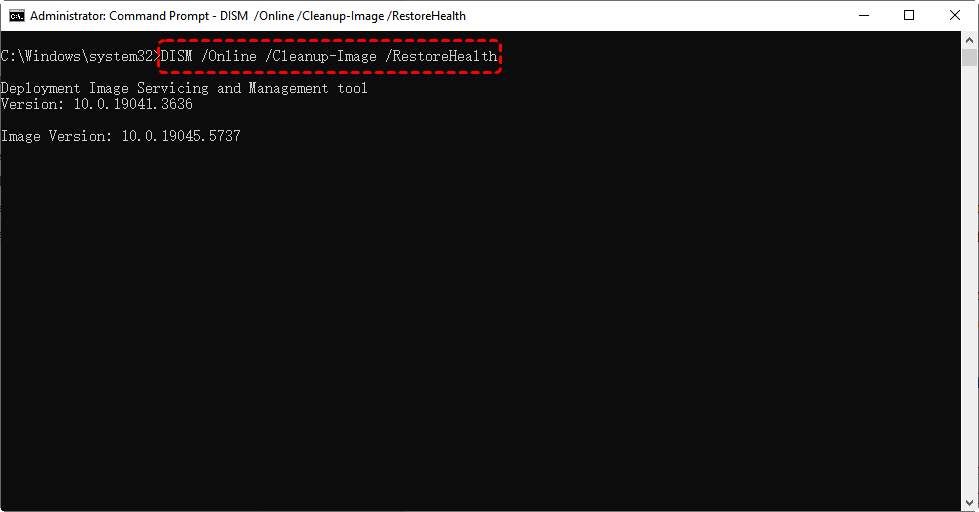
3. Press Enter. Wait for completion.
4. Restart the system.
>> Look here if the DISM gets stuck.
Method 4: Check GPU Temperature
Overheating is silent but deadly.
Step 1: Monitor Temperature
Use hardware monitoring software to check GPU temps during gaming.
Ideal range:
- Idle: 30–50°C
- Load: 65–85°C
Above 90°C is dangerous.
Step 2: Reduce Temperature
1. Clean dust from GPU fans.
2. Improve case airflow.
3. Add additional cooling fans.
4. Replace thermal paste if the GPU is older.
Method 5: Disable Overclocking
If you have overclocked:
1. Open BIOS or overclocking software.
2. Restore default settings.
3. Save and restart.
Even factory overclocked GPUs can sometimes be unstable.
Method 6: Test RAM for Errors
Faulty memory can trigger driver crashes. Let’s run Windows Memory Diagnostic.
1. Press Windows + R.
2. Type mdsched.exe.
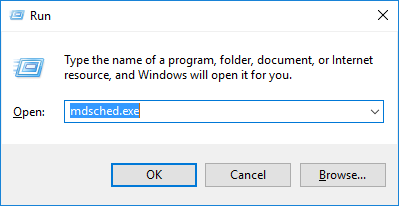
3. Press Enter.
4. Choose Restart and check for problems.
If errors are detected, consider replacing RAM.
Method 7: Update Windows
An outdated system can conflict with modern drivers.
1. Open Settings. Go to Windows Update.
2. Click Check for updates.
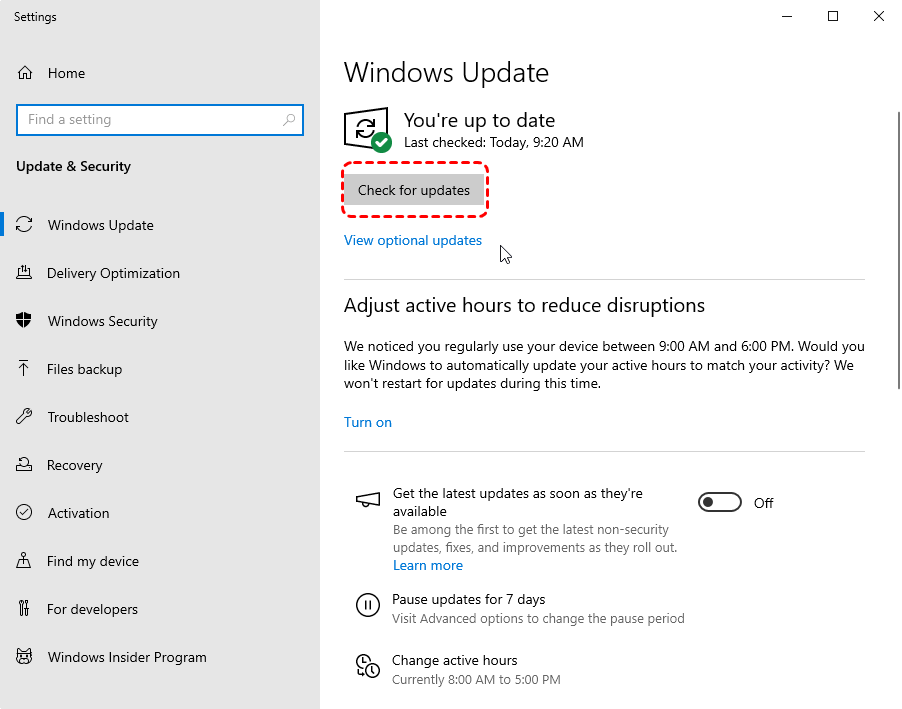
3. Install all available updates.
4. Restart PC.
If the issue persists, move forward carefully.
>> Look here if you want to update Windows 10 to Windows 11 without losing data.
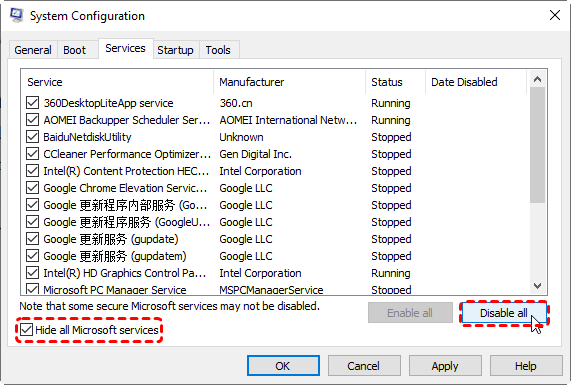
Method 8: Perform a Clean Boot
This identifies software conflicts.
1. Press Windows + R. Type msconfig.
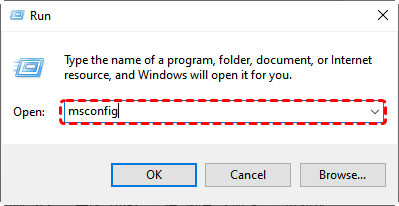
2. Go to the Services tab. Check "Hide all Microsoft services". And click Disable all.
3. Go to the Startup tab. Open Task Manager. Disable all startup programs.
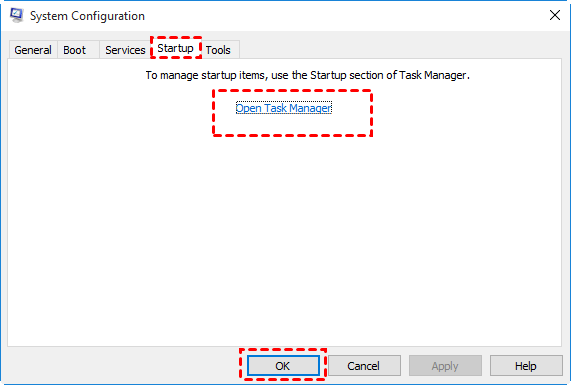
4. Restart the system.
If crashes stop, a third-party program was causing the issue.
Method 9: Increase TDR Delay (Advanced Users Only)
TDR (Timeout Detection and Recovery) controls how long Windows waits before resetting the GPU.
Increasing this delay may prevent unnecessary crashes.
⚠️ Editing registry incorrectly can cause issues. Proceed only if comfortable.
Method 10: Reinstall Windows (Last Resort)
If all else fails:
1. Back up important files.
2. Use MyRecover if needed to restore lost data.
3. Create Windows installation media.
4. Perform a clean Windows installation.
5. Install drivers carefully.
This resolves deep system corruption.
❗Sometimes the problem isn’t software. Consider replacement if:
- Blue screens continue after all fixes.
- You see visual artifacts.
- GPU crashes under minimal load.
- System freezes even after a fresh Windows install.
Hardware failure becomes more likely over time.
How to Prevent nvlddmkm.sys Blue Screen in the Future
Prevention is smarter than constant repair.
- Keep drivers updated (but avoid unstable beta versions)
- Clean your PC every 3–6 months
- Avoid aggressive overclocking
- Ensure proper airflow
- Monitor GPU temperatures regularly
- Use high-quality power supply
Think of your PC like a sports car. Maintenance matters.
Conclusion
The nvlddmkm.sys blue screen may look intimidating, but in most cases, it’s simply a driver or stability issue. Start with updating or reinstalling your NVIDIA drivers. Then move on to checking RAM, temperatures, and system files. And if data loss occurs during the process, tools like MyRecover can help you recover what matters most.
Troubleshooting is like detective work. Follow the clues, eliminate possibilities, and you’ll find the solution. You’ve got this.


Stay Updated With Our
Latest Tips
Add us as a preferred source on Google to never miss helpful guides.