
TestDisk Guide: Recover Files After Deletion or Format in Windows 10
This guide provides a complete tutorial on using TestDisk recover files windows 10. We cover everything from installation to scanning, ensuring you can successfully recover deleted files. The process also details how to use TestDisk to recover a formatted drive, walking you through partition restoration and file extraction safely.
By Delores / Updated on February 12, 2026
Preface
Suddenly, a crucial file vanishes. Or maybe a drive shows up as blank, raw, or just plain unreadable. It's a disaster.
But here is a powerful, free tool called TestDisk that might be your lifesaver. So, learning how to use TestDisk to recover files in Windows 10 and 11 is your top choice right now.
This guide is your complete, step-by-step handbook. It demystifies the complexity and gives you the exact know-how to harness this open-source powerhouse and rescue your precious files from data loss.
What is TestDisk?
TestDisk is a free, open-source, specialized recovery utility that interacts directly with the low-level structures of your hard drive or SSD. This software focuses on the partition table and file system, which address serious storage failures.
TestDisk is designed for reversing accidental formatting, repairing drives that display as "raw," and reconstructing damaged partition tables. TestDisk excels at restoring deleted partitions, correcting boot sector errors, and facilitating a deep testdisk recover deleted files process within recovered volumes. It supports common file systems including FAT, exFAT, and NTFS.
Preparations Before TestDisk File Recovery
A vital preparatory step must be taken before initiating recovery: stop all use of the compromised drive. Continuing to operate the system risks overwriting the sectors holding your lost data, which can make it permanently unrecoverable. If the affected drive is your primary Windows installation, the most secure method is to power off the computer and install the drive as a secondary unit in another PC.
Furthermore, you must prepare a separate, functional storage location—such as a different internal drive, a spacious external drive, or a network folder—for saving any recovered files.
How to Use TestDisk to Recover Filesfrom Corrupted Partition
It's easy to follow, even if it's a command-line interface. Check the step-by-step guide to recover files now.
1. First, head to the official CG Security website to download TestDisk. Run the testdisk_win.exe file as an administrator after uncompressing.
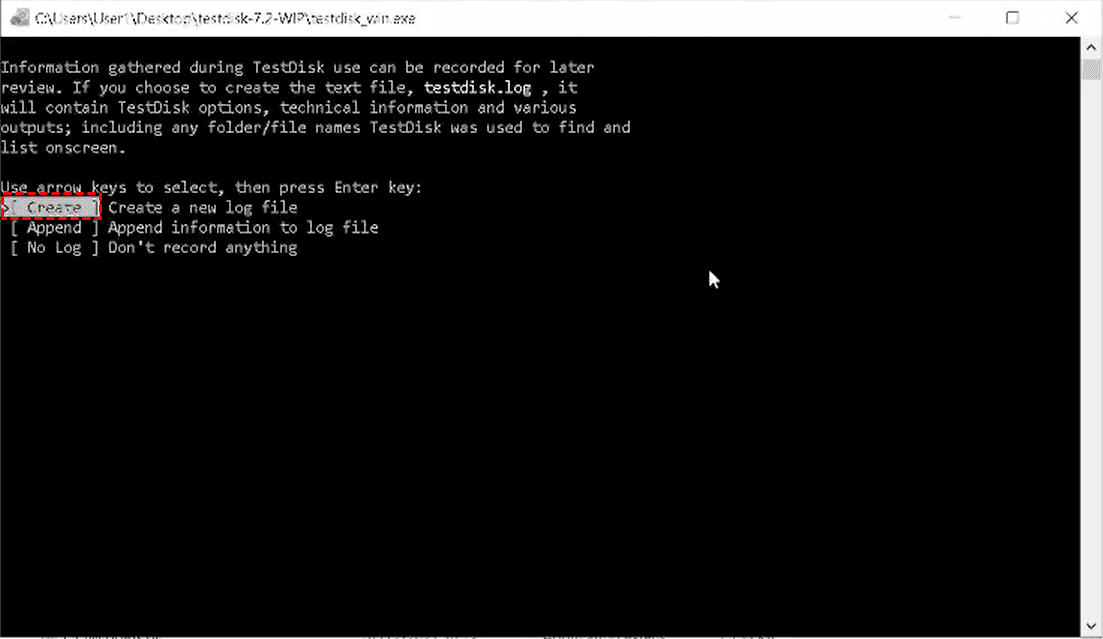
2. A black console window will pop up, and it uses a simple text menu. Choose Creation to create a log and press Enter.
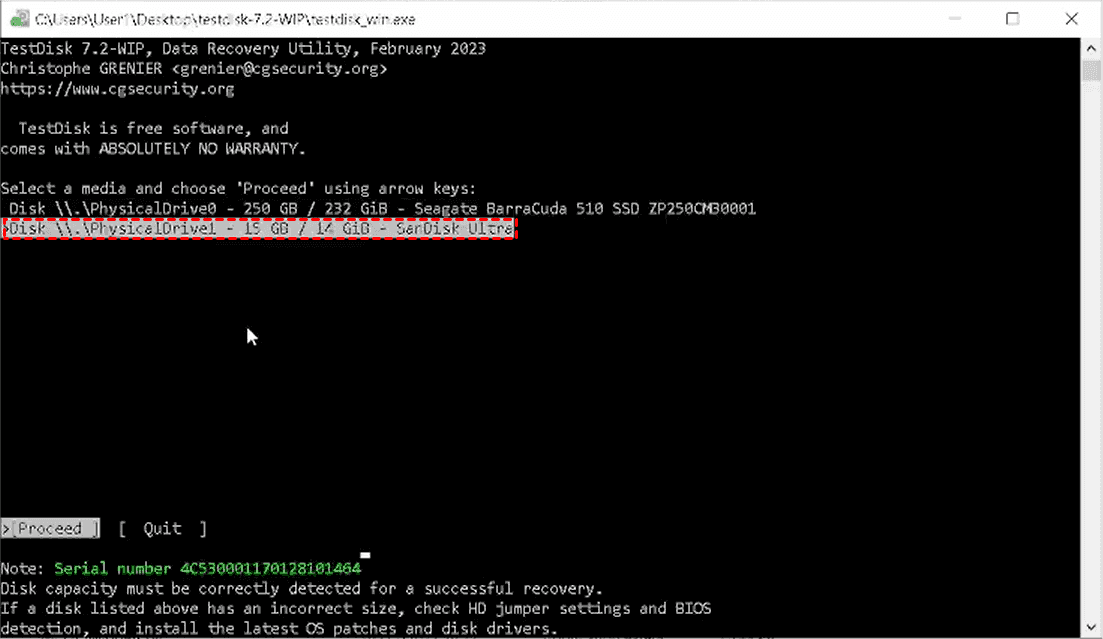
3. Next, you’ll see a list of the physical storage devices connected to your computer. You must identify the correct disk with the size (in GB) to pick the right one. Use the arrow keys to highlight it and press Enter.
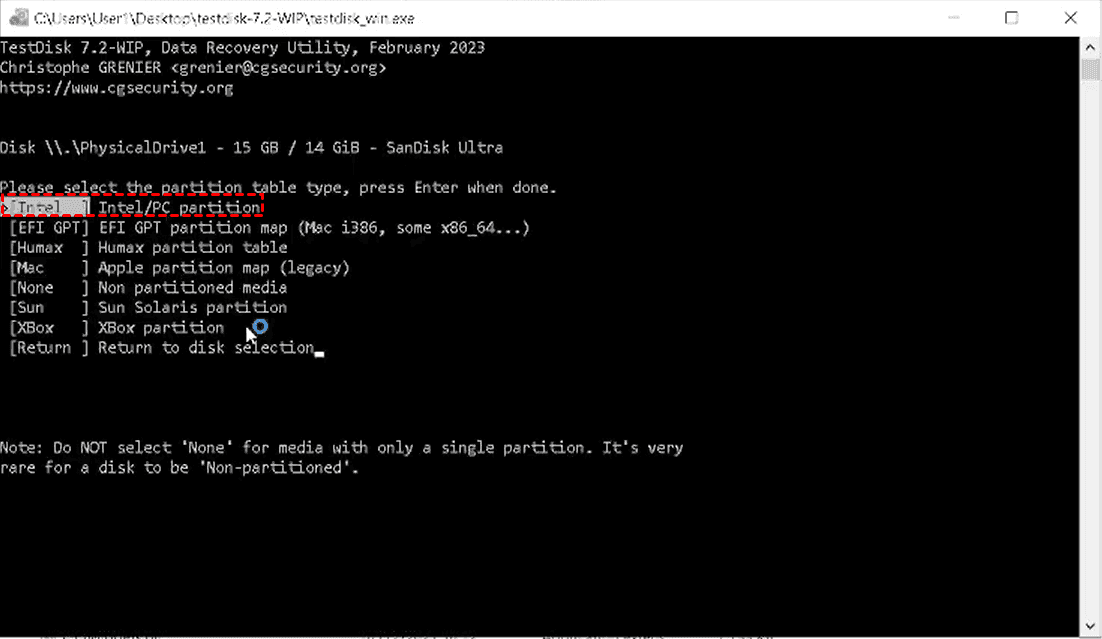
4. Choose a partition table type. Choose "Intel/PC" for most modern Windows systems and press Enter again.
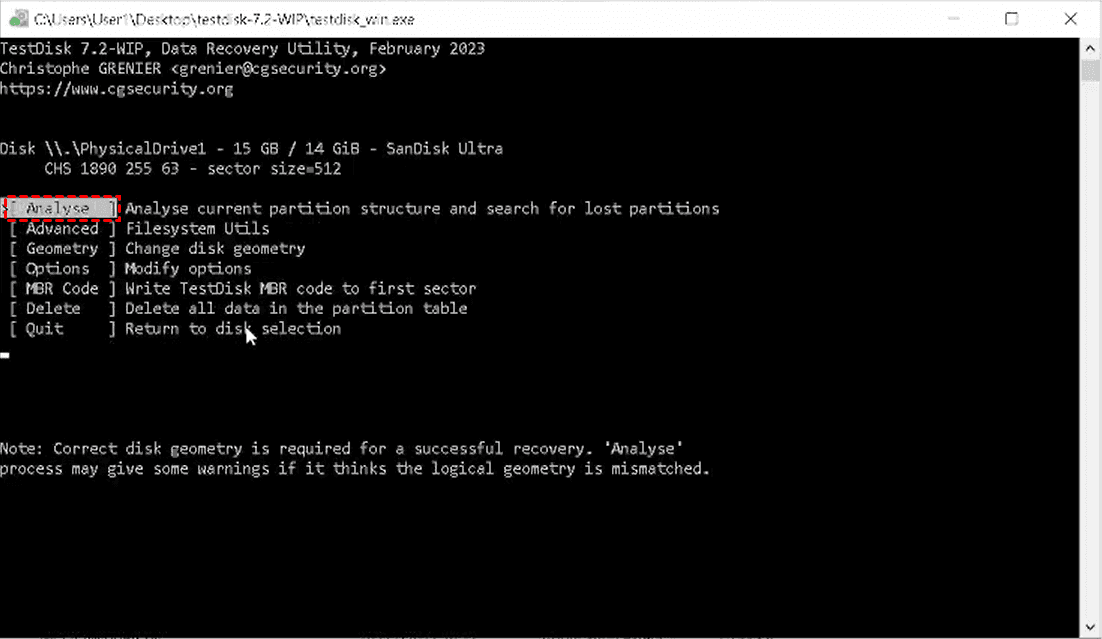
5. Now choose Analyse > Quick Search to find all partitions(existing and lost partitions).
6. Once the correct partition is found, highlight it and use the Write option to save the partition table, or use Advanced to undelete specific files.
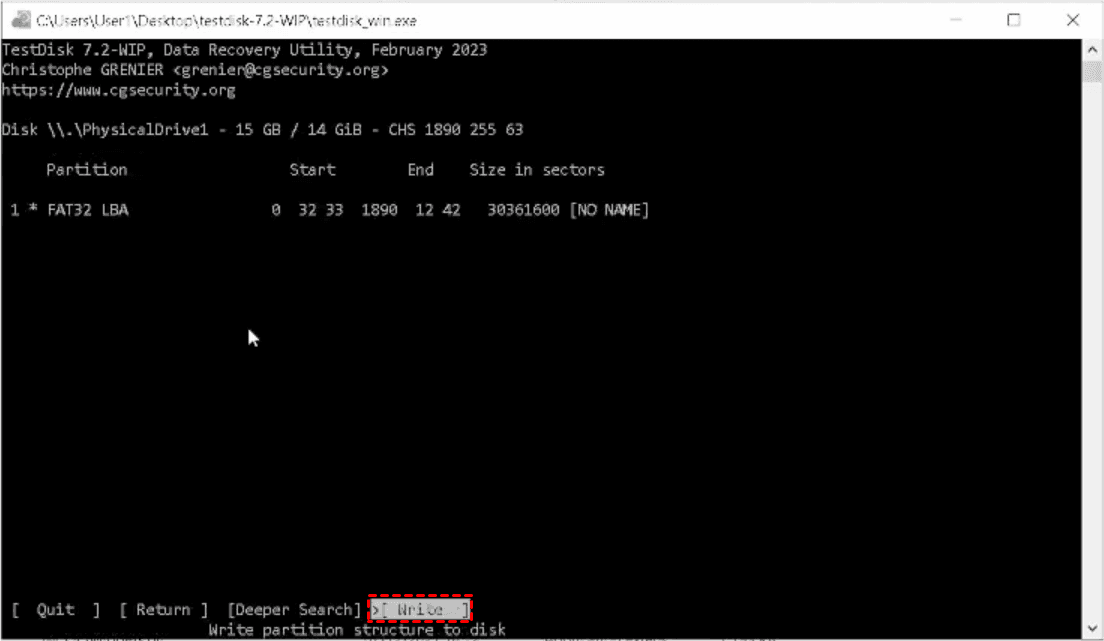
Tip: After the Quick Search, TestDisk will display a list of partitions it has found. Lost or deleted partitions will often be highlighted in a different color, typically with a "P" (Primary) or "L" (Logical) label, but marked as deleted.
Only do this if you are sure it’s the correct partition. After writing, reboot your computer. If you’re lucky, Windows will now see the drive with all its files intact.
How to Recover Deleted Files from An Intact Partition with TestDisk
Sometimes, the partition is fine, but specific files are gone. You need to use the Advanced File Undelete feature.
1. From the partition screen, you can select the "Advanced" option.
2. Here, you choose the partition again and then select the "Undelete" function.
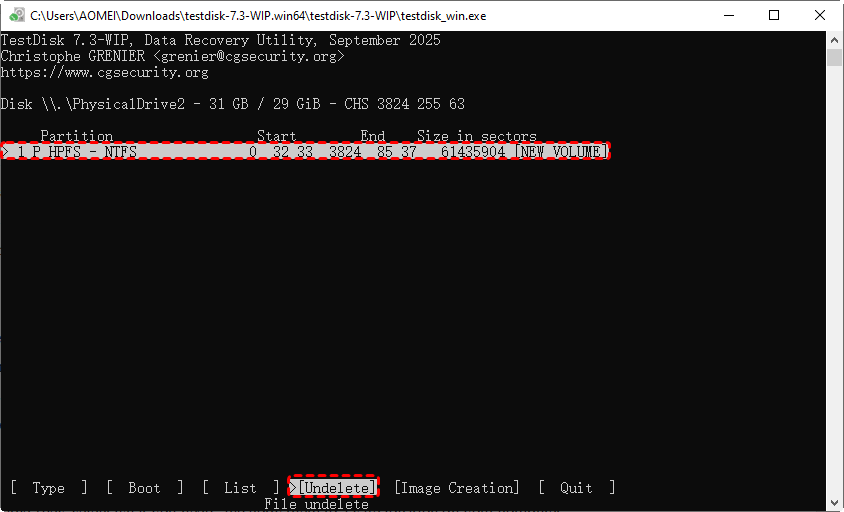
3. TestDisk will now scan the file system’s metadata, looking for directory entries of files that have been marked as deleted. It will present a list, often with some files showing a red status, indicating they’re recoverable if their data hasn’t been overwritten.
4. Using the arrow keys and 'C' to change directories to find the files you need. To recover a file, highlight it and press the 'C' key (for Copy).
5. You will then be prompted to select a destination folder on your healthy recovery drive.
This step-by-step process is the essence of how to use TestDisk to recover files individually from a still-intact partition.
Alternative Steps If TestDisk Is Unsuccessful
TestDisk is powerful, but it's quite a bit too complex for ordinary users. Because it does not provide a user-friendly interface. If it feels too technical or doesn’t find your data, all is not lost. A fantastic alternative for a more user-friendly, Windows-native experience is a tool like MyRecover.
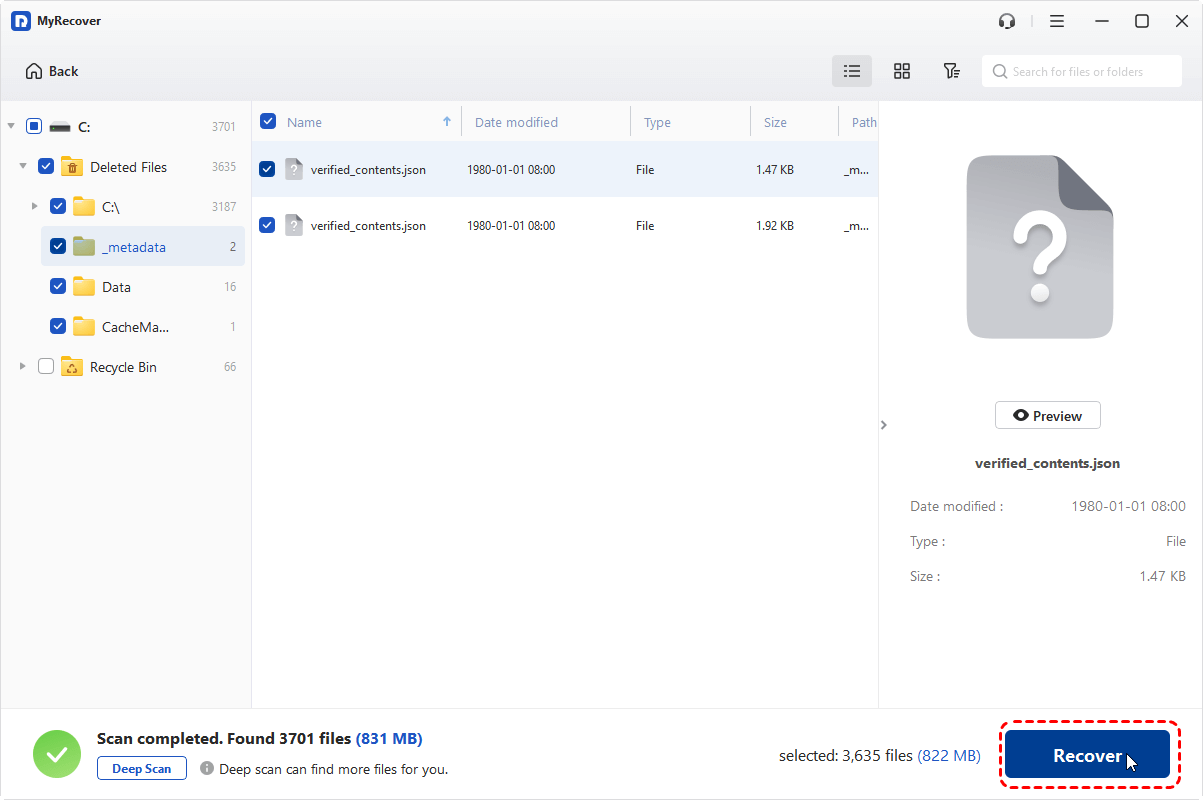
MyRecover offers a graphical interface that feels instantly familiar. It excels at scanning 500+ devices and presenting recoverable files in their original folder structure with previews for photos and documents.
Here is how to recover deleted files with MyRecover if TestDisk is not working:
1. Please download and install MyRecover on your computer, then launch it.
2. Tap Deleted Files Recovery, choose the drive where the files were located before, and hit Scan.

3. Hit OK when it’s done.
4. Select the files you need, and hit Recover.
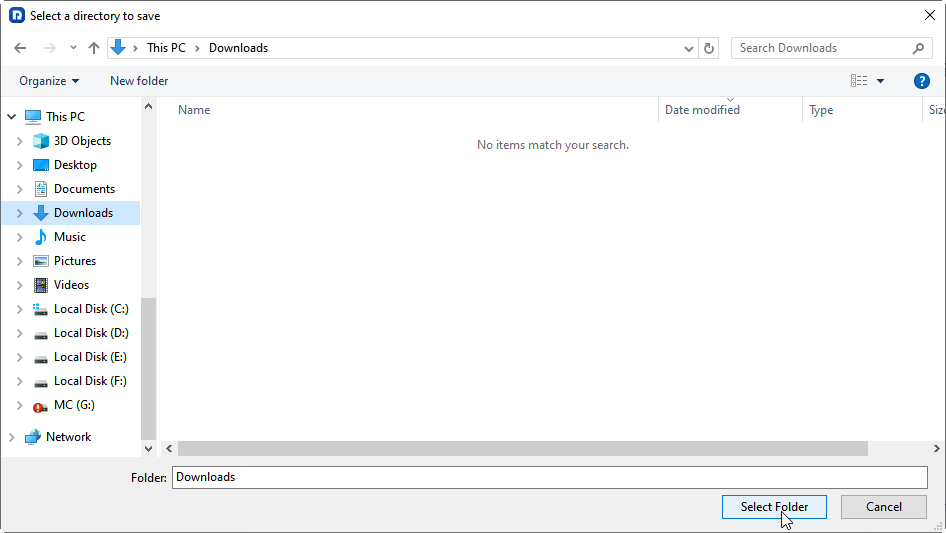
5. Choose a location to keep them now.
- Notes:✎...
- If your computer is unbootable, you can create a bootable media to boot from it and then recover files easily.
- Besides, you can also recover files from a formatted hard drive, a corrupted SD card, a RAW partition, etc.
- Please upgrade to MyRecover Technician to recover files from unlimited computers within your company if you’re an administrator.

- Recover Deleted Files Easily with Simple Clicks
- 1000+ File Formats Supported
- Support HDD, SSD, External Hard Drive, USB Drive, SD Card, etc.
- Quickly Find Files Using File Types, Name, Size, etc.
- Preview Files Before Recovering
- Recover Unlimited Data
FAQs About TestDisk Recover Files in Windows 10
Q: Can TestDisk recover files from a solid-state drive (SSD) on Windows 10?
A: Yes, but with a key limitation. TestDisk can handle logical failures like formatting on SSDs. However, due to the TRIM command SSDs use, deleted file data is often permanently erased to optimize performance. If TRIM has acted, recovery is unlikely. Success is higher for sudden failures or partition loss, not simple deletions.
Q: Is TestDisk safe to use, or can it cause further data loss?
A: It is safe software, but must be used cautiously. The "Write" function is permanent and can worsen data loss if misapplied. Always first use the "Analyse" and "Quick Search" options in a read-only mode to preview what can be recovered before committing any changes.
Q: How long does a full TestDisk recovery scan take on a 1TB drive?
A: It varies widely. A quick partition scan may take 15-30 minutes. A full, deep scan can take 6-12 hours or more, depending on your drive's speed and health.
Q: What are the main differences between TestDisk and its companion tool, PhotoRec?
A: TestDisk repairs partition tables and file systems to regain access to data. PhotoRec ignores the file system and directly "carves" out files based on their data signatures (like photos, documents). Use PhotoRec when the file system is destroyed, but be prepared to lose filenames and folder structures.
Q: My files were recovered, but are corrupted or won't open. What happened?
A: This usually means the original data on the drive was overwritten by new information after the deletion. Once data is overwritten, it is generally impossible to recover intact. This underscores the critical rule: stop using the drive immediately after data loss.
Q: Do I need to disable Windows Defender or my antivirus before running TestDisk?
A: Typically, no. TestDisk is legitimate. However, some antivirus programs may flag its deep disk access. If blocked, you can temporarily add an exception for the TestDisk executable or pause real-time scanning only for the duration of the recovery task, then re-enable it.


Stay Updated With Our
Latest Tips
Add us as a preferred source on Google to never miss helpful guides.