 MyRecover



M.2 NVMe Data Recovery - Recover Data from M.2 & NVMe SSD
With our SSD M.2 data recovery service, you can retrieve photos, documents, and system files lost due to crashes or corruption. We specialize in deep-level SSD recovery with high success rates, ensuring your data is restored securely and quickly.

By Vera / Updated on May 20, 2026


What is M.2 NVMe? (And Why Its Speed Comes with a Catch)
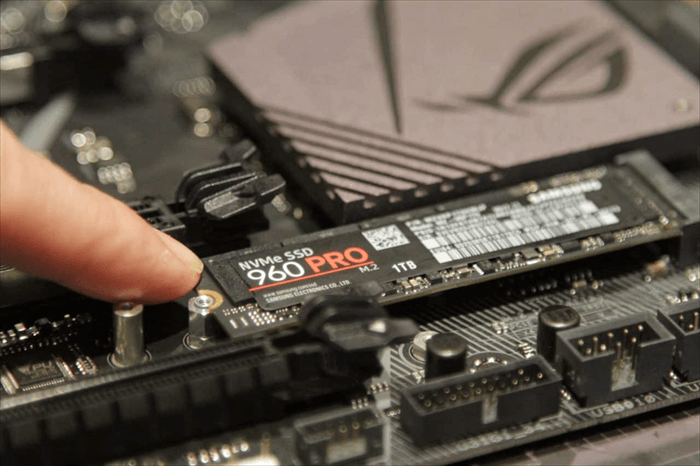
Let’s start simple. M.2 is the slim, stick-like connector used for SSDs inside most modern laptops and desktops. NVMe (Non-Volatile Memory Express) is the high-speed protocol that lets these drives talk to your computer through PCIe lanes instead of the older SATA interface.
While the combination of M.2 and NVMe delivers blazing-fast performance, it makes the process of M.2 data recovery significantly more complex than traditional hard drives. Unlike HDDs that store data linearly on spinning platters, NVMe SSDs use advanced controllers and complex wear-leveling algorithms. These components make the drive efficient but introduce unique hurdles when you need to recover data from NVMe SSD units after a crash or accidental deletion.
Why NVMe Data Recovery is Different (The Technical Hurdle)
Recovering data from M.2 SSD isn’t the same as recovering from a regular hard drive. The very technologies that make them fast also make them "aggressive" when it comes to permanently erasing data.
- 1️⃣The TRIM Command: When you delete a file, Windows sends a TRIM command to the SSD. This tells the controller that the data blocks are no longer needed, allowing the drive to wipe them in the background to maintain high write speeds. Once TRIM has fully executed, the data is often gone forever.
- 2️⃣Complex Data Mapping: NVMe SSDs don’t store data in a fixed, physical location. To prevent wearing out specific memory cells, the controller spreads data across different chips (Wear Leveling). This means SSD M.2 data recovery requires sophisticated logical reconstruction to piece fragmented files back together.
- 3️⃣Controller and Firmware Dependency: The "brain" of the SSD is the controller. If the firmware or controller fails, the drive may become completely "dead" or show up as "Uninitialized" in Disk Management, even if the memory chips themselves are healthy.
- 4️⃣Hardware Encryption: Many modern NVMe drives (like those from Samsung or Western Digital) feature "Always-on" hardware encryption. If the controller chip is damaged, the data on the NAND chips may be unreadable without the original hardware key.
Common NVMe Data Loss Scenarios
Understanding what caused the data loss helps determine whether DIY M.2 NVMe data recovery is possible. Here are the most common situations:
- ☹️Accidental Deletion or Formatting: Maybe you accidentally deleted files or formatted the wrong partition. If TRIM hasn’t run yet (or if it’s disabled), there’s a slim chance you can recover those files using data recovery software. But you’ll need to act fast — the longer you keep using the drive, the lower your chances.
- ☹️Firmware or Controller Failure: If your NVMe drive isn’t showing up at all or keeps disconnecting, you could be dealing with firmware or controller failure. These are hardware-level issues and typically require professional recovery services that can repair or bypass the controller to read raw memory chips.
- ☹️Physical or Electrical Damage: Dropped your laptop? Spilled coffee on your SSD? Physical or electrical damage can burn components or break solder joints on the M.2 board. Recovery in these cases often involves chip-off techniques, where specialists remove NAND chips and read data directly using specialized tools.
Top 2 Ways for M.2 NVMe Data Recovery
The success of any M.2 data recovery attempt depends on the drive's visibility. If your computer can still "see" the drive—even if it says the drive is unallocated or RAW—you are dealing with a logical issue. The goal here is to use professional-grade software to scan raw sectors before the drive’s internal garbage collection overwrites the deleted blocks.
Method 1: Using MyRecover for M.2 NVMe Data Recovery
When files are deleted or a partition is formatted, the actual data often remains on the NAND flash for a short window of time. MyRecover is specifically engineered to interface with the high-speed throughput of NVMe controllers, allowing it to scan millions of sectors rapidly. It is the preferred choice to recover data from NVMe SSD drives because it can bypass the operating system's file "masking" to find original file headers.
 MyRecover
- ✨Rapid PCIe Scanning: Optimized to handle the massive IOPS of modern M.2 drives without crashing.
- ✨Advanced Deep Scan: While TRIM makes recovery difficult, MyRecover can often find remnants in "stale" blocks that haven't been wiped yet.
- ✨High Success Rate: Supports NTFS, exFAT, and FAT32, covering almost all Windows-based M.2 storage scenarios.
 100% Secure
Detailed Steps to Recover Data from M.2 NVMe Using MyRecover:
Step 1: Stop Using the Drive
Stop using the NVMe drive immediately. If it is your C: drive, consider connecting it to another computer via an M.2 to USB adapter to prevent Windows from writing background temp files.
Step 2: Install MyRecover
Download and install MyRecover on a different drive (not the one you want to recover data from). Then, open the program.
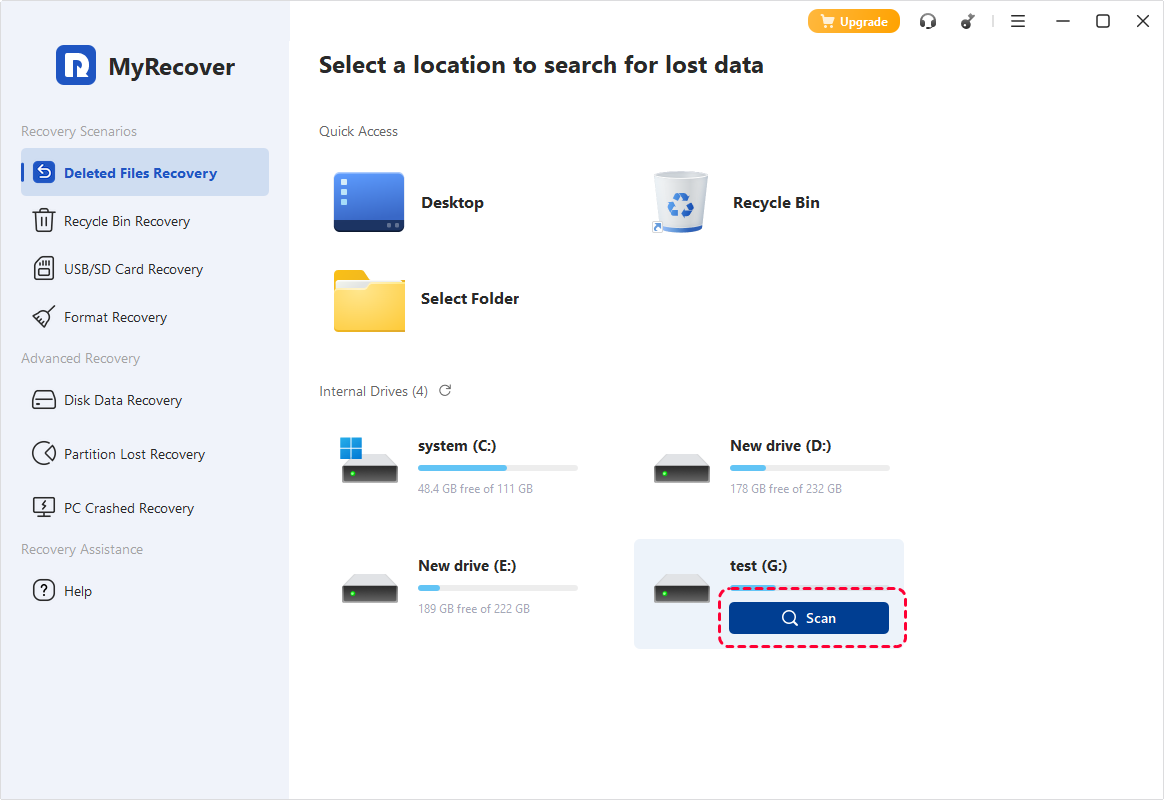
Step 3: Choose Your NVMe Drive
On the main screen, select your M.2 NVMe SSD and click Scan.
Step 4: Scan for Lost Files
MyRecover automatically performs a quick scan to find recently deleted or lost files. You’ll see results appear in real time as the scan runs. You can also choose Deep Scan to find files with lost directory structures.
Step 5: Preview and Select Files
After scanning, preview the files (like photos, videos, or documents) to confirm what you need.
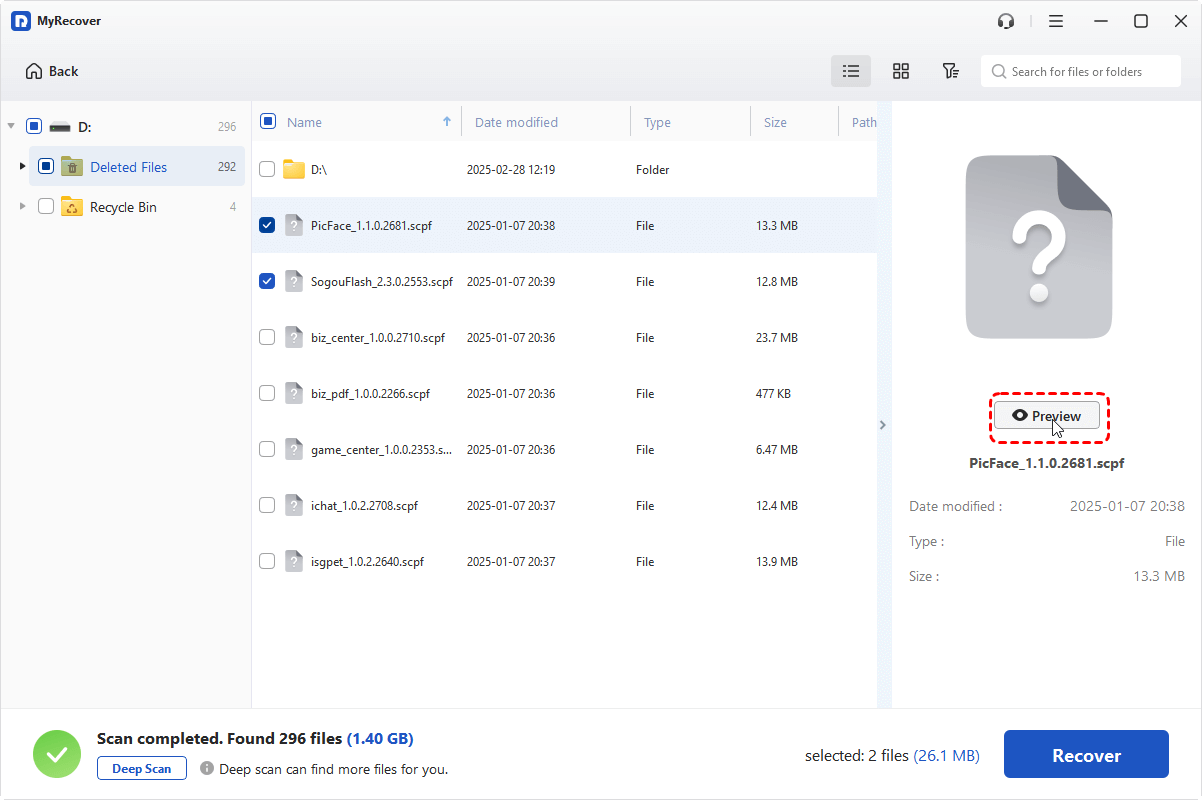
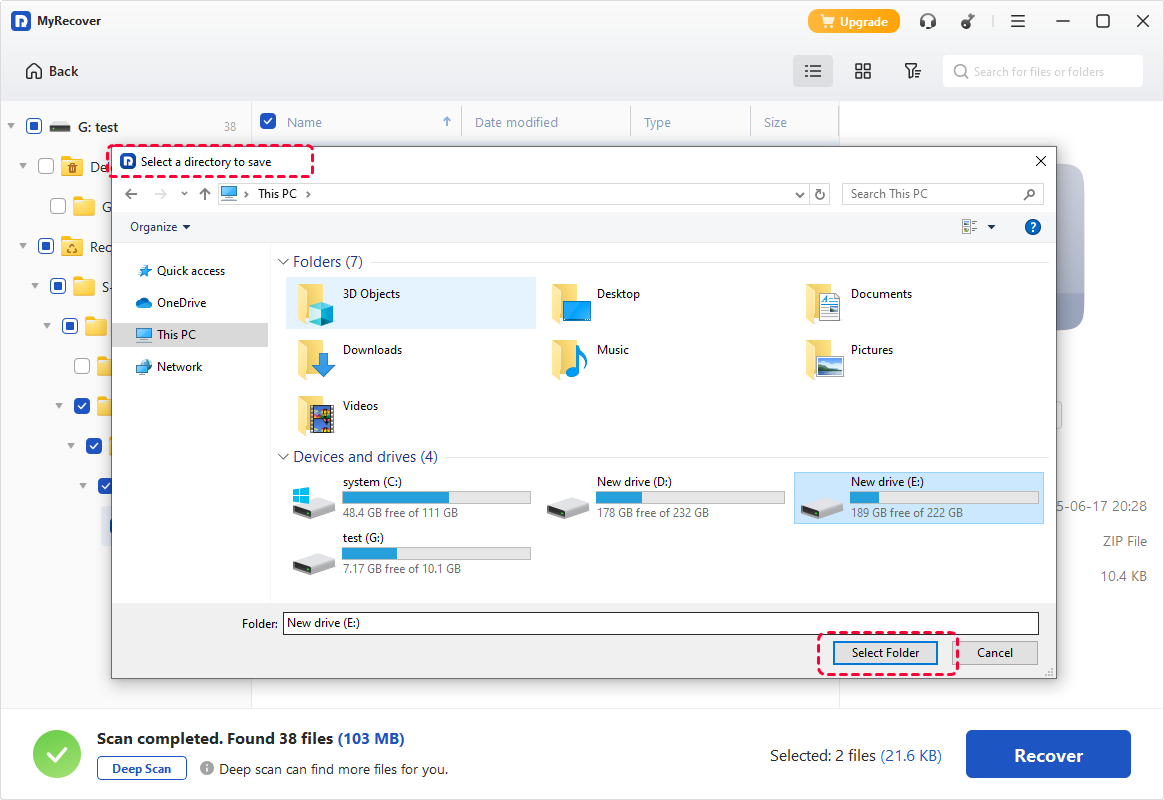
Step 6: Recover Your Data
Select the files you want and click Recover. Save them to a different drive or external disk, not the original NVMe, to avoid overwriting data.
- ★ Pro Tips for Better DIY Results:
- Avoid writing anything to the NVMe drive before scanning.
- If you’re unsure whether TRIM is enabled, check it using Command Prompt: fsutil behavior query DisableDeleteNotify. If it returns 0, TRIM is active.
- Always save recovered files to a different drive or an external disk.
- If MyRecover doesn’t find your files, stop there — further attempts might worsen your chances. It’s time to contact a professional lab.
If MyRecover cannot see your drive or the files appear corrupted, the issue might not be the data itself, but how your system is communicating with the M.2 slot. Before giving up, you should attempt to fix the communication layer.
Method 2: Troubleshooting NVMe Detection (Driver & BIOS Level)
Sometimes, what looks like a need for M.2 NVMe data recovery is actually a communication failure. If the NVMe controller driver is outdated or the BIOS is configured incorrectly (e.g., RAID vs. AHCI), the drive might appear as "Missing." This method aims to restore the logical link between the OS and the hardware.
Logical Steps:
1. Update NVMe Controller Drivers: Right-click the Start button > Device Manager. Look under "Storage controllers." If you see "Standard NVM Express Controller" with a yellow triangle, right-click and select Update driver.
2. Check BIOS/UEFI Settings: Restart your PC and enter BIOS (usually F2 or Del). Ensure the M.2 slot is enabled and that the PCIe link speed is set to "Auto" or the correct Generation (Gen3/Gen4).
3. Reseat the Drive: M.2 sticks can occasionally shift due to heat expansion. Power down, remove the screw, take the drive out, and re-insert it firmly into the slot.
Do’s And Don’ts After NVMe Data Loss
Here’s the golden rule: stop using the drive immediately. Every second it’s powered on, background processes like TRIM or garbage collection might be erasing your data.
✅Do: Power Off Immediately
If you notice files missing or the drive behaving oddly, shut down your computer right away. Do not reboot repeatedly or install recovery tools directly on the affected drive.
✅Do: Document What Happened
Write down exactly what occurred — error messages, system changes, software updates, etc. If you decide to send the drive to a professional, this info can help them understand what went wrong.
❌Don’t: Reformat or Reinstall Anything
Formatting writes new file tables and metadata, overwriting your lost data. Reinstalling Windows or cloning the drive can have the same effect — permanently erasing what you’re trying to save, making it impossible to recover data from NVMe SSD later.
❌Don’t: Keep The Drive Connected
Disconnect the NVMe drive to prevent any background processes (like TRIM) from running. If possible, store it in an anti-static bag until you’re ready to attempt recovery.
Preventing Future NVMe Data Loss
Because NVMe recovery is so hit-or-miss due to TRIM technology, prevention is your only 100% guarantee.
- ✔️The 3-2-1 Rule: Keep 3 copies of data, on 2 different media, with 1 offsite (Cloud).
- ✔️Monitor Drive Health: Use tools like CrystalDiskInfo to monitor the "Percentage Used" and "Available Spare" on your NVMe drive. If "Available Spare" drops below 10%, replace the drive immediately.
- ✔️Active Cooling: M.2 drives thrive under 50°C. If yours runs hot, install a small copper heatsink to prevent controller burnout.
Conclusion
Navigating M.2 NVMe data recovery can be stressful due to the high speeds and aggressive data management of modern SSDs. However, by understanding the difference between logical and physical failure, you can choose the right path. For most logical errors, using a dedicated tool like MyRecover provides the best chance to recover data from M.2 SSD effectively. Remember: the faster you stop using the drive, the better your results will be.
And next time? Set up automatic backups using Windows File History, Backup and Restore Windows 7 or System Restore Point. That single step can save you from ever needing to read another recovery guide like this one.
Frequently Asked Questions (FAQ)
1. Can I recover data from an NVMe SSD if TRIM is enabled?
It is difficult but possible. TRIM does not always wipe data instantly; it queues the operation. If you stop using the drive immediately after deletion and use a tool like MyRecover, you may be able to "catch" the data before the controller executes the wipe command.
2. Why does my NVMe SSD show as "Uninitialized" or "RAW"?
This usually indicates a corrupted partition table. In this state, Windows cannot read the file system, but the data is still there. This is a prime scenario for SSD M.2 data recovery software.
3. Does MyRecover support NVMe drives from all brands like Samsung, WD, and Crucial?
Yes. MyRecover is brand-agnostic. As long as the drive is recognized by Windows as a storage device (even a RAW one), the software can communicate with the controller to scan for lost partitions and file signatures.
4. Can I recover a BitLocker-encrypted NVMe drive?
Yes, provided you have the 48-digit recovery key. With MyRecover, you can first unlock the drive, then scan the decrypted volume to find deleted files.
5. Is there a difference between M.2 SATA and M.2 NVMe recovery?
Yes. M.2 SATA drives are slower and use the AHCI protocol. M.2 NVMe drives use the PCIe bus, which requires recovery software that can handle higher data throughput and different controller command sets. MyRecover is optimized for both, but NVMe recovery generally requires faster processing power from your CPU.
6. Will formatting my NVMe drive make data recovery impossible?
A "Quick Format" only deletes the file directory, making recovery very likely with software. A "Full Format" in modern Windows versions (since Vista) writes zeros to the entire drive, which makes data recovery impossible.

Stay Updated With Our
Latest Tips
Add us as a preferred source on Google to never miss helpful guides.
 Add as preferred source >>