 MyRecover


Best Open Source File Recovery Software in 2026
Choosing the right open source file recovery software empowers users to restore data without hidden costs. Learn how flexible, community-supported solutions recover files securely, support multiple platforms, and give full visibility into the recovery process.

By Vera / Updated on July 22, 2026


What is File Recovery and Why It Matters
File recovery is the digital equivalent of an archaeological dig. It is the process of restoring lost, deleted, or inaccessible data from storage devices like hard drives, SSDs, USB flash drives, and memory cards.
In today’s data-driven world, losing a file isn’t just an inconvenience; it can mean losing years of family photos, critical business contracts, or weeks of academic research. Understanding how recovery works—and having the right tools—is your first line of defense against digital accidents.
Common Causes of Data Loss
Data loss rarely happens at a convenient time. Understanding the "why" behind the loss helps you choose the right recovery strategy:
- Accidental Deletion: The most common cause, often involving the "Shift + Delete" shortcut.
- Drive Formatting: Accidentally wiping a partition while installing an OS or managing storage.
- File System Corruption: When the "table of contents" of your drive (like NTFS or FAT32) becomes unreadable.
- Virus or Malware Attacks: Ransomware or malicious code that targets file headers.
- Hardware Malfunctions: Physical wear and tear on spinning disks or NAND flash degradation in SSDs.
Why Deleted Files Are Often Recoverable
Here’s a little secret: when you delete a file, it’s usually not actually gone. The system just marks that space as "available". Until it’s overwritten, recovery is often possible. It’s like erasing a pencil mark instead of shredding the paper.
Understanding Open Source File Recovery Software
Before choosing a tool, it’s important to understand the philosophy and mechanics of "Open Source" in the context of data forensic tools.
What Does "Open Source" Really Mean?
Open source software is built with publicly available source code. This transparency is vital in data recovery because it ensures the tool isn't performing hidden operations on your fragile drive.
Open Source vs Proprietary Recovery Tools
While both aim to get your files back, they serve different user needs:
| Feature | Open Source (e.g., PhotoRec) | Proprietary (e.g., MyRecover) |
|---|---|---|
| Cost | 100% Free | Paid |
| Interface | Often Command-Line (CLI) | Graphical User Interface (GUI) |
| Logic | Manual & Highly Customizable | Automated & AI-Driven |
| Support | Community Forums | Dedicated Tech Support |
While open-source tools offer raw power and transparency, the lack of a visual interface often makes them a daunting choice for the average user. This leads us to the specific tools currently leading the market.
Best Open Source File Recovery Software in 2026
Each of these tools uses a specific logic to retrieve data. Choosing the right one depends on how your data was lost.
1. PhotoRec: The "File Carving" Expert
PhotoRec ignores the file system entirely. This is called "File Carving." Even if your drive's file system is completely destroyed or formatted, PhotoRec searches for "signatures" (the specific byte sequences that start a JPEG, PDF, or ZIP file).
- Applicable Scenarios: Recovering data from severely corrupted SD cards or formatted drives where the structure is lost.
- Best for: Specific file types (Photos, videos, documents).

Step-by-Step Guide: Recovering Files Using Open Source Tools
Let’s make this practical. Before you start:
- Stop using the affected drive immediately
- Install recovery software on a different drive
- Use external storage for recovered files
Then, run the recovery process below:
1. Launch the tool (e.g., PhotoRec).
2. Select the affected drive.
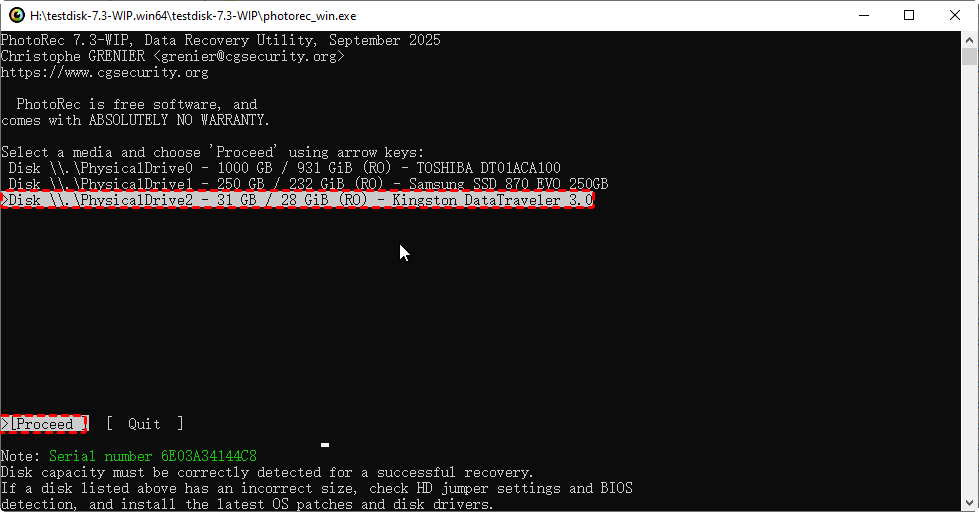
3. Choose file types to recover.
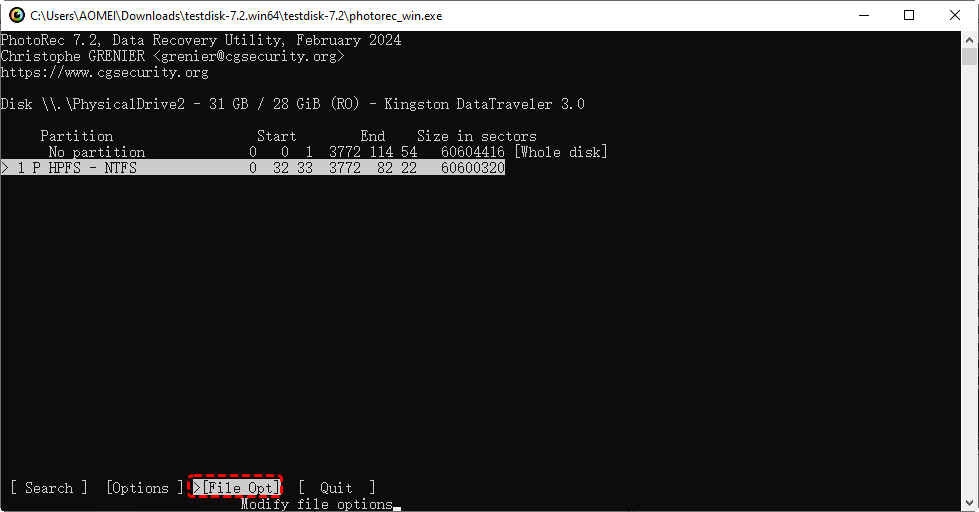
4. Start scanning.
5. Save recovered files to a safe location.

Patience is key here. Good recovery takes time.
2. TestDisk: The Partition Repair Specialist
TestDisk doesn't just look for files; it looks for the "map" of your entire hard drive. When a partition disappears or a disk shows up as "Unallocated," the partition table is usually damaged. TestDisk scans the drive’s cylinders to find where partitions used to start and end, then "rewrites" the table to bring the entire drive back to life.
- Applicable Scenarios: RAW drives, missing partitions, or "Drive not formatted" errors.
- Best for: Partition recovery and boot sector repair.
3. Foremost: The Forensic Standard
Originally developed by the U.S. Air Force Office of Special Investigations, Foremost works on image files (copies of drives). It "scrapes" the drive based on internal headers and footers, making it excellent for legal or forensic data retrieval where drive integrity is paramount.
- Applicable Scenarios: Digital forensics and recovering files from Apple/Linux disk images.
- Best for: Advanced users and forensic investigators.
4. Scalpel: The High-Speed Alternative
Scalpel is a rewrite of Foremost. It uses a "single-pass" scanning logic, which makes it significantly faster when dealing with massive multi-terabyte drives. It allows users to define custom file signatures in a configuration file.
- Applicable Scenarios: Large-scale recovery where speed is the priority.
- Best for: IT professionals managing large server drives.
How Open Source File Recovery Works
To use these tools effectively, you must understand the two primary scanning methods they employ:
1. File System Analysis (Quick Scan): The software looks at the $MFT (Master File Table) or FAT (File Allocation Table). It’s fast because it’s just reading a list. If the list is deleted, this method fails.
2. Signature Scanning (Deep Scan/Carving): The software reads every single bit of the drive. It looks for patterns like FF D8 FF (the start of a JPEG). It is slow but incredibly thorough.
However, even the most powerful open-source tools struggle with modern SSD "TRIM" commands and complex user interfaces. When time is of the essence, a more streamlined approach is often required.
Best Alternative to File Recovery Open Source Tool – MyRecover
While file recovery open source tools are powerful and free, they’re not always the easiest or most efficient option—especially for beginners or urgent recovery situations. That’s where MyRecover steps in as a strong and user-friendly alternative.
Think of open source tools as manual cars—powerful but requiring skill—while MyRecover is the automatic version. It is a professional data recovery software designed to simplify the recovery process without sacrificing performance. Unlike many open source tools that rely on command-line interfaces, MyRecover offers a clean, modern graphical interface that anyone can use—no technical background required.
It’s built for users who want fast results, higher success rates, and zero confusion.
Why Choose MyRecover Over Open Source Tools?
Here’s where MyRecover really shines:
 MyRecover
- ✨Beginner-friendly interface – No commands, no guessing
- ✨Higher recovery success rate – Optimized scanning algorithms
- ✨Preview files before recovery – Know what you’re getting back
- ✨Supports more file types – Documents, photos, videos, emails, and more
- ✨Works well with SSDs – Better handling of modern storage devices
 100% Secure
- If you need to maintain the original folder structure.
- If you are uncomfortable using a Command Prompt.
- If you need to recover data from a formatted Recycle Bin quickly.
Step-by-Step Guide: Recovering Files Safely with MyRecover
Step 1: Immediate Triage (Critical)
The moment you realize data is lost, STOP. Do not download the recovery software to the same drive where the data was lost. This is the #1 reason recovery fails—the software installation overwrites the deleted file.
Step 2: Preparing the Environment
-
Connect an external drive or USB stick to save the recovered files.
-
Close all background applications (browsers, Spotify, etc.) to prevent them from writing temporary files to the disk.
Step 3: Execution
1. Select Location: Launch MyRecover and hover over the partition where the data was lost. Click Scan.
2. Automatic Scanning: The software will run a Quick Scan automatically.
3. Filter and Find: Use the search bar or filter (by file type or date) to find your specific lost files.
4. Preview and Save: Double-click a file to preview it. Select the files you want and click Recover, saving them to your external drive.
Conclusion
Open-source file recovery tools like TestDisk and PhotoRec are incredible resources for those who are tech-savvy and budget-conscious. They offer a level of transparency and "raw" power that is hard to beat. However, for users who need a reliable, fast, and intuitive solution—especially when dealing with modern SSDs and complex folder structures—MyRecover provides a professional safety net that simplifies an otherwise stressful process.
The key to success? Act fast, stop writing data, and choose the tool that fits your comfort level.
Frequently Asked Questions (FAQ)
1. Is it possible to recover files from a drive that has been physically damaged?
Software—whether open source or proprietary—cannot fix a mechanical failure (like a clicking drive). If the drive isn't spinning or detected by the BIOS, you need a professional data recovery lab with a "clean room." Attempting to run software on a physically failing drive can actually make the damage worse.
2. Why can't PhotoRec recover my original file names?
PhotoRec uses "File Carving" logic. Since it ignores the file system (which holds the names and folders), it can only find the raw data. It assigns new names like f12345.jpg. If you need your original file structure, a tool like MyRecover is a better choice because it prioritizes rebuilding the File Table.
3. Does the "TRIM" command on SSDs make recovery impossible?
TRIM is a feature that tells an SSD to wipe data blocks as soon as a file is deleted to maintain speed. This makes recovery much harder than on traditional HDDs. However, if you act immediately or if the drive was disconnected shortly after deletion, MyRecover’s advanced algorithms may still be able to find data that hasn't been scrubbed yet.
4. How long does a "Deep Scan" usually take?
This depends on the size and speed of the drive. A 1TB HDD might take 3 to 5 hours for a full sector-by-sector scan. SSDs are much faster, usually finishing in under an hour.
5. Can I recover data after a Windows Factory Reset?
Yes, but it is difficult. A factory reset overwrites many sectors. Your best chance is to use a tool that supports "deep carving" to find fragments of data that weren't touched by the new OS installation.
6. Can MyRecover help if my drive shows up as "RAW"?
Yes. When a drive becomes "RAW," the operating system can no longer read the file system. MyRecover is designed to bypass the OS's error and scan the underlying data directly, allowing you to copy files off the RAW partition to a healthy drive.

Stay Updated With Our
Latest Tips
Add us as a preferred source on Google to never miss helpful guides.
 Add as preferred source >>