
Solved: SanDisk Extreme Portable SSD Not Detected on Windows 10/11
Troubleshoot the common SanDisk Extreme Portable SSD not detected issue. Our article details diagnostic steps, from basic checks to advanced driver solutions for Windows 10/11, Mac, iPhone, and Android devices.
By Delores / Updated on March 12, 2026
SanDisk Extreme Portable SSD Not Detected!
Trouble Detecting SanDisk Extreme Portable SSD
I recently acquired a SanDisk Extreme Portable SSD, but it’s not being detected by any of my devices. I’ve tried different ports and cables, but to no avail.
Has anyone else experienced this problem, or do you have any suggestions for resolving it? I’d greatly appreciate any insights or troubleshooting steps.
- Question from forums.sandisk.com
If you are stuck in the Sandisk Extreme portable SSD not detected situation, don't panic. This SanDisk Extreme portable SSD of high-speed storage is mainly used for photographers, students, professionals, and gamers alike, so when it cannot be detected, it can feel like a mini-crisis. In the vast majority of cases, it’s usually a communication hiccup and can be fixed easily. Let’s find out the behind reasons and solutions to fix it, and get your files back.
Why is the Sandisk Extreme Portable SSD Not Detected?
Your SanDisk Extreme Portable SSD may not be detected due to a series of common, often easily fixed, issues. The problem typically lies in one of four areas: the physical connection, your computer's software, the drive's format, or, rarely, the drive itself.
Here is a concise breakdown of the primary causes:
1. Basic Physical & Connection Issues (Most Common)
- Faulty Cable/Port: The USB cable or the computer's USB port may be damaged.
- Dirty Connection or Insufficient Power: Lint in the port or a low-power port (common on hubs or front-panel ports) can prevent detection.
- Drive Not Powered: Check the SSD's LED indicator. No light means no power from the cable or port.
2. Software & Driver Problems
Your computer's operating system may not be communicating correctly with the drive.
- Outdated/Corrupted USB Drivers: The system drivers that manage storage can glitch.
- Drive Needs Initialization or a Drive Letter (Windows): A new drive or one with a corrupted partition may not auto-mount.
- Incorrect File System (Mac/iPhone): If formatted for Windows (NTFS), it won't be writable on Macs or detectable on iPhones.
3. Device-Specific Causes
- On iPhone/iPad: Requires an official Apple adapter (Lightning or USB-C) and the drive must be formatted in APFS or exFAT.
- On Android: Requires OTG (On-The-Go) support to be enabled in settings and a cable that provides enough power.
4. Hardware Failure (Least Common)
If all else fails and the drive shows no activity light on multiple systems/cables, it may have physically failed. Contact SanDisk support for warranty service. For critical data, consult a professional data recovery service.
How to Fix SanDisk Extreme Portable SSD Not Detected in Windows 11/10?
Here we will show you the proven solutions to fix the SanDisk Extreme Portable SSD not detected, from simple to complex solutions. Now, just check it out:
Way 1. Check Your Hardware Connections
Check that your USB-C or USB-A cable is firmly seated in both the SSD and your computer’s port. Give it a gentle wiggle and a firm push.
Dirt or lint in the port can also break the connection—a quick blast of compressed air can work wonders.
If you’re using a hub, dock, or adapter, bypass it entirely and plug the SSD directly into your computer. Those middlemen are convenient, but often the culprits.
Way 2. Try a Different Cable and Port
The cable that came with your SanDisk Extreme is high-quality, but it can wear out from bending, twisting, or just plain old use. Try a different, known-good USB cable if you have one.
Similarly, switch the USB port on your computer. If you’re plugged into a front-panel port, try one on the rear directly connected to the motherboard. If it works on another port, you’ve likely identified a faulty or underpowered USB connection on your machine.
Way 3. Verify Power and Drive Status Lights
Your SanDisk Extreme SSD has a small LED activity light. When properly connected and powered, it should glow solid white or blink during data transfer.
No light at all? That strongly points to a power delivery issue—either the cable, the port, or, less likely, the drive itself isn’t getting the juice it needs.
A steady or blinking light is a good sign; it means the drive has power and is "alive", even if your computer isn’t seeing it yet. This clues us in that the problem is more about software recognition than hardware failure.
Way 4. Update or Reinstall Disk Drivers
Sometimes, the corrupted or outdated drivers are the problem. Let’s refresh it.
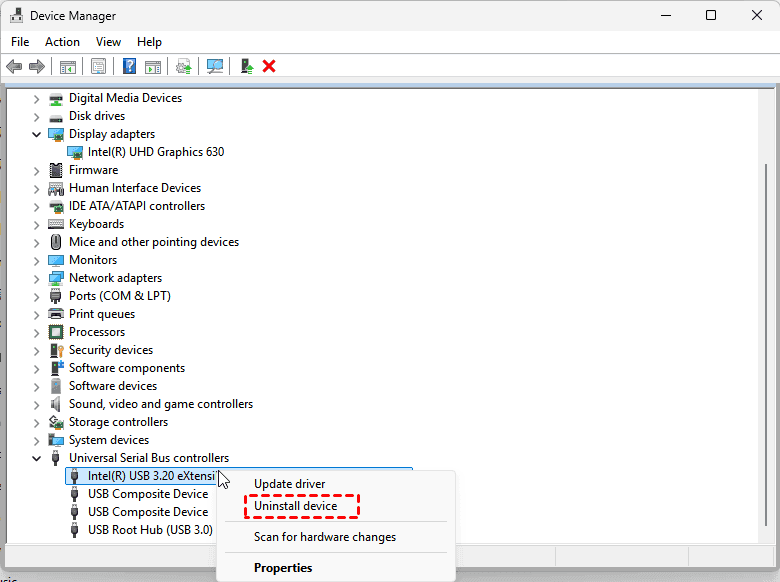
1. Right-click the Start button and select Device Manager.
2. Look for the categories Disk drives and Universal Serial Bus controllers. Expand them.
3. Right-click your SanDisk Extreme SSD and choose Update driver.
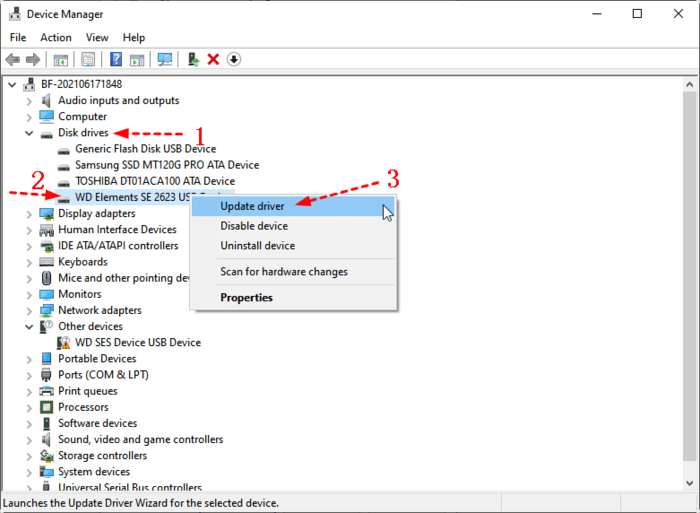
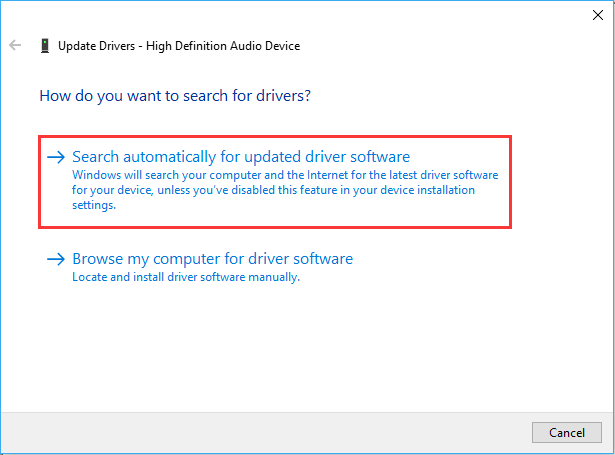
4. Then choose Search automatically for updated driver software.
If that doesn’t work, or if the drive appears with a yellow exclamation mark, choose Uninstall device. Don’t worry—restart your computer afterward.
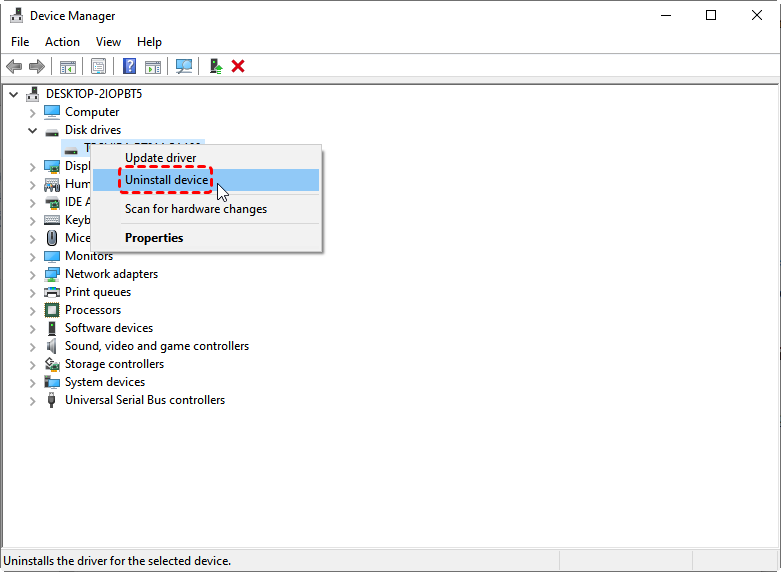
Windows will automatically attempt to reinstall the driver with a fresh copy upon reboot, which can clear up any glitches causing the SanDisk Extreme Portable SSD not to be detected in Windows 11, 10, etc.
Way 5. Reset All USB Controllers
1. Press Windows + X, then choose Device Manager.
2. Expand Universal Serial Bus controllers, right-click, and uninstall every device listed as a "USB Root Hub" or "USB Host Controller".
3. Then restart your PC.
Windows will reinstall these fundamental drivers, which can resolve persistent detection problems stemming from a corrupted USB stack.
Way 6. Initial Your SanDisk Extreme Portable SSD in Disk Management
Sometimes, your drive might be physically detected but not initialized or formatted for Windows, which makes the SanDisk Extreme Portable SSD not detected problem.
1. Press Windows Key + X and select Disk Management.
2. Take a careful look at the bottom pane. If your disk is listed with a black bar labeled “Unallocated” or a blue bar labeled “RAW”? That’s likely your SanDisk Extreme SSD.
3. To use it, you'll need to right-click on that unallocated space and select New Simple Volume, following the wizard to format it with NTFS.
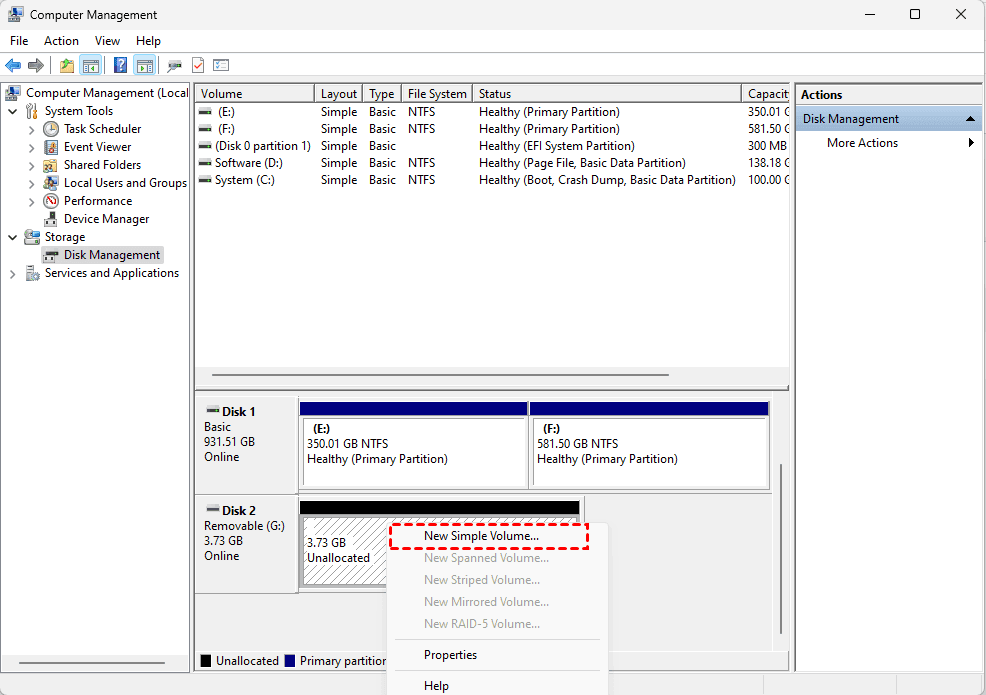
Warning: This will erase any data on the drive! This is a solution for a new drive or one where data recovery isn’t needed. If you have important files on there, skip this step—we’ll cover data recovery soon.
Way 7. Assign A Drive Letter in Disk Management
Sometimes, the drive is healthy and formatted, but has been assigned a drive letter that’s already in use or has had its letter removed. Now, assigning a drive letter can make your SanDisk Extreme Portable SSD be detected.
1. Right-click the Start button, and choose Disk Management.
2. If you see your SSD with a healthy blue “Primary Partition” but no letter (like C:, D:), right-click the drive and choose Change Drive Letter and Paths.
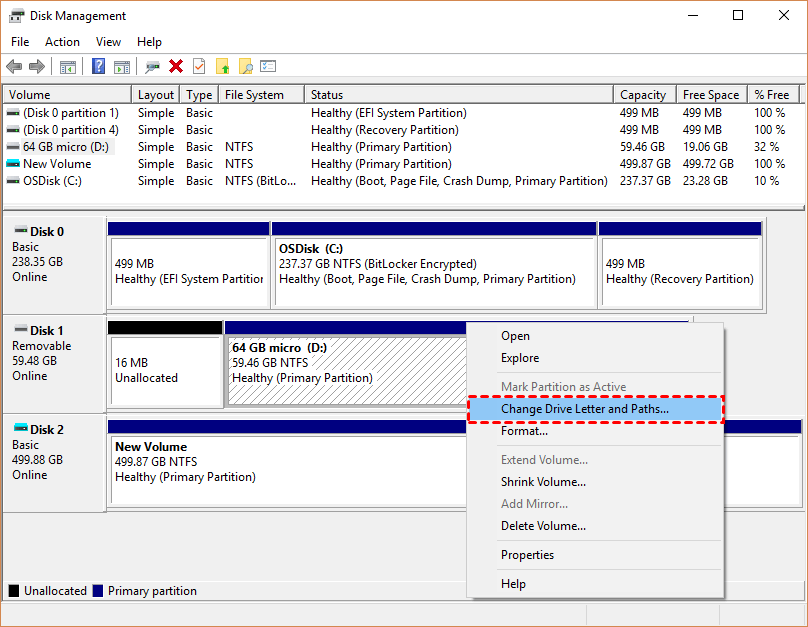
3. Click Add and assign it an unused letter.
Now, it should appear in File Explorer.
Way 8. Seek Official Support and Professional Repair
If there’s no activity light, no warmth from the drive casing, and it’s completely unresponsive on every device and cable you try, you may be facing hardware failure.
Your first stop should be the SanDisk Support Website. Check your warranty status and use their tools—they have diagnostic software that can sometimes force a response from a troubled drive.
If the drive is under warranty, they’ll replace it (note: they won’t recover your data).
If the data is critical and the drive has failed, your only recourse is a professional data recovery service. This is a costly last resort, but for irreplaceable data, it can be worth it. They work in cleanrooms to physically repair drives and extract data.
Fixes for SanDisk Extreme Portable SSD Not Detected on Android
Sometimes, the SanDisk Extreme Portable SSD is not detected on Android due to the OTG being disabled, power issues, or a corrupted USB cable.
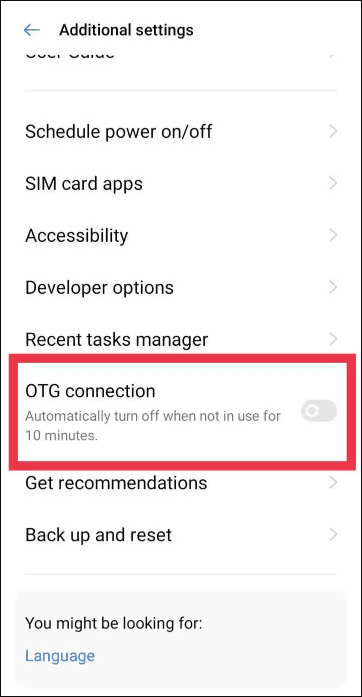
Way 1. Enable OTG on Android
First, your Android phone must support USB On-The-Go (OTG). Most modern phones do. You often need to explicitly enable this feature. Dig into your Settings, look for Connections > USB or search for “OTG”, and switch it on.
Way 2. Fix Android Power Delivery to Your SSD
Next, power is a bigger deal here. Some Android ports can’t deliver enough power to spin up an SSD. Using the official SanDisk cable and a direct connection (no hub) is best. If it still doesn’t work, your SSD might need a powered USB hub that plugs into the wall for extra juice.
Fixes for SanDisk Extreme Portable SSD Not Detected on iPhone
The issue of the SanDisk Extreme Portable SSD not being detected on an iPhone usually boils down to two things: compatibility and format.
When a SanDisk Extreme Portable SSD is not detected on an iPhone, the root cause typically involves compatibility and file format.
iPhone Compatibility and Formatting Requirements
Successful connection requires both the correct hardware and a compatible file system.
- For iPhones with a USB-C port (iPhone 15 series and newer iPads), use a standard USB-C to USB-C cable.
- For iPhones with a Lightning port, you must use Apple's official Lightning to USB 3 Camera Adapter. Third-party adapters often lack the proper power delivery and data integrity.
- File System: The SSD must be formatted to either APFS or exFAT, which iOS/iPadOS can read. If it is formatted as NTFS (the default for Windows), it will not be recognized. Reformatting requires a computer and will erase all existing data on the drive.
Using the Files App with Supported Adapters
With the correct adapter and proper format, access the drive via the Files app. Navigate to the Browse tab, and the SSD should appear under "Locations".
If it does not, try reconnecting the adapter. The consistent use of Apple-certified adapters, while more expensive, is essential for reliable performance with external storage devices.
Recover Lost Files If Needed with MyRecover
So, what if the drive is now detected, but the fix involves a format, or you discover a crucial partition is missing or corrupted? The data you thought was gone might still be recoverable. This is where a reliable data recovery tool like MyRecover comes into play.
It’s designed to scan the raw data on a storage device—even one that’s been formatted or has lost its partition—and rebuild your files. Let’s walk through how to use it to recover files easily.
We will show you the steps of recovering lost files with MyRecover:
1. Download and install MyRecover on your computer. Then connect your malfunctioning SanDisk Extreme Portable SSD to your computer.
2. Launch MyRecover, tap Disk Data Recovery, select your SanDisk Extreme Portable SSD, and hit Scan. Wait patiently for the process to complete, and hit OK.

3. Preview and tick the boxes before the files and folders you need, and hit Recover.
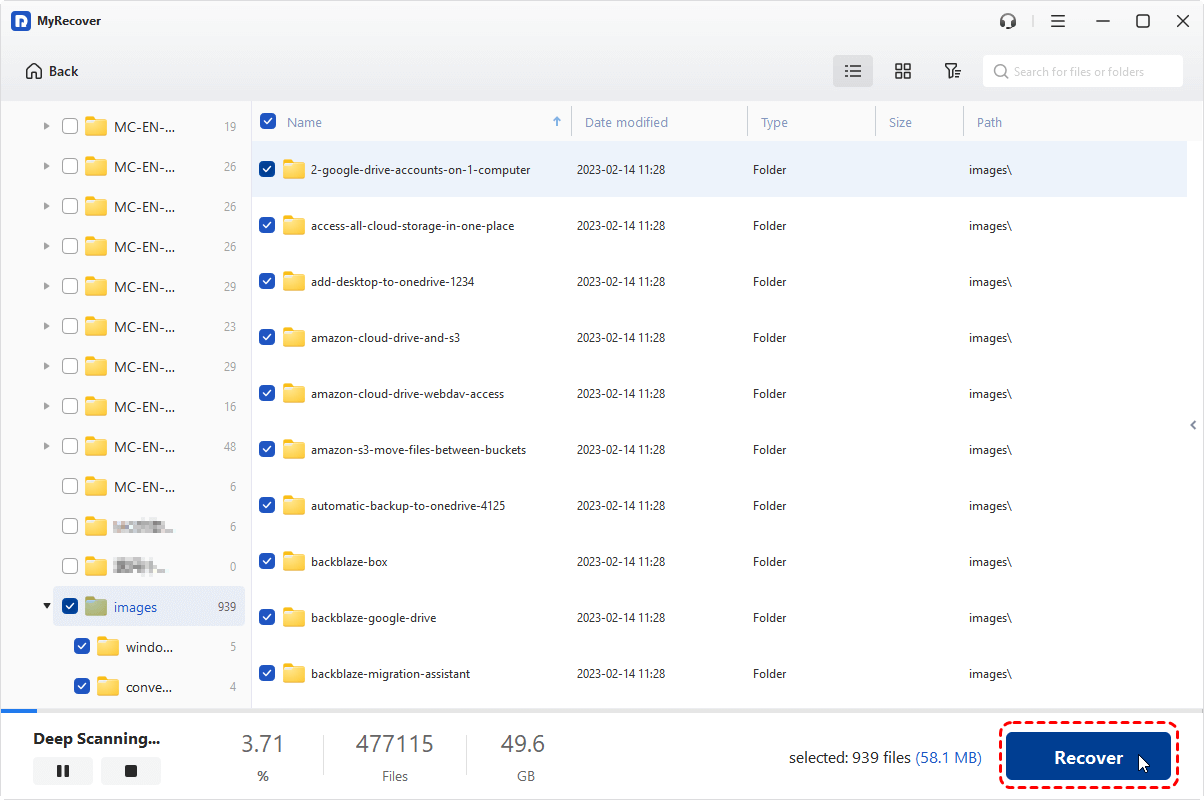
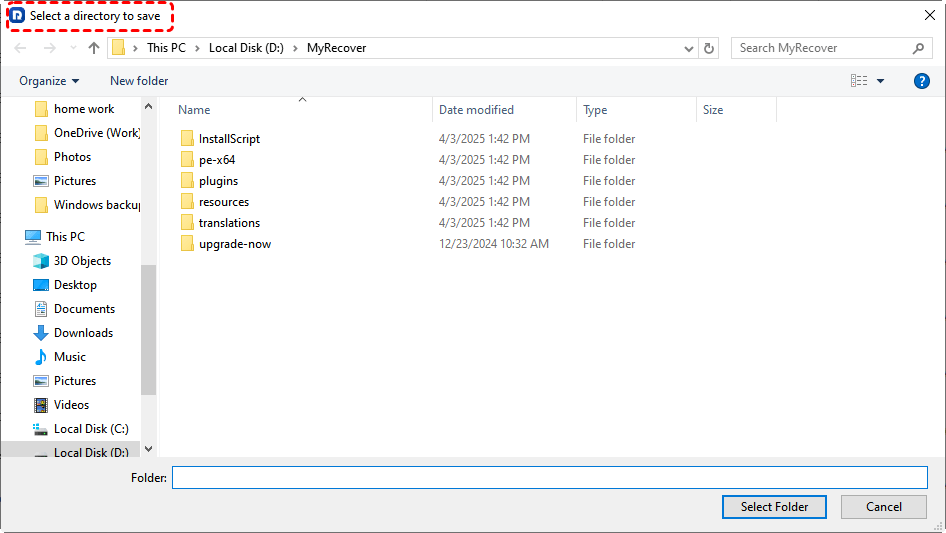
4. Choose another safe location to save these recovered files.
- Tips:✎...
- During scanning, this can take some time depending on the SSD’s capacity, so be patient. You’ll see a progress bar, estimated time remaining, the number of found files, etc.
- Once scanned, all the found files are often organized by original folder structure and file type. And you can use filters to narrow down the search, like file name, size, or modified date, etc.
- You can browse, preview many common file formats to ensure they are the right files to recover and intact.
- MyRecover Technician also allows you to recover files from unlimited computers, which saves time and effort.

- Recover Deleted Files Easily with Simple Clicks
- 1000+ File Formats Supported
- Support HDD, SSD, External Hard Drive, USB Drive, SD Card, etc.
- Quickly Find Files Using File Types, Name, Size, etc.
- Preview Files Before Recovering
- Recover Unlimited Data
FAQs About SanDisk Extreme Portable SSD Not Detected
Q: My SanDisk Extreme was working yesterday, but now it's not detected. What's the most likely cause?
A: The most common cause is a simple software glitch or cable issue. First, restart your computer, try a different USB cable, and test another USB port. These basic steps resolve most detection problems by resetting the connection.
Q: I need to recover files from my SSD before I try formatting it. What's my best option?
A: Use dedicated data recovery software like MyRecover or Disk Drill. Install it on a different drive, connect your SSD, and run a deep scan. This bypasses the corrupted system to reconstruct files. Avoid formatting prompts and do not save new data to the SSD.
Q: Why would my Sandisk Extreme portable SSD not be detected on my iPhone but work fine on my Windows laptop?
A: This is typically due to formatting and power. Windows often uses the NTFS format, which iPhones cannot read. iPhones require exFAT or APFS. Also, iPhones provide limited power. Reformat the drive to exFAT (erasing data) and use an official Apple adapter.
Q: Are the fixes different for the SanDisk Extreme Portable SSD not detected in Windows 11 versus Windows 10?
A: The core principles are the same. Windows 11 has more updated drivers and may handle the drive better. For Windows 10, you may need to more thoroughly reset USB controllers in Device Manager. The universal first steps—checking cables, ports, and drivers—apply to both.
Q: Can a virus or malware cause my SSD not to be detected?
A: Yes, though it's less common. Malware can corrupt partitions or disable USB ports. Run a full system antivirus scan from Safe Mode. The malware is likely on your computer's main drive, interfering with external device recognition. Cleaning it may restore detection.
Q: What does it mean if my SSD is detected in Disk Management but not in File Explorer?
A: This indicates a partition or file system issue, but confirms the hardware is detected. In Disk Management, the partition may be labeled "RAW" or "Unallocated", or lack a drive letter. Assign a drive letter to a healthy partition. For RAW or Unallocated space, use recovery software first if you need the data, or create a new volume to format it.


Stay Updated With Our
Latest Tips
Add us as a preferred source on Google to never miss helpful guides.