 MyRecover


Windows Upgrade Failed 0x80070490: Complete Fix Guide
Struggling with Windows upgrade failed error code 0x80070490? This detailed guide covers why the error appears, how it affects Windows updates, and proven step-by-step solutions to fix upgrade failures and restore a smooth, successful Windows upgrade process.

By Vera / Updated on July 23, 2026


What is Windows Error 0x80070490?
If you’ve landed here, chances are your Windows update or upgrade crashed and burned with the dreaded message "Windows upgrade failed 0x80070490". Annoying, right? You’re not alone. This error is a common roadblock that prevents users from accessing the latest security features and performance improvements.
This error usually pops up when Windows runs into corrupted system files or damaged update components, stopping the upgrade process halfway—like a car running out of fuel mid-highway.
Understanding the Error Code Meaning
Error 0x80070490 translates to “Element not found.” In simple terms, Windows can’t locate certain files, registry keys, or driver packages it needs to complete the upgrade. When the Windows Update engine (the CBS or Component-Based Servicing manifest) finds a "missing link," it triggers this code to stop the installation and prevent further system damage.
When Does Error 0x80070490 Occur?
You may encounter this error when:
- Upgrading from Windows 10 to Windows 11.
- Installing major feature updates (like the 22H2 or 23H2 updates).
- Running standard Windows Update for security patches.
- Performing a system repair, reset, or using the System Restore feature.
Common Symptoms of Windows Upgrade Failed 0x80070490
Here’s how this error usually shows up:
- Windows update gets stuck at a certain percentage (often 62% or 88%) for a long time.
- Upgrade fails repeatedly with the specific code 0x80070490 appearing in the update history.
- An error message appears immediately after a system restart during the upgrade process.
- The system becomes slow, unstable, or unresponsive while checking for updates.
- An update rollback occurs automatically, returning you to your previous version of Windows.
Sound familiar? Let’s dig into why it happens.
Why Does Windows Upgrade Fail with Error 0x80070490?
Understanding the root cause is the first step toward a permanent fix. Here are the primary culprits:
- ❗Corrupted System Files: Broken or missing system files are the #1 culprit. Think of it like missing pages in an instruction manual—Windows doesn’t know what to do next because the "Element" it needs is unreadable.
- ❗Damaged Windows Update Components: If the folders responsible for storing temporary update data (SoftwareDistribution and Catroot2) are corrupted, the upgrade process cannot move forward.
- ❗Registry Issues: Invalid or broken registry entries can confuse the Windows installer, especially during major OS upgrades where registry keys are being migrated.
- ❗Malware or Virus Infection: Malware often targets system files to disable security updates. Even a small infection can derail your upgrade by modifying the files Windows needs to verify the update.
- ❗Conflicting Third-Party Software: Aggressive antivirus tools, firewalls, or system optimizers can block essential Windows update processes because they mistake the upgrade's deep system changes for a malicious attack.
How to Solve Windows Upgrade Failed 0x80070490
There are a few critical things to do before fixing error 0x80070490 to ensure your data stays safe.
1. Back Up Important Data: Before troubleshooting, back up your files. Even safe fixes can go sideways sometimes, especially when dealing with system images and registry edits.
2. Check Disk Space and System Requirements: Make sure you have at least 20–30 GB of free space on your C: drive, and verify that your PC meets the official Windows upgrade requirements (especially TPM 2.0 for Windows 11).
Once these precautions are in place, you can solve this Windows upgrade failed 0x80070490 error using the following methods.
Method 1: Run Windows Update Troubleshooter
This is the built-in "first aid" tool for Windows updates. The tool automatically scans, identifies, and resets the core Windows Update services (like BITS and the Windows Update service) to clear minor roadblocks. Use this as your first step when the error is caused by minor service glitches or background process hangs.
1. Press Win + I → Settings.
2. Go to System > Troubleshoot > Other troubleshooters.
3. Click Run next to Windows Update.
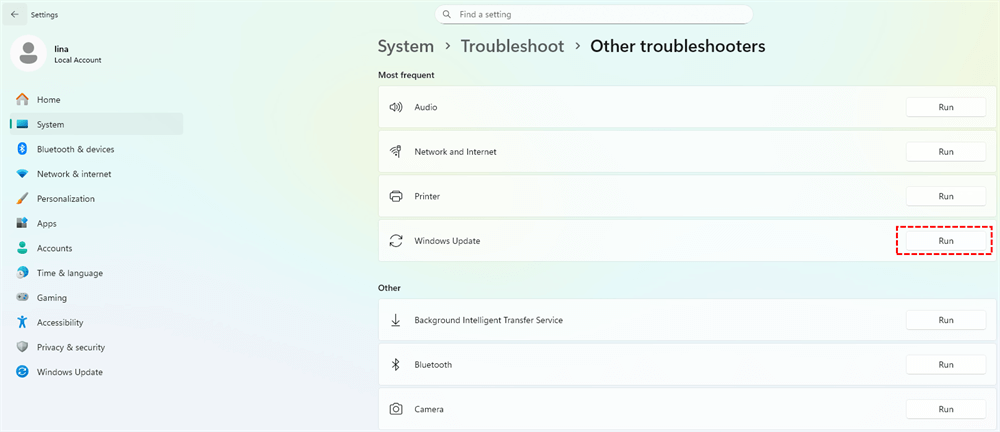
4. Follow the on-screen instructions as the tool diagnoses the issue.
5. Restart your PC and try the update again.
Method 2: Repair Corrupted System Files Using SFC
If the Troubleshooter fails, the issue is likely a corrupted file within the OS itself. The System File Checker (SFC) scans the integrity of all protected system files. If it finds a mismatch, it replaces the corrupted file with a healthy cached version stored in the Windows directory. Use this when you suspect system-level file damage or after a system crash.
1. Type cmd in the search bar.
2. Right-click Command Prompt → Run as administrator.

3. Enter: sfc /scannow.
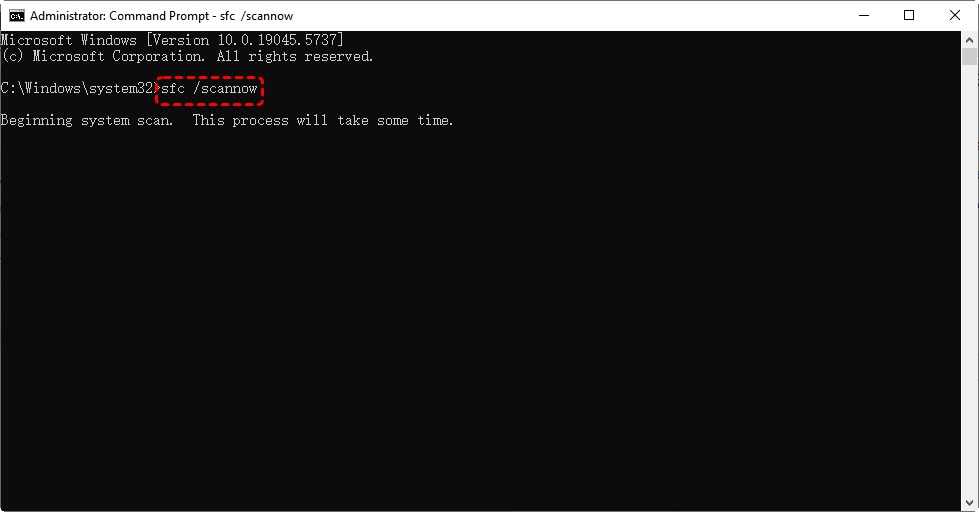
4. Wait for the scan to complete (it may take 10-15 minutes).
5. Restart your computer.
Method 3: Use DISM to Fix Windows Image
Sometimes the "source" files that SFC uses for repairs are themselves corrupted. The Deployment Image Servicing and Management (DISM) tool connects to Windows Update servers to download fresh, healthy versions of system components, effectively repairing your local Windows recovery image. Use this if the SFC scan says "Windows Resource Protection found corrupt files but was unable to fix some of them."
1. Open Command Prompt (Admin).
2. Run: DISM /Online /Cleanup-Image /RestoreHealth.
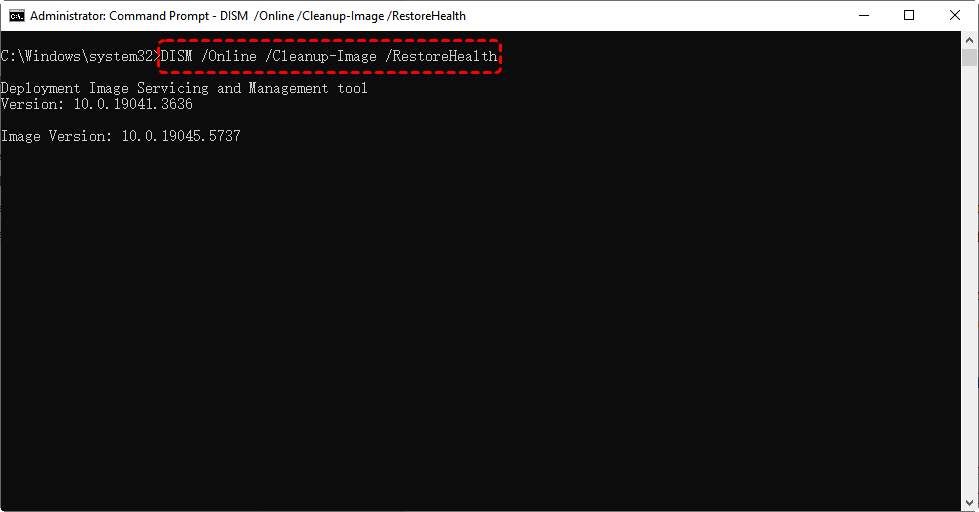
3. Let the process finish (it may take time and may seem stuck at 20%—this is normal).
4. Reboot and retry the upgrade.
Method 4: Reset Windows Update Components
The folders that store downloaded update files can become "clogged" or corrupted. By stopping the update services and renaming the cache folders, you force Windows to create clean, new folders and start the update process from scratch. Use this when updates download partially or if you keep getting the 0x80070490 error immediately upon starting the download.
1. Open Command Prompt (Admin)
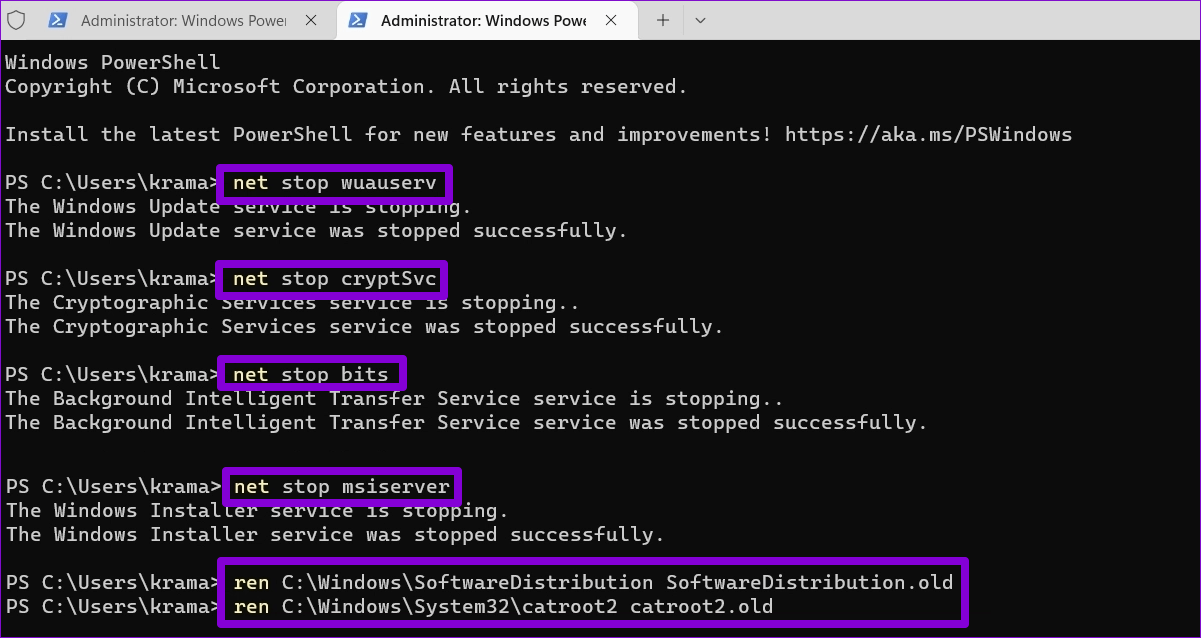
2. Stop update services (Press Enter after each):
net stop wuauserv
net stop cryptsvc
net stop bits
net stop msiserver
3. Rename update folders to clear the old cache:
ren C:\Windows\SoftwareDistribution SoftwareDistribution.old
ren C:\Windows\System32\catroot2 catroot2.old
4. Restart services:
net start wuauserv
net start cryptsvc
net start bits
net start msiserver
Method 5: Perform an In-Place Upgrade
This is the most effective fix for persistent 0x80070490 errors. It reinstalls the entire Windows operating system structure while preserving your files and apps, effectively overwriting every single system file with a fresh copy. Use this when command-line tools fail to resolve deep-seated system corruption.
1. Download the Windows ISO from the official Microsoft website.
2. Right-click and Mount the ISO.
3. Run setup.exe.
4. Choose Keep personal files and apps when prompted.
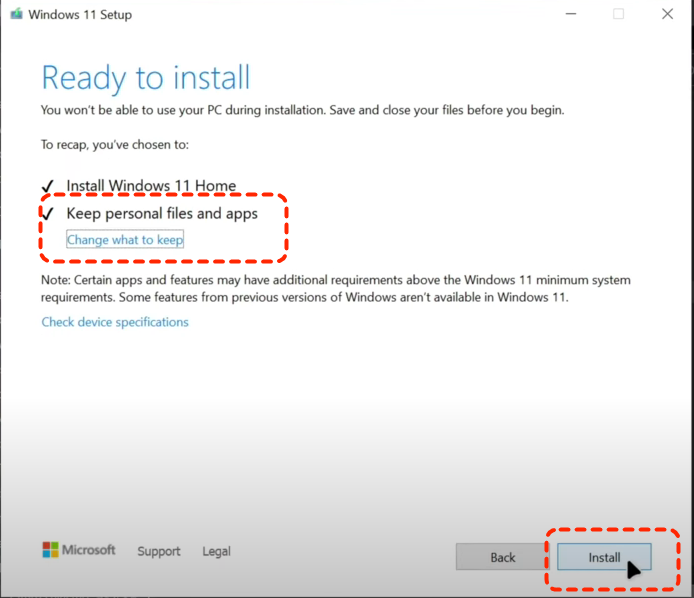
5. Follow the installation prompts to refresh your OS.
Method 6: Check and Repair Registry Errors
The registry acts as the database for all system settings. Invalid keys related to the Component-Based Servicing can block the upgrade "Element" from being recognized. Use this if you have recently uninstalled software or if the error persists after file repairs.
1. Use a trusted registry cleaner or manually check registry entries if you’re experienced.
2. Search for keys related to:
HKEY_LOCAL_MACHINE\SOFTWARE\Microsoft\Windows\CurrentVersion\Component Based Servicing.
Method 7: Disable Antivirus Temporarily
Third-party security software can be overprotective. Disabling the software prevents it from locking the system files that Windows needs to modify during the upgrade process. Use this if you have non-Microsoft antivirus (e.g., McAfee, Avast, Norton) installed.
1. Disable antivirus temporarily via its settings menu.
2. Disconnect from the internet if you are worried about security while unprotected.
3. Run the upgrade again.
4. Re-enable antivirus immediately afterward.
Method 8: Scan for Malware and Viruses
Malware can intentionally break Windows Update to keep the system vulnerable. Removing malicious code restores the integrity of the update services. Use this if your system is running slowly or showing unusual behavior alongside the 0x80070490 error.
1. Open Windows Security and run a Full Scan.
2. Alternatively, use a reputable third-party anti-malware tool.
3. Ensure the system is clean before re-attempting the upgrade.
Method 9: Update Windows Using Media Creation Tool
The standard Windows Update interface can sometimes become buggy. The Media Creation Tool creates a fresh connection to Microsoft servers and bypasses the local update client glitches. Use this as a more reliable alternative to the "Check for Updates" button in Settings.
1. Download the Media Creation Tool from Microsoft.
2. Run the tool and choose Upgrade this PC now.
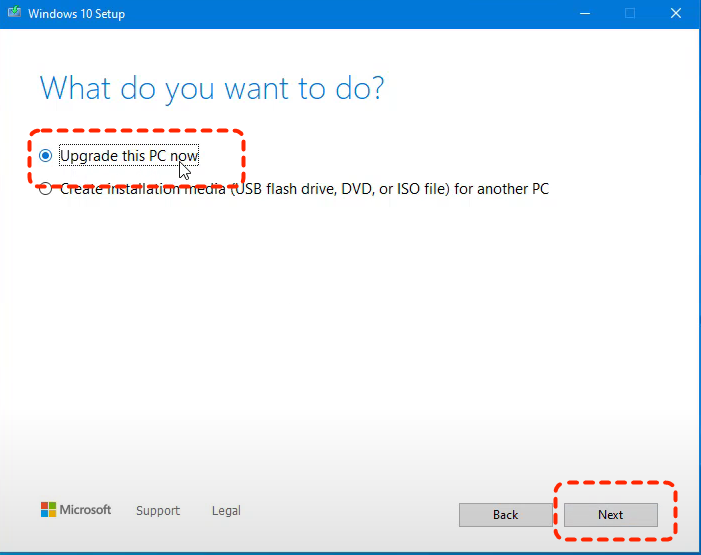
3. Follow the instructions. This is often the most reliable way to jump from Windows 10 to 11.
- Keep Windows updated regularly: Small, frequent updates are less likely to fail than one massive jump.
- Avoid aggressive system cleaners: These tools often delete essential registry keys that Windows needs for upgrades.
- Use reliable antivirus software: Ensure your security software is always the latest version to maintain compatibility with Windows.
- Maintain enough disk space: Always keep at least 15% of your system drive free.
- Shut down background apps: Close heavy software (games, video editors) during an upgrade to prevent file-locking conflicts.
Best Way to Recover Lost Data After Solving Error 0x80070490 – MyRecover
Let’s be honest—sometimes fixing Windows upgrade failed 0x80070490 isn’t the end of the story. During failed upgrades, forced restarts, or in-place repairs, files can quietly disappear. When the "Element not found" error occurs, it can lead to file system discrepancies where your photos, documents, and work folders are no longer mapped correctly and seem "gone."
That’s where MyRecover comes in as a lifesaver. Unlike generic recovery tools, MyRecover is specifically optimized for Windows environments, making it ideal for retrieving data lost during OS upgrades and system repairs.
Why MyRecover is the Best Choice for this Issue:
 MyRecover
- 💡Upgrade Failure Recovery: Specifically handles data loss caused by interrupted Windows 11/10 installations.
- 💡File System Support: Works perfectly with NTFS, FAT32, exFAT, and ReFS—the primary systems affected by 0x80070490.
- 💡Versatile Hardware Support: Restores data from SSDs, HDDs, and external drives that may have been corrupted during the upgrade attempt.
- 💡Comprehensive Recovery: Supports over 1000+ file types, ensuring your specific documents or professional creative files are found.
- 💡User-Friendly: A clean interface that doesn't require you to be an IT expert to undo the damage of a failed update.
 100% Secure
How to Recover Lost Data Using MyRecover
Recovering files after a failed 0x80070490 repair is simple—no tech wizardry needed.
1. Install MyRecover on a drive different from the one where data was lost.
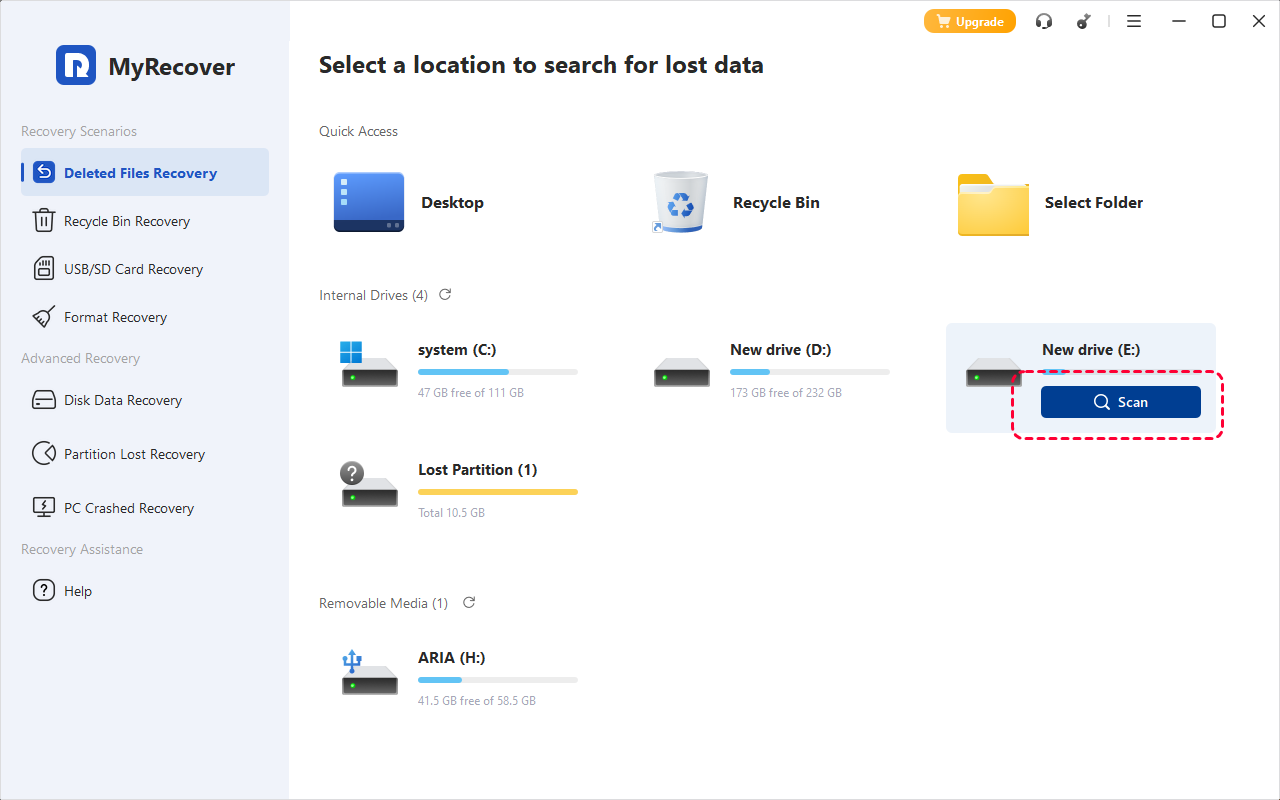
2. Launch the software and select the affected drive or partition. Click Scan.
3. Preview recoverable files in real time.
4. Select the files you need and click Recover.
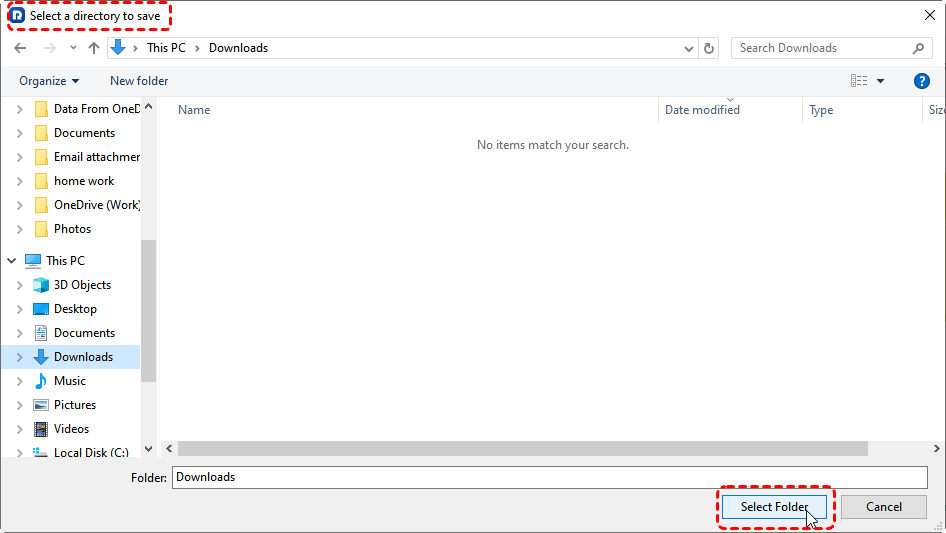
5. Save them to a secure location.
It’s like rewinding time and grabbing your files before they vanished.
Conclusion
The Windows upgrade failed 0x80070490 error may look intimidating, but it’s completely fixable. In most cases, corrupted system files or broken update components are to blame. By following the step-by-step solutions above—from running SFC and DISM scans to resetting Windows Update and performing an in-place upgrade—you can get your system back on track.
Think of it like fixing a jammed zipper: patience, the right tools, and a calm approach make all the difference. And if things go wrong during the repair, tools like MyRecover ensure your data is never truly lost.
Frequently Asked Questions (FAQ)
1. Does Error 0x80070490 mean my hard drive is physically broken?
Not necessarily. While this error is usually a software-level issue involving corrupted "Elements" (files or registry keys), it can occasionally be triggered by bad sectors on a failing drive. If you fix the error but it returns shortly after, it is wise to check your disk health using a tool like CrystalDiskInfo.
2. Can MyRecover help if I accidentally formatted my drive while trying to fix this?
Yes! If you performed a "Clean Install" instead of an "In-Place Upgrade" and lost your files, MyRecover can perform a Deep Scan to find data that was deleted during the format. As long as you stop using the drive immediately to prevent overwriting, the recovery success rate is very high.
3. Why did the SFC scan find errors but say it "could not fix them"?
This happens when the "source" image (the healthy version of Windows stored on your PC) is also corrupted. In this scenario, SFC has no clean files to copy from. You must run the DISM command (Method 3) first to repair the source image from the cloud, then run SFC again.
4. Will I lose my installed programs if I use Method 5 (In-Place Upgrade)?
No, as long as you select the option "Keep personal files and apps" during the setup process. This method replaces the Windows OS files but leaves your Program Files and Users folders untouched. However, it is always a best practice to have a backup before starting.
5. How does MyRecover find files that "vanished" after a Windows Update rollback?
During an update rollback, Windows tries to move files back to their original positions. If the process is interrupted, the file pointers are often broken. MyRecover scans the disk's sectors directly to find the actual data, even if the Windows "map" (File Table) no longer knows where the files are.
6. Is there a way to fix 0x80070490 without using the Command Prompt?
Yes, Method 1 (Troubleshooter) and Method 9 (Media Creation Tool) are GUI-based and do not require typing commands. However, the Command Prompt methods (SFC/DISM) are often more powerful for resolving the specific "Element not found" issue.

Stay Updated With Our
Latest Tips
Add us as a preferred source on Google to never miss helpful guides.
 Add as preferred source >>